New Year's salad recipes (2016) Meat salad with prunes
The New Year's whirlwind will spin us so quickly and rapidly that it's time to thoroughly think through the New Year's menu....
In Windows 7, there are two ways to get into safe mode:
1) Entering Windows 7 safe mode at system startup.
2) Entering Safe Mode from the Windows 7 environment (from a running OS by changing the boot in System Configuration).
Turn on the computer and while the system is loading, press the F8 key several times; if the welcome window appears (Windows 7 logo), it means you did not have time to press the F8 key, in this case you need to wait for the system to boot and turn off the computer again and when loading, press again F8 key. When trying to get into safe mode, you need to consider:
- On some keyboards, the function keys F1–F12 are always disabled by default. To turn them on, you need to press a special key (usually Fn) and while holding it, press the F8 key.
- If your computer has two or more operating systems, use the arrow keys to select the one you want, and then press Enter.
- To use the arrow keys on the numeric keypad, Num Lock must be disabled.
In the window Additional download options select " Safe mode" and press the key " Enter».
After a few seconds, the system will boot into safe mode.
Press the button " Start" and write in the search bar msconfig and press the " Enter» 
In the window that opens system configuration, go to the “” tab and check the “ Safe mode" and select " Minimum».
For reference:
Safe Mode: Minimum- Boots the Windows graphical user interface (Windows Explorer) in safe mode, running only the most important system services. Network components are disabled.
Safe Mode: Another Shell- Boot Windows command line in safe mode, running only the most important system services. Network components and GUI are disabled.
Safe Mode: Active Directory Restore - Boots the Windows GUI in Safe Mode, running only the most critical system services and Active Directory.
Safe Mode: Network- Boots the Windows GUI in safe mode, running only the most important system services. Network components are enabled.
Without GUI - The Welcome screen does not appear while Windows is loading.
Download log - All information regarding the boot process is saved in the file %SystemRoot%Ntbtlog.txt.
Basic video- Boots Windows GUI in minimal VGA mode. This mode loads standard VGA drivers instead of display drivers that match the computer's video hardware.
OS information - Displays the names of loaded drivers during system boot.
Make these boot options permanent - Changes made to system settings are not tracked. You can change the settings later using System Setup, but only manually. If this option is selected, you will not be able to roll back changes by selecting Normal Startup on the General tab. 


In the usual way, if there are malfunctions or certain errors in its operation, you can try to boot it using safe mode. In this option, the OS will use standard settings, which will allow the technical device to turn on.
Safe mode in Windows 7 is a special diagnostic state of a personal computer that allows you to troubleshoot problems associated with incorrect operation or configuration of a specific installed program or PC hardware. In this mode, the OS uses a minimum set of drivers that are needed for the normal launch of a technical device. These are monitor, mouse, disk, keyboard and standard services drivers. If the device does not start, for example, after installing new unknown software, then when you start the OS in safe mode with minimal services specified, you can remove it.
Safe Mode (Windows 7) is distinguished from normal boot according to the following basic parameters:

In Win 7, Safe Mode can be launched in two main ways:
In order to install Safe Mode (Windows 7) using this method, you need to turn on the computer and press the F8 key several times while it boots. If after this a welcome window of the operating system and the corresponding corporation logo appear on the screen, it means that the moment to press the key has been missed and you need to repeat these steps from the beginning, that is, turn off the computer, turn it on again, while pressing the F8 button.

If you cannot enter safe mode this way, you need to pay attention to the following points:

After the device has booted and entered safe mode after pressing the F8 button, you can proceed with the following steps:
In order to start safe mode (Windows 7) in the second way, you must perform the following manipulations:
If the PC boots in safe mode without any action on the part of the user, then, first of all, you need to determine the possible reason for this result. These could be recently installed programs or new hardware. If we are talking about new software, most often games, then the situation can be resolved using the “Add/Remove Programs” tab in the “Control Panel”. All new applications should be uninstalled and then restarted. The chance that the operating system will boot normally without the consequences of a previous malfunction is quite high. If safe mode started after installing new hardware, then you must again go to the Control Panel and remove either the device itself or its drivers. After this, you should restart your computer. If after performing these manipulations the OS loaded normally, then the error was associated with a certain hardware conflict. If the problem starting Safe Mode is not related to either new hardware or recently installed software, then most likely the registry has been damaged. This means in most cases that you will have to reinstall the entire operating system.

After logging into the operating system in safe mode, you can take a number of actions that will correct some errors and other OS problems:

Safe mode is a special computer state that allows you to correct a number of operating system errors or the consequences of incorrectly installed software and additional devices. You can boot your device in safe mode in different ways, each of which has its own characteristics.
Safe Mode in Windows is a kind of “cure” for the ailments that plague your computer. Its essence is to load the operating system, and preferably nothing more. All programs from automatic startup, all services, drivers, and possibly viruses will not start in safe mode so that you can identify and fix the cause of your computer's malfunction. In Windows 10, developers removed the convenient function of entering safe mode using the F8 key, so I decided to tell you how to enter safe mode in Windows 10 in other ways:
Attention! If you don't understand how to perform these methods, there is a video below that will help you figure this out.
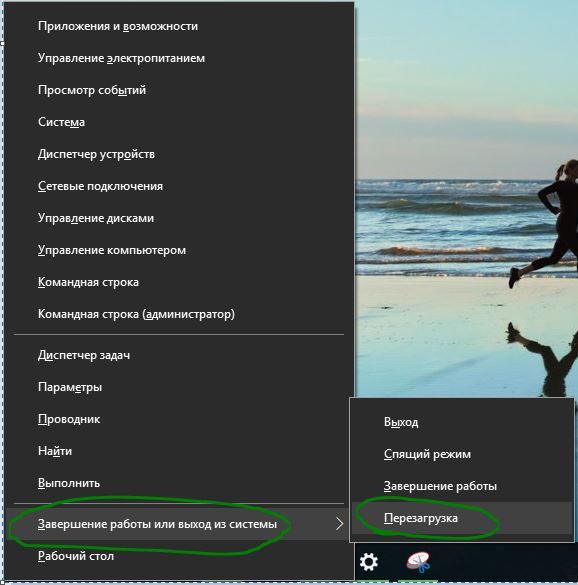
This method is convenient and simple, so I decided to talk about it first. You need to click on “Start”, then on the “Shut down” button. A menu will pop up with three ways to shut down; hold down the “Shift” key and select “Reboot”.
The monitor image will turn blue and the message “Please Wait” will appear. After loading, we will see three possible options for further actions. The first allows you to continue working on the computer, the second takes you to a further selection menu, and the third shuts down the operating system. You need to select the second option “Diagnostics”.
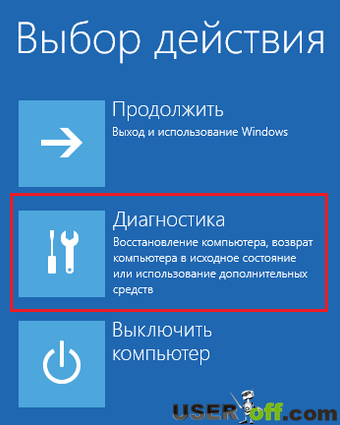
The Diagnostics menu appears. Now you have to click on “Advanced Options”.

If we click on it, we will see a menu with many icons, select the “Boot Options” item, which will allow us to configure the Windows boot settings to get into safe mode.

Here you will find system boot options that will allow you to select safe mode. Now you need to click on “Restart”:
After a quick reboot, you will see a blue screen with boot options. We are interested in the options that are under points: 4, 5 and 6. They differ from each other in the loaded drivers and services that can enable network mode or command line. But we need to select the mode number 4, to do this, press the F4 key.
The utility is a very useful tool for working with the operating system. Using it, we will now launch safe mode in Windows 10.
To run this program, you need to press the key combination “Win” + “R” on your keyboard and enter “msconfig” in the window that appears, click “OK”. You can also launch the “Run” window in a simpler way - right-click on “Start” and select “Run”.
The system configuration window appears. It contains five tabs, each of which is responsible for specific functionality. Go to the “Boot” tab, it contains settings for safe mode. The first step is to choose an operating system that will boot securely.
In the group of elements called “Boot Options” you need to check the box next to “Safe Mode”, under it you can use the switch to select the boot type, minimal – standard mode, another shell – allows you to use the command line and network – allows you to work with a local network and Internet. We will also set a parameter that defines the timeout, i.e. a time delay before selecting a boot type before starting the operating system.
If such boot settings for a given OS should be made permanent, you can check the box next to the corresponding item. Done, all you have to do is click apply and the next time you reboot you will be asked to choose which mode to start Windows 10 in.

After you enter safe mode and do all the necessary steps, you can go to msconfig and boot the system normally.
I find this method quite advanced and interesting. We will need a command line, to launch it, right-click on “Start” and select “Command Prompt (Administrator)” from the menu that appears.

A small black window appears into which you can enter various commands that the program will execute with the specified parameters. Let's enter the following line: bcdedit /copy (current) /d “Safe Mode”(or any other name) and press Enter. You can now close the command prompt.
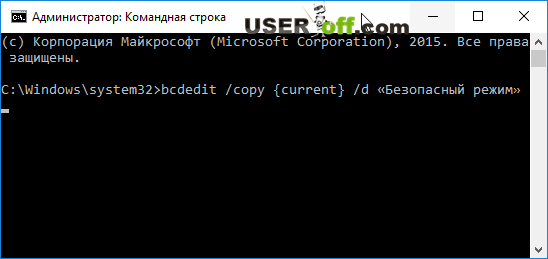
The command entered above will create a new parameter in the msconfig program (we looked at it earlier). In the “Boot” section there will be a new option to launch the operating system, which will be called “Safe Mode”.
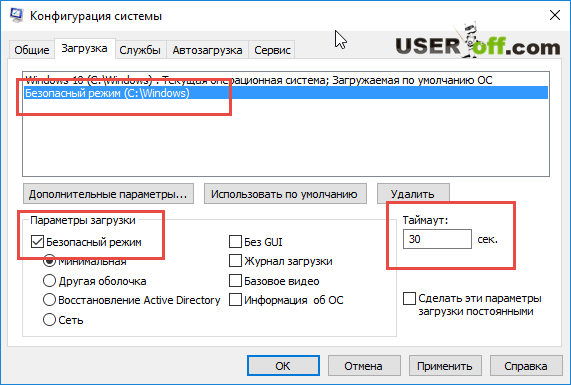
When you go to “System Configuration” and go to the “Boot” tab, you need to click on the 2nd item - “Safe Mode (C:/Windows)” and check the box next to “Safe Mode”. Also pay attention that the timeout is at least 10, since if it is less, you may not have time to select the parameter you need.
Now this option will always be present on your system; if it interferes and creates some inconvenience, then this function can be disabled. To do this, you need to run the utility - press the “Win” + “R” keys and enter “msconfig” and press Enter.
A familiar window will appear, go to the “Download” tab. To delete, select the desired item with the left mouse button and click on the “Delete” button.

Now when you turn on the computer, everything will happen without delay.
To use this method, click on the notification icon in the lower right corner of the desktop. And select “All parameters”.


The next stage and all subsequent ones are the same as in the first method described in this article, we confirm the reboot.
The computer will shut down and a boot method selection window will appear before Windows starts. Options 4,5 and 6 correspond to the F4, F5 and F6 keys. All these modes are briefly described in the first method discussed in this article.
Bcdedit /set (default) safeboot minima l and press Enter. Now restart your computer and you will automatically be in safe mode. If you need to return it to its original state (as it was), then enter bcdedit /deletevalue (default) safeboot.
You can also use another method, enter bcdedit /set (globalsettings) advancedoptions true into the command line and then reboot the system. Next, the system will show boot options, where there will be a safe mode. To disable this option, you need to enter in the command line bcdedit /deletevalue (globalsettings) advancedoptions. Attention! This command can be entered in normal Windows mode.
The computer in safe mode (in English Safe Mode) loads a limited set of drivers and system files necessary for starting and subsequent operation of the system. This tool allows you to perform many troubleshooting tasks that are difficult or impossible to do in a regular OS session. There are plenty of ways to start Windows 7 safe mode on your computer, which are detailed in the instructions.
Safe mode is enabled in three options (see screenshot below).
Choose option 1 or 2, depending on the essence of solving the problem; you are unlikely to need option 3, because it requires knowledge of using cmd. Before restarting Windows, remove disks and USB drives from the drive. To get to the Safe Mode boot options, follow the steps below.
Additional boot options provide a list of tools to start the OS in various modes for troubleshooting. To display the list and start safe mode, do the following:
1. Turn on or restart your computer or laptop via .
2. If several operating systems are installed, on the system selection screen, use the keyboard arrows (up, down) to select Windows 7. Next, press the top row button F8.
3. If one Windows 7 OS is installed, immediately after reboot, quickly press the F8 key. If you do not have time to press and see the Windows logo, then the system has started. Repeat step 1 and 3.
4. The steps above will take you to a list of download options. Use the keyboard arrows (up, down) to select one of three options for starting safe mode, then click Enter.

You can enable safe mode on Windows 7 in the OS settings. Do the following series of actions:

2. There are 5 tabs available in the system configuration. Visit the "download" tab. If you see several operating systems, select Windows 7. Next, check the “safe mode” option and specify the boot option:

3. After changes, click OK. To start Windows 7 safe mode on your computer, in the message, click “restart” (the PC will restart immediately) or “exit without rebooting” (restart itself).
4. After working in safe mode, open the system configuration window, on the “boot” tab, uncheck the “safe mode” boot option. Next, click OK and restart your computer. If you do not complete step 4, then this mode will load constantly.
To use the method, . Type the command BCDedit, press Enter. In the "Windows Boot" area, note the "identifier" (in the screenshot (current)) and "description" (in the Windows 7 screenshot).

For example, to launch safe mode: minimal, for the data shown in the screenshot above, you need to enter the following construction:
bcdedit /set (current) safeboot minimal

Execute or close cmd and restart your PC in the traditional way.
After successfully logging in using one of 3 methods, you will see “safe mode” in each corner of the screen. At the same time, the visual design of the interface will disappear and many services will stop.
Fix any problems. Then do not forget to restart the computer if you used the first method or change the settings corresponding to normal mode (2, 3 methods) and restart the system. After studying the recommendations, you can easily start Windows 7 safe mode using a method that is convenient for you.
When you have problems with your Windows computer, one of the first troubleshooting steps is to boot into Windows Safe Mode. Safe mode is a simple, stripped-down version of the operating system, loading only the most important files and drivers. In safe mode, you can fix a number of errors with drivers and cure your computer of viruses that prevent the system from starting up stably. If earlier you could enter the familiar Windows 7 using the F8 button when you start the computer, then Windows 10, 8 no longer have this function, but there is a trick that will help you return the F8 button to enter safe mode when you turn on your computer with Windows 10 In this guide, we'll look at how to enter and launch Safe Mode in Windows 10 from the desktop and return the familiar F8 button to always enter through it, and we'll look at how to disable Safe Mode to avoid cyclic booting.
Note: The easy ways are at the bottom, provided you can boot into your desktop.
If the Windows 10 system does not boot to the start screen and you need to enter or start safe mode when turning on Windows 10 through the “BIOS”, as for example before in Windows 7, with the F8 key, then you will need to get into the Windows 10 recovery environment using other methods. which are described below. It can be created on another working computer or while yours was still working.
Note: If you can boot to your desktop, then launch Command Prompt as an administrator and proceed to step 3.
Step 1. When you start from the installation flash drive, go to the point installations and click on the link below " System Restore".
Step 2. You will be taken to the additional settings of windows 10. Next, go to the settings Troubleshooting > Advanced Settings >Command line.

Step 3. Enter the following code into the command line (you can copy it in its entirety, you can enter each command via Enter):
c:
bcdedit /set (default) bootmenupolicy legacy
exit

Step 4 . You can now start in safe mode using the key F8 in Windows 10, press the button F8 continuously during system boot until the menu appears with download methods. If you want to go back to how it was, then enter instead of legacy > standard. There will be the following type of command bcdedit /set (default) bootmenupolicy standard .
Windows 10 now has additional startup options. This will look the same as if you have multiple versions of the OS installed on your computer. If you often use safe mode, then setting up the menu when choosing an OS will be very excellent and convenient. In the picture below I have configured some settings for myself. Let's look at this method.

Note: Before performing this method, read it from the beginning to the end and you will understand the meaning.
Step 1. There will be three commands for the three menus created. Maybe you don’t need three, but only need one menu with safe mode. Launch Command Prompt as Administrator and enter the following commands of your choice.


Step 3. The system configuration will open, go to the "" tab. We will see the list that was specified via the command line above. Let's customize each menu.
1) . Select "safe mode" from the list at the top and click on the checkmark at the bottom and select " Minimum". Next, check the "" box and click apply. You can also set a menu timer, for example, after 10 seconds it will automatically load just Windows 10. This way the boot menu will appear in safe mode.

2) . Select "PSU with network" from the list and select "Network" from the bottom and check the " Make these boot options permanent". Click apply and this way we can load safe mode with the network, i.e. with the ability to access the Internet.

3) . Highlight "BP CMD", below select " Another shell"and check the box" Make these boot options permanent." Click Apply and OK.

Step 2. You will be taken to the windows 10 recovery environment. In this environment, you can reset settings, restore the system, and much more. In the recovery environment, click on Troubleshooting.

Click the button Reboot.

Click on your keyboard F4 to begin the procedure of starting Windows 10 in safe mode.

Method 1. Windows 7 starts when you press a button F8. Once you have turned on or restarted your computer, press the F8 button at 1 second intervals. The method will also work with Windows XP. After calling up the additional settings menu, select the download option.


The New Year's whirlwind will spin us so quickly and rapidly that it's time to thoroughly think through the New Year's menu....

The article offers you some of the most delicious recipes for making vinaigrette. Vinaigrette is a delicious salad made from simple...

July 4th, 2015 , 08:33 pm Lately our Nastena has been completely giving up sweets (and thank God), but...

Fragrant, very tasty chocolate cake, it’s impossible to stop eating! The Negro’s Kiss cake is very easy to prepare, and besides, everything...

Dream interpretation is an ancient art that allows you to at least assess the psychological status of a person, because...

As soon as the first mirrors were born, people immediately endowed them with all sorts of mystical abilities....

Photo: Anatoly ZHDANOV We understand the program “The East is a delicate matter” on Radio “Komsomolskaya Pravda” [audio]...

Interpretation of the dream in the dream book: A man sees himself being released from prison - to great difficulties in life...

Making a new friend in a dream foreshadows the birth of a child. Seeing friends who have been absent for a long time means...

In the context of the implementation of the Federal State Educational Standard, it is of great importance. Over the course of decades, educational institutions have developed a system...

The manual discusses programs of domestic and foreign authors that are used in the work...

How often do we see this monster with goat horns when we lay out Tarot cards. "Devil" is the personification of hell...

Navigation: Description and history of the map: To the side of the road there is a large oak tree, in its foliage they find both shelter and food...

Dear forum visitors, I am opening this topic for fans of Patrick Walesa's "Deviant Tarot" deck...

The article offers you some of the most delicious recipes for making vinaigrette. Vinaigrette is a delicious salad...

July 4th, 2015 , 08:33 pm Lately our Nastena has been completely giving up sweets (and thank God), but...