Herring under a fur coat - a classic recipe
What would New Year be without champagne, tangerines, Olivier, aspic and everyone’s favorite “Herring under a fur coat”. With the last one...
Pottery is a combination of beauty and practicality. This inventory is the most ancient and was the only one for a long time. At first, people used unfired objects, and then ceramics was invented - clay fired by fire. Clay dishes are suitable for preparing any dishes; for some housewives it is simply an irreplaceable thing. The material used to make it is believed to draw out bad energy through a combination of water, earth, air and sun. And the best part is that you can make items yourself with a little dexterity and patience.
Clay dishes should not be placed in a hot oven or exposed to sudden temperature changes. You must first place the dishes in the appliance and then turn it on so that heating occurs slowly.
Do not place ceramic dishes on an open fire, especially teapots and coffee pots. Before use, you need to rinse them with hot water and only then start preparing the drink.
For cleaning, use only soft materials and dishwashing detergents. Do not rub ceramics with hard brushes or graters - this will damage the top layer of glaze.

There are several types of clay found in nature, differing in composition. Now you can find deposits of any clay mixture suitable for making both earthenware and stove bricks. Don't try to find valuable clay in large deposits. As a rule, such rocks have already been found and the largest factories for the production of ceramic products have been built next to them. But ordinary clay, suitable for modeling dishes, can be found everywhere. Very often, a layer of clay is found on personal plots during excavation work.
To determine whether the clay is suitable for making dishes, you need to take a small lump of slightly moistened clay, roll it into a rope between your palms and bend it in half. If no cracks or a small number of them form at the bend site, then such material is quite suitable for further work.
Place the prepared amount of clay in a deep container and fill it with water. It should completely cover the material. At the same time, do not be afraid to prepare too much clay - to make dishes you will take a small amount of rock, and the rest will sit in water, which will greatly simplify the sculpting process the next time.
Elutriation allows you to make the clay more plastic, fatty and clean. More often, elutriation is carried out with clay containing a large amount of sand, due to which it becomes less plastic.
Before modeling, it is necessary to remove the air; to do this, knead the dough and beat it with your hands. If difficulties arise due to the material being too hard, you can add a little water.
You can knead the clay with your feet, which greatly simplifies the process.

There are two ways to make clay dishes: from strands and flat pieces. It is better to make dishes using the first method. To do this, roll out a piece of clay with a rolling pin like dough and give the resulting piece any shape. Please note that this method produces shallow bowls and flat plates.
.JPG)
To make a pot or vase, you will need to resort to more complex technology:
You can make a pot or vase with a smooth change in diameter. To do this, when applying layers, make a slight deviation to the side, which will allow you to create original dishes. If necessary, attach handles, but you should not hold the product by them until completion of production.
When drying, rushing is unacceptable. If you rush, cracks and wrinkles may form on the dishes. Also, hasty drying leads to defects during firing. Therefore, follow all the deadlines indicated below so that you are pleased with the result.
During the first days, the dishes are dried upside down in a room where there are no strong drafts. Pre-drying should continue for at least two days, after which the dishes are transferred to a heated oven and dried until the moisture has completely evaporated. If the product is started to be fired in its raw form, it will burst under strong heat.
There are special laboratory muffle furnaces for various purposes. You can install such equipment at home; it will be useful for making ceramic and other products.
Pottery is fired at a temperature of +950 0. Do not immediately turn on the oven at full power and allow temperature fluctuations. Heating should be carried out smoothly, gradually reaching the maximum temperature. In about an hour, increase the temperature by 100 degrees. Do not open the window during firing - this will lead to the entry of cold air and cracking of the dishes. It will take you about 8 hours to fire, after which you should also begin to gradually reduce the temperature. You can remove the product from the oven only at a mark of at least 40 degrees.
After firing, cover the piece with glaze and fire again.

If you do not have the opportunity to buy a special oven, you can fire it in a fire. To do this, cover the dishes with firewood and set them on fire. The minimum time for firing is 8 hours. The longer you keep the cookware in the fire, the stronger it will be.
Pottery is a timeless classic that is in demand even in the modern world of advanced technology. Ceramic products are not only highly durable and practical, but also beautiful. And thanks to the possibility of self-production, you can avoid material costs and create luxurious dishes with your own hands.
It is quite possible to make a facing material such as ceramic tiles with your own hands. Making ceramics at home can be done using plastic and silicone molds. They are sold in a fairly wide range in gardening and construction stores.
Modern housing cannot be imagined without tiled cladding. And ceramics, made and painted with your own hands, will become a real decoration in kitchens, bathrooms, and even as a decorative element in rooms. For those who are not afraid to make the required amount of ceramics themselves, the technique of making such a coating at home comes to the rescue.
Decorative tiles can also be made to look like stone. Any type of natural stone can be imitated. Such material will resemble its natural analogue as realistically as possible. How to make tiles that imitate stone yourself? In the simplest version, gypsum powder is used for this with the addition of fillers and dyes, which form a unique pattern for each finished product. But it won't be ceramics.
What is this article about?
Tile in the form of artificial decorative stone can also be ceramic. Homemade tiles have advantages over finishing with natural materials. The main advantage of decorative ceramics made to resemble stone is its cost, which is significantly lower than the cost of natural analogues. The components used in production make tiles lighter than natural materials. Ceramics made to look like brick are perfect for decorative finishing.
There are no limits to your imagination when it comes to how to make tiles for your needs. It can be decorated in any way you like. For example, the kitchen can be decorated with ceramic finishes depicting still lifes. You can “settle” sea creatures in the bathroom, and fancy patterns or fairy-tale motifs will be in place in the nursery. Stone-like tiles will look great in the living room, hallway, and around doorways. This finishing material will perfectly complement the design wherever its use is appropriate.
Such a universal finishing material, made with your own hands, will not only enrich and diversify the interior, but will also provide significant cost savings. Despite the fact that homemade tiles are less durable than factory products, with proper care they can last for decades, delighting you with their original, absolutely unique design. These bases are enough for you to start making ceramics yourself to cover small sections of walls, paths, openings, etc.
Many people are accustomed to the idea that making tiles is only possible using complex technological equipment, which means that making your own tiles at home is unrealistic. But this is not true. Of course, when making ceramics yourself, the technology differs from the factory one.
The stages of making tiles yourself include:
How to make ceramic tiles in the right quantity? In domestic conditions, a sufficient number of forms will be required. The more molds are purchased, the faster the process of manufacturing the coating material will go. It is important to consider that it will take about 2 days to produce one tile. Dried tiles can be removed from the mold only after this period. Thus, the cycle of using the mold ensures that one product is obtained every 2 days.

Do-it-yourself tiles cannot be made from just any clay. It is important to take into account the plasticity of the selected raw material, because it will not be possible to make high-quality tiles without this. Clay can be low-plasticity and plastic. It can also be called skinny and fat. To determine how plastic the clay is, just take a small piece, roll it into a sausage and stretch it. If it stretches well, this means that the raw material has sufficient plasticity.
To make tiles with your own hands, it is recommended to choose clay with an average plasticity index or not very “fat” raw materials. The best option would be medium-plastic clay, which will make a fairly strong tile. During the firing process, such a tile will not “tear”. The clay must be damp. Before use, it must be allowed to rest in the bag, preventing the evaporation of water. The structure of unpacked clay contains pores with air, which reduces its plasticity and impairs its binding properties.
Step-by-step instructions for making tiles yourself are not complicated. The production of ceramic tiles begins with molding:
Despite the fact that the raw material looks quite strong, it can crumble when tapped. At this stage, you can still change anything. It is enough just to throw the raw material into a container with wet clay so that it takes up water, softens and becomes suitable for use again.
The next step is firing, which changes all the physical properties of the clay and no alterations will be possible.
If you plan to make floor tiles at home without glaze, then only one firing will be enough. If, after the first firing, it is planned to cover the plates with glaze, then a second firing stage will be required.
The facing tiles are fired at a temperature not exceeding 1000°C. The first firing is called biscuit firing. Its result will be a porous structure of the material, which will ensure the absorption of the required amount of glaze at the second stage. This is how they basically make floor tiles with their own hands.
The second firing is carried out at a similar temperature, which will ensure that the glaze is baked sufficiently. When creating floor tiles with your own hands, it is better not to make glaze, as it is very slippery, which is unsafe, especially in the bathroom. Wall tiles are most often made with a glassy coating.
During the firing process, the tile shrinks. It can be significant. That is why tiles at home must be made in quantity so that there is enough finished material to cover a certain surface. The number of spare parts can be determined by eye, because it will be difficult to make an exact calculation. In addition, it is necessary to provide for possible slaughter and cracking of products during the cladding process.
Some skeptics argue that it is impossible to reach temperatures close to 1000°C in domestic conditions. But for the manufacture of ceramics, 900°C may well be sufficient. And this value can be provided by a muffle furnace.
For biscuit firing, the temperature should be from 850°C. It is then that the remaining moisture evaporates from the tile and it becomes finely porous, like a biscuit.
You can stop at this stage if the tiles are intended to be laid on the floor. After this firing, the tile becomes quite hard and strong. When creating wall tiles with your own hands, when you want to get a tile cladding with a smooth surface that imitates natural stone or some kind of pattern, additional processing will be required. Ceramics that have gone through one stage of firing without glaze are called terracotta. If it is necessary to obtain majolica, then a second firing of the ceramics will be required to form the glaze coating.

Making tiles is not everything. It must externally correspond to the intended design. To do this, you will need to master some additional decorating techniques so that the drawing you make with your own hands is unique.
How are patterned ceramics made?
One of the ways is painting on ceramics. This is a fairly simple method that allows you to give the tiles an original appearance. You can also use the decoupage technique to decorate the tiles.
Do-it-yourself tiles are rarely made without a pattern. You can paint your own made tiles using the decoupage technique. If you choose the right materials, you will get a fairly strong coating that will be able to withstand damage. These tiles will last a long time.
A step-by-step action plan consists of several steps. First of all, you need to choose a suitable napkin motif. What to choose from? For example, for a kitchen it could be a basket of fruit, wine, or floral motifs, a landscape, etc. The appearance of hand-made tiles for painting will be better if the motif covers the entire surface.
If the napkins are multi-layered, then for decoupage you will only need the top layer with a pattern. When wet, the napkins stretch, so it will be necessary to treat them using a certain method. The napkin should be laid out with the pattern facing up on a flat surface. After this, it should be coated with hairspray, covered with parchment and ironed with a warm iron. This procedure will allow the napkin to retain its shape.

At the next stage, the prepared tiles are degreased with alcohol or detergent. The finished motif is then placed face down on a stationery file and held under a thin stream of water to wet it. After this, the excess water is drained and the napkin is straightened. Next, the file is placed on the tile. Take a soft cloth and smooth the surface with light pressure. The file is carefully removed, the napkin should remain on the surface of the tile.
If bubbles and folds have formed, they should be removed using a fan brush, moving from the center to the edges. It is important not to press too hard to avoid tearing the paper. After a few minutes, the napkin should be secured with PVA glue. To apply the glue, you should again use a fan brush. The finished work should sit until it is completely dry.
Next, take an aerosol can of car varnish and cover the surface of the tile with a thin layer of the product, which must then dry completely. If during work the napkin accidentally tears, you can paint on the corresponding area with acrylic paints. The same can be done if a motive of insufficient size was used. In such a case, you can shade the transition from the drawing to the rest of the surface or paint a shadow in gray tones. After finishing the painting, the surface is also covered with a layer of varnish.
Colorful tiling for the kitchen or bathroom is ready.
03.08.2018
Pottery is one of the most unique and practical inventions of mankind. The environmentally friendly material from which original utensils were created and are still being created makes them especially valuable. According to ancient belief, clay products have the ability to absorb negative energy. For this reason, before you start making an original item, you should be in a positive mood.
It is very important to stretch the canvas very tightly and stitch it on the underside of the plywood. After some time, the canvas can stretch and should be stretched at the table. This is a very practical workbench and a great surface for preparing clay or any other work you might need to do other than glazing. You don't want the glaze to mix with your clay or stain your countertop. Ideally, you should have a separate table for glazing. Once your pieces are done, you will need a storage shelf to hold them until you are ready to shoot or iron them.
According to historians, the first clay products appeared around 10,000-18,000 BC. Initially, dishes were used only for storing food. But over time, our ancestors came to the conclusion that fired products are particularly durable and impenetrable. Since then, they began to burn it on fire, thereby increasing the term of its exploitation.
Drill 1 hole in two 2 x 4s and attach them to the wall. Cut the dowels, cut them into 12 pieces and tap them into the 2" x 4" holes. You can place them on pegs and store your pots on them. It's really helpful to have a place where you can store wet pieces that still need to be finished. Old refrigerator with shelves, still works well. Another option is a metal or wooden shelf that has a plastic clamp cover on it so that it is completely enclosed. Another option would be a small three-story green house with plastic on the bottom shelf.
The emergence of the potter's wheel during the Bronze Age greatly facilitated the work of pottery masters. This event allowed us to expand the range of products - jugs, pots, bowls, teapots, saucepans, cups. Food cooked in clay utensils has an extraordinary aroma and taste. Since the walls of the cookware retain heat well, this allows the dish to “simmer” rather than boil.
The goal is to have a completely enclosed area that will support wet pots. There are many electric ovens out there, but not all ovens are created equal. Interest in pottery has been growing over the past few years, and many people have created homes for hobbyists. Many of them bought the cheapest furnaces, used them for several years and stored them until they decided to sell their equipment. Many of these stoves are easily available, but they are not good. They are well built, very well calibrated and reliable.
Do-it-yourself dishes are always a spiritually created product that retains the special energy of the master. Having mastered some skills and patience, you can create a truly unique thing that will decorate your interior or become a wonderful gift for loved ones.
To do this you need to know something about the properties of clay:
These stoves are expensive, but they are worth the price! One has a computerized controller and the other is manual. Computerized kilns are excellent for controlled glaze firing cycles. They are also useful for low-end bisque shooting. Hand ovens are just as good, but require a lot more attention.
Most manual stoves are equipped with a device called a "stove setter" that will turn the stove off at the appropriate temperature. No matter what type of stove it is, stoves should not be left unattended while firing. Whether you make your own glazes or buy pre-made powders and mix them yourself, you'll need a designated area in your studio to hold your glazes and iron your pots. Five gallon buckets with lids work well for storing mixed glazes.
The emergence of the potter's wheel had a huge impact on the improvement and variety of pottery.
You want to set the buckets on the table so they are at a comfortable level for working. Setting them on the floor will be very heavy on your back, and the table level too high will make it difficult for you to glaze your pots. In the glazing area, you also need to have a work table. This table can be any size as long as it can hold the pots you are currently glassing and you still have enough room to work with.
A central location to keep your bats and tools is important. A mobile cart with a shelf on top is ideal, but any type of shelf with horizontal slats to hold bats and a shelf on top to store tool containers will work. Indeed, you can make or buy any size shelf to suit your needs.
During the rotation of a small disk, which is driven by a flywheel rotated by the master’s foot, a clay product is formed. Using your hands, the clay lump should be placed in the center of the disk and, grabbing the workpiece, press it against the circle. The rotational movements of the circle will make it possible to move the workpiece to the sides. This process is called warming up.
You just don't want to take up valuable desk space. A good place to store bulk clay would be under your desk. A simple shelf raised a few inches off the floor is important to go under the clay, as any sweeping or chopping will allow dust or water to collect under your boxes or bags. Cleanliness is important in your studio. Dust obtained from dry clay contains silica and should not be inhaled. One of the best ways to avoid excessive dust is to not leave clay waste sitting around to dry and clean up later.
To determine the width of the future dishes, it is necessary to determine the center by pressing on it with the thumb of your left hand. To further deepen the workpiece, support the raw material with your left hand; touch the bottom with the finger of your right hand.
Creating the walls of the product consists of pulling them out using the index and middle fingers, which should be located on the inside of the workpiece. While supporting the work with your other hand, you should control the thickness of the walls.
Water left on the floor around the clay will create mold, in addition to being a slip hazard. Good hygiene practices and keeping your studio clean and safe! Tools can be purchased from mud houses or by hand. We use them because they are inexpensive and good enough, but there are many other brands on the market that are just as good. Here's a list of the basic tools you'll need to get started.
A tip on how to make your wire tool last longer: keep it taut as you remove clay from it, don't step over it as you cut. They perform several different functions. They are colored to differentiate between hardness levels. They get progressively tougher in this order: red, yellow, green and blue.
After separating the dishes from the circle using a special string, you need to trim the outer walls. To avoid damage, the clay creation must be carefully removed. Hands must be dry.
The next stage in the production of pottery is drying in several stages. A characteristic ringing sound when tapped lightly indicates that the utensil is ready for firing.
We have found these ribs to be invaluable tools in the shop. Glazing pliers: Used to hold your pieces while glazing. Turntable: Used for glazing, small hand work or anywhere else that requires a turning surface.
Glazing Brushes: The 1-inch glazing brush is one of the best glazing brushes. There are a few other tools that are good, but not essential to get you started. Simple Carving Tools: Carving designs into your clay is very satisfying, and there are many different carving tools available. The best thing to do if you want to get into carving is to buy some that look like they will do what you want and keep trying them until you find the best one for you.
This master class discusses the method of modeling clay without using a potter's wheel. In the process, the oldest techniques will be used with the help of some available means. There are three most famous sculpting techniques without a pottery wheel or professional tools. They will be used further.
Throwing stick: Useful when you need to shape a piece that your hand won't fit. Calipers: These are very useful for creating lids! One end of the caliper measures the bot; the other end measures the lid. The camper also works well, but only measures one direction. This is a basic list of tools and equipment you will need to get started. As your work grows, there are many other things you can gain once you get a feel for what the basic tools do.
Natural clay can be purchased at any pottery or pottery store. Idols made from natural clay decompose within a day or two as compared to other materials. The paint used to make the idol was water-soluble non-toxic paint. This means that after the festival of Ganesh Chaturthi, the idol worshiper of Ganeshji was immersed in a bucket and when everything was dissolved, the same water was used to supply water to indoor plants. Sorry for the poor image quality.

Preparing for the sculpting process
We will need: kneaded clay, a glass of water, a rolling pin, a flat surface for rolling out clay, a wooden spatula and a sheet of paper.
Water - enough to knead the dough. A toothpick to make marks on the idol. Flatten the dough and make 3 large balls, 2 medium balls and 5 small balls. The size depends on how big you want your idol to be. 3 large balls will be used for the base, body and head. 2 medium sized balls will be reduced in size to make eyes, tusks and other things. 5 small balls will be used to make the ears and head. Flatten one ball and place another large ball on top of the flattened one.
They form 2 legs, an arm and a chest. As shown in the picture below, use 2 long rolls to create the legs. Roll them out and smooth the ends outward. Use another long roll to wrap around the body and make it look like arms. Throw the dough up and spread it out - hands in blessing mode. Use some dough to make a palm in your other hand.
First you need to knead the clay until it becomes an elastic dough so that it does not stick to your hands. Then start sculpting.
Method one:
Method two:
Place the third large ball above the body - this is the head. Continue working with the clay and smooth it out. Use the last long roll to make a trunk. Press the top of the trunk and flatten. Use 2 small balls to make the ears.
Press and smooth the ears. Use the other 3 small balls to make the head crown. Use a toothpick to make some marks on the idol. Let's start with the fun part. Use your imagination and decorate your idol. And he placed Ganesha in this water. The idol was dissolved in water after two days and this water was used to wash our house plants.
The principle of making a mug from clay is the same as the technology of making a plate or dish. These techniques can be used to sculpt any product. But there is another option for making dishes with your own hands. It will require a mold, food paper, a rolling pin, a knife and a stencil. A glass bottle or any other narrow vessel is suitable for the form.
Our daughter Emilia, 6, is the creator. Art is all over the house, haphazardly tagged in closets, tacked to kitchen walls, chalked on the ground in the backyard. We're eating at our dining room table, but instead of crumbs you'll find leaves, feathers, pine cones and glitter embedded in it. As she has gotten older, her ambition has evolved from drawn and built forms to functional objects such as cups and bowls, and she becomes increasingly fascinated by how the physical material she creates can interact with technology.
Method three:
After the product has acquired the desired shape, it must be left to dry for a day. The next step is to fire the product in a kiln. The approximate time required for firing until the product is completely ready is 8 hours. The temperature in the oven must be increased gradually so that the product does not crack. Approximately 100 - 200 degrees every hour. The maximum firing temperature should reach 900 degrees.
After doing some research, he found a simple way to make gypsum mold. I didn’t want anything complicated, too much time,” Brian explains. Eventually we could use it to make multiples of our original reusable plaster molds.
This project works best in warm weather and is particularly patient and subtle. Here's how to create any vessel from computer to clay to completion. He used plaster to create the mold and liquid clay for the mold. Step 2: Make a plywood box slightly larger than the final mold that can be filled with liquid clay.
If you do not have a special oven, then the product can be fired over a fire. To do this, you need to carefully surround the vessel with small firewood and set it on fire. This firing time is also 8 hours. This method requires great vigilance and caution.
Clay dishes are an excellent solution for every home. This type of cookware will last for quite a long time. She is not painstaking in her care and has her own unique style. And besides, such dishes will be a good gift for any occasion.
“This clay block was then shaped, shaved and polished to our best possible symmetry,” he explains. Using paper templates, then quarter-inch veneered curved templates with cutouts to size the sanded mold, they achieved their Master Mold shape.
The plaster master is lightly coated with wax remover and then placed in the simple plywood box created in step 2, centering the plaster mold upside down. The box will be slightly taller than the form itself. Step 3: Pour plaster over one of the solid molds into the plywood box.
There was a period in the history of our country when harsh reality forced us to do something with our own hands, namely the lack of the necessary product in the retail chain, and the only opportunity to become the owner of this or that item was to make it from something at home.
The main component for ceramic tiles is clay
Now modern industry and trade provides consumers with any range of goods, including satisfying the needs of buyers in the finishing materials market. Ceramic tiles are presented in all imaginable and inconceivable types, sizes and colors.
It would seem that it would be simpler: come, choose, buy, install, but this option does not suit everyone; in our rapid age of standardization and standard solutions, we want to highlight our individuality, at least in the decoration of a particular room. And this raises the question: is it possible to make ceramic tiles at home with your own hands, realizing your own ideas for decorating the interior space of a bathroom or kitchen. We won't languish. We answer. Yes, you can, but subject to some simple conditions, which are discussed below.
First of all, you must have great desire, patience and confidence in a positive result, as well as have the necessary materials, tools, devices and equipment available. You may not succeed in everything right away, but the effort spent will ultimately give you the opportunity to be proud of yourself, showing your friends and acquaintances such a rather technologically advanced product as ceramic tiles made from clay with your own hands.

Handmade clay ceramic tiles
Everyone probably knows what any ceramics is made from; the main component is clay. Here's a look at what types of clay exist, their properties and the possibility of using them to make ceramic tiles with your own hands. Based on their composition, properties and application, clays are divided into four groups:
Plasticity is the ability of clay to take on any shape and retain it as it dries.
Clays are also divided into “fat” and “lean”. The former are plastic and products from them can be given any shape, but to make ceramics with your own hands at home, it is necessary to prepare the clay, for which the starting material is diluted to the required composition with sand, chamotte or ground pumice.

You should not take too “oily” clay, preferably medium plastic
If you decide to make tiled or regular ceramic tiles with your own hands, you will need:
The technology for producing ceramic tiles with your own hands consists of the following steps:
The highest quality molds are made from polyurethane; the products are quite smooth with the same parameters.


Stages of technology: making raw materials, firing ceramics and applying a decorative layer
Particular attention should be paid to controlling the process temperature; it should not be higher than the primary firing temperature. Otherwise, the glazed surface may be damaged or the terracotta workpiece may sinter.
This tile manufacturing technology allows you to create unique compositions on the glossy surface of the product, for which different glaze compositions are used. If glazing with firing is not suitable for you for some reason, you can create an attractive, smooth and shiny surface with your own hands by treating the workpiece with enamel or varnish.
And so, if you read the article to the end, and the difficulties of making ceramic tiles from clay with your own hands, reflected in this manual, did not frighten you, then honor and praise to you. After all, knowing what and how to make such a unique finishing material, the originality and individuality of the cladding, as well as the delight of your friends and acquaintances, are guaranteed to you.
For making plates, bowls, salad bowls, cups, mugs, etc. Today, different materials are used, which differ from each other in cost and quality characteristics. A popular option is ceramic tableware of foreign and Russian production, the main material for which is clay raw materials. Ceramic dishes have been serving people for more than a thousand years. Despite the range of modern materials, ceramics still remain popular, and dishes prepared in earthenware have a refined and unique taste.
Such tableware refers to products made from ceramics, which consists of a mixture of clay with mineral additives. At the same time, it is not correct to divide utensils into clay and ceramic based on the fact that the first is not covered with glaze, and the second is covered. All kitchen utensils for the production of which clay was used are usually called ceramic, i.e. This includes earthenware and porcelain dishes.
Ceramic dishes made in Russia or abroad are made by sintering clay or clay mixtures. Despite the wide range of products, a mixture of clay with kaolin and the addition of feldspar and quartz is used for the production of ceramics. To give the desired look to the resulting mixture, plaster molds are used. Next, air is removed from the workpieces, because this is necessary to improve the plastic properties and overall quality of ceramic products.
The main stage of production involves sintering at high temperatures followed by subsequent processing, i.e. firing, surface decoration. Depending on the type of final product, heat treatment is carried out at high temperatures - ranging from 900 to 1250°C. As a result, the pliable clay mixture becomes hard, retaining its given shape, fire-resistant and acquires chemical resistance. To avoid cracks that appear due to humidity and sudden temperature changes, the outside surface is covered with glaze.
Having learned about what ceramic dishes are made from and familiarized yourself with the manufacturing technology of such products, pay attention to the pros and cons. Such heat-resistant kitchen utensils have the following advantages:
You can order suitable ceramic products in specialized online stores with delivery by mail. Before you buy ceramic tableware in Moscow, St. Petersburg or another city, familiarize yourself with its disadvantages. Like utensils made from any other material, it is not without them. If you take into account the disadvantages, you may extend the service life of your purchase. Negative qualities include:
Jugs and clay pots for baking, saucepans, mugs, tea cups and other ceramic products are divided into two main groups: for cooking and for serving. Ceramic utensils are widely used not only at home, but also in many catering establishments, for example, when it is necessary to add some ethnic flair to the interior. In addition, such products are divided into glazed and unglazed. New technologies make it possible to produce ceramics of various types, depending on which the dishes can be divided into the following types:

If you visit a ceramics store, you can find many domestic products: ceramic frying pans, teapots, cups, etc. As for manufacturing, this is mostly done not by pottery workshops, but by entire factories with high productive capacity. A handmade ceramic “Verona” glass would be a good purchase. The product will keep chilled drinks cold and tea hot for a long time:

Check out another Russian-made product. This tea saucer is made from Dulevo porcelain:

The “Dream” set, consisting of two items, fully meets Russian quality standards. The products have an interesting blue-blue tint:

Ceramic dishes are highly valued because they are heat-intensive, easy to clean, and heat evenly. It can even be used in the oven, just heat it up gradually to avoid any potential problems. Ceramic products from Polish manufacturers have gained some popularity in the country, which can sometimes be purchased at a good discount - during sales and promotions. Alternatively, you can order a fruit platter from Boleslawiec (Poland):

Boleslawiec is a manufacturer of Polish tableware unique in design and quality, which has considerable popularity not only in Poland, but also in Russia. Another great creation that can even be used as a gift:
If you are interested in a beautiful Polish-made teapot, then take a closer look at the following products. The teapot has a convenient locking lid. Due to the ceramic, the heat in it lasts for a long time, so the tea turns out tasty and aromatic:

A good purchase would be a set of kitchen utensils with a non-stick ceramic coating (internal) ECO-CERA. The set consists of 3 items; the lid of the pan is made of heat-resistant glass. The handles are mounted on rivets:

The 6813BS from Barton Steel is another ceramic coated utensil set that is great for the kitchen. Suitable for all types of hobs, including induction. The lids are made of glass, have a steam vent and metal handles:

The Dalmatians kitchen utensil set includes 3 items. It is inexpensive, produced by Dobrush Porcelain Factory (Belarus):

Ceramic kitchen utensils, painted in different colors, will delight every guest in your home. With its help, you can add some originality and effectiveness to your kitchen. The main thing is to make sure that the product is really high quality, durable and made of environmentally friendly material. A yellow and blue teapot from Cesiro would be an interesting purchase:

Check out this bright orange pot from Bekker. Meat cooked in ceramic vessels becomes especially soft, and vegetables remain juicy. The outside of the product is ribbed, suitable for the dishwasher, oven and microwave:

If you're looking for a plate, then take a closer look at the blue-colored wildcard option. There is no drawing:

Pay attention to the BK-7033 dining set from Bekker, all items of which are made of high-quality porcelain. The dishes comply with all existing international standards in the field of ecology and safety. The set includes a large salad bowl, a gravy boat, classic-shaped plates and some other items. The set is relatively inexpensive, but high quality - ideal for daily use:

High quality porcelain dinner set BK-7038 from BK-7038 are products decorated with beautiful floral designs. The surface of each item is covered with a sparkling glaze, which does not contain lead. This service will especially appeal to lovers of the classics and those who prefer sophistication and sophistication:

Another good set of ceramic tableware is the “Tulips” service. All items are covered with glaze and decorated with a beautiful floral design:

When you decide to purchase a set of ceramic dishes, take its choice seriously. In this case, it is better to make a choice in favor of the whole set, because All the utensils included in it are designed in the same style. By buying dishes separately, you will end up creating a kind of aesthetically disordered mess in your kitchen. Pay attention to the design, presence of a pattern, color. Be sure to check the surface of each product to ensure there are no chips or other defects.
Decide on the type of ceramic. The most durable option is ceramic utensils made of earthenware, because... This material has great mechanical resistance, acid and heat resistance. Earthenware is less durable, but cheaper - in general, dishes made from it are not afraid of temperature changes. There is also terracotta, which should not be placed on an open fire, and after washing it should be thoroughly wiped.
11023 0
There was a period in the history of our country when harsh reality forced us to do something with our own hands, namely the lack of the necessary product in the retail chain, and the only opportunity to become the owner of this or that item was to make it from something at home.
The main component for ceramic tiles is clay
Now modern industry and trade provides consumers with any range of goods, including satisfying the needs of buyers in the finishing materials market. Ceramic tiles are presented in all imaginable and inconceivable types, sizes and colors.
It would seem that it would be simpler: come, choose, buy, install, but this option does not suit everyone; in our rapid age of standardization and standard solutions, we want to highlight our individuality, at least in the decoration of a particular room. And this raises the question: is it possible to make ceramic tiles at home with your own hands, realizing your own ideas for decorating the interior space of a bathroom or kitchen. We won't languish. We answer. Yes, you can, but subject to some simple conditions, which are discussed below.
First of all, you must have great desire, patience and confidence in a positive result, as well as have the necessary materials, tools, devices and equipment available. You may not succeed in everything right away, but the effort spent will ultimately give you the opportunity to be proud of yourself, showing your friends and acquaintances such a rather technologically advanced product as ceramic tiles made from clay with your own hands.

Handmade clay ceramic tiles
Everyone probably knows what any ceramics is made from; the main component is clay. Here's a look at what types of clay exist, their properties and the possibility of using them to make ceramic tiles with your own hands. Based on their composition, properties and application, clays are divided into four groups:
Plasticity is the ability of clay to take on any shape and retain it as it dries.
Clays are also divided into “fat” and “lean”. The former are plastic and products from them can be given any shape, but to make ceramics with your own hands at home, it is necessary to prepare the clay, for which the starting material is diluted to the required composition with sand, chamotte or ground pumice.

You should not take too “oily” clay, preferably medium plastic
If you decide to make tiled or regular ceramic tiles with your own hands, you will need:
The technology for producing ceramic tiles with your own hands consists of the following steps:
The highest quality molds are made from polyurethane; the products are quite smooth with the same parameters.


Stages of technology: making raw materials, firing ceramics and applying a decorative layer
Particular attention should be paid to controlling the process temperature; it should not be higher than the primary firing temperature. Otherwise, the glazed surface may be damaged or the terracotta workpiece may sinter.
This tile manufacturing technology allows you to create unique compositions on the glossy surface of the product, for which different glaze compositions are used. If glazing with firing is not suitable for you for some reason, you can create an attractive, smooth and shiny surface with your own hands by treating the workpiece with enamel or varnish.
And so, if you read the article to the end, and the difficulties of making ceramic tiles from clay with your own hands, reflected in this manual, did not frighten you, then honor and praise to you. After all, knowing what and how to make such a unique finishing material, the originality and individuality of the cladding, as well as the delight of your friends and acquaintances, are guaranteed to you.

What would New Year be without champagne, tangerines, Olivier, aspic and everyone’s favorite “Herring under a fur coat”. With the last one...
Let's prepare the necessary ingredients for the cookies. The first thing to do is put the water to boil. We need...

Is it possible to register an employee for the position of financial director - chief accountant? The chief accountant claims that yes, but...

The head of a small business can easily manage the budget independently. CHECKED! If you're budgeting...

The creation of new projects involves a preliminary economic justification for their feasibility, subsequent...
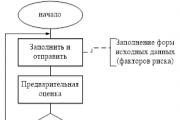
Reporting is generated by the RM, is agreed upon (approved) by the Risk Committee under the Management Board and transmitted to...

At the edge of a large, very large meadow, on a long emerald blade of grass lived a tiny Ladybug. God's little...

Nowadays, it is quite common for people to turn to the stars. With the help of a horoscope a person can find out...

Business or friendly. If you were pursuing a stranger, it means your level of trust in the female sex...

according to Freud's dream book If you dreamed about how you were fishing, it means that in real life you can hardly switch off...

The New Year's whirlwind will spin us around so quickly and rapidly that it's time to thoroughly think through the New Year's...

The article offers you some of the most delicious recipes for making vinaigrette. Vinaigrette is a delicious salad...

July 4th, 2015 , 08:33 pm Lately our Nastena has been completely giving up sweets (and thank God), but...
Fragrant, very tasty chocolate cake, it’s impossible to stop eating! The Negro’s Kiss cake is very easy to prepare,...
Let's prepare the necessary ingredients for the cookies. The first thing to do is put the water to boil. Us...

Is it possible to register an employee for the position of financial director - chief accountant? The chief accountant claims...