What is possible and not possible during the Nativity Fast?
In 2018, the Nativity Fast will begin on November 28. During this period, Orthodox believers prepare to celebrate Christmas...
When you love the landscape around you, the only sure thing is to take a panoramic photo. You don't need a wide-angle lens to capture large areas of the landscape.
First, let's go over the main points of creating this type of photography:
1) Hopefully you are using a DSLR camera with variable shutter speed and aperture. Don't let the shooting speed and aperture change between shots; because the result of editing the pictures will be unattractive. Some parts of the photo would have been captured at a slower shutter speed and exposure and at a slower speed. Accordingly, the depth would not correspond to the aperture settings. So use manual mode and remember to keep the shooting speed and aperture settings the same for every shot.
2) Focus on the first photo, set the lens to manual focus. This method will allow you to control the focus for each shot, which should be the same for all of them.
3) Take the photo while holding the camera vertically, this will give you more coverage of the top and bottom of the photo.
4) Make sure each photo is taken to overlap the previous one by a quarter. We need to avoid any intermediate areas between shots.
5) Before the first shot, take a photo of any object, such as a hand or glove in the snow in this case. After the last photo, do the same. Thanks to this technique, you will determine which image is the first in your panoramic series, and which is the last when you further download the folder to your computer.
Supporting files:
Before you start, download (7.04 MB), containing six images that you will use throughout this lesson.
Stage 1. So, let's begin. For this example, I didn't use my DSLR because I didn't want to carry a huge Canon Rebel, while snowboarding, especially since it is much more expensive than the one I bought, Canon Powershot. I can put Powershot into your pocket while snowboarding, which is much more convenient. But using a DSLR is ideal for the reasons described above. Let's go ahead and launch Photoshop CS5. Here are the six photos we'll use from the supporting files.

Stage 2. Go through the menu File - Automate - Photomerge(File - Automation - Photomerge).

Stage 3. The command will open a window with several different settings.
« Auto» (Auto) gives the command Photoshop choosing the best settings and applying them. It is less flexible, but quick to use.
« Perspective» (Perspective) sets the image to a perspective that includes less cylindrical distortion, while " Cylindrical"(Cylindrical) has greater cylindrical distortion.
« Move only"(Reposition Only) simply moves the images, but does not change the perspective.
« Interactive layout"(Interactive Layout) provides a bit more options, so let's select it.

Stage 4. Click Review(Browse) and select images from the supporting files by selecting them all in the dialog box. Click OK, and now the images will move into our dialog box. If our photos had been uploaded earlier, they would have appeared immediately in this window. Click OK to merge photos.
 Stage 5. Function " Move only» (Reposition Only) shows what the photos would look like if they were simply copied and pasted one after the other.
Stage 6. Selecting the option " Perspective"(Perspective) on the right adds perspective to the photo rather than a flat look.

Stage 7. The tools on the left side allow you to select and move photos (selection tool), move the view (move view tool), and zoom(zoom) and turning(rotate) will allow you to rotate and resize photos. Another tool tool vanishing point(vanishing point tool), which can be used when perspective is selected. Click anywhere to apply the tool vanishing point(vanishing point tool).

Stage 8. I pressed Ctrl+Z to cancel this tool. Select any: " Perspective" (Perspective) or " Move only» (Reposition Only), press OK to merge the photo.

Stage 9. Note that each photo layer is partially masked.

Stage 10. Select cropping tool() and cut out the empty pixels.
Final result 
Using the " Photomerge is a great way to create breathtaking landscape photos.
Here are some examples:

Note: The more pictures you take, the wider your panorama will be, and accordingly, more landscape will be included in it. Don't forget that in addition to a horizontal panorama, you can also create a vertical panorama, for example, of a waterfall. Good luck!
Translator: Alexandra Antsyperovich;
We found out what opportunities panoramic photography gives a photographer and what tools will be needed for it. Today we will touch on the practical aspects of the issue. How to shoot individual frames of a panorama so that when stitching it together everything comes together without problems?
So, we are at the shooting location and want to take a panoramic photo.
Thinking through the frame. Where to begin? As always, from an artistic concept. Imagine the composition of the future photo: select the subject, foreground, etc. The difficulty of panoramic shooting is that we cannot see the final frame directly through the viewfinder or camera screen: only its fragments will fit there, from which the panorama will be assembled. Therefore, for such shooting it is very important to develop a special skill - to see the finished frame without the help of a camera. Mark for yourself the boundaries of the future photo: what you want to include in it and what you will leave outside its boundaries. For example, like this: “I will shoot a panoramic frame starting from that tree on the left to that stone on the right so that this picturesque house is located in the final image according to the rule of thirds.” Such a mental plan will help you act effectively further, and not just click the camera in all directions, trying to shoot a frame with the maximum possible viewing angle. Lack of thoughtful composition is the main problem with most panoramas taken by beginners, so think carefully about your future shot before you start shooting!
Tripod. In order for the captured frames to come together into a single panorama, it is important to take them strictly from one point. A tripod will help with this. In addition, this device will allow you to shoot at long shutter speeds. This is especially important if you have a foreground close to the camera (which is almost always the case).
What does a panorama consist of? Of course, a panoramic shot consists of several separate frames! But how to take these photographs correctly so that they later come together well into a single image? To do this, you need to shoot “overlapping”, turning the camera on a tripod. Each subsequent frame should capture a certain part of the previous photo. Naturally, the less they overlap one another, the fewer frames will be required for the final panorama, but at the same time, the higher the chance of making mistakes when shooting. A hastily shot panorama may not form a single image. Therefore, in order for the frames to reliably converge, the overlap of one frame on another must be at least one third. And the larger it is, the better. How many frames should there be in a panorama? As much as you like - it's up to you. Don't rely on the number of frames, but on the subject being shot: just take the required number of photographs with the required overlay.


Taking images with insufficient overlap is the main reason why novice photographers fail to stitch together a final panorama. So pay special attention to this moment.

The attentive reader may notice that in most examples, panoramas are assembled from vertical frames. There is nothing fundamental here: you can stitch together both vertical and horizontal photographs. But working with vertical frames seems more convenient to me. Especially if we are talking about a single-row panorama: in this case we can get a more detailed image (since the narrow side of the panoramic frame becomes the wide side of the captured frames). In addition, a vertical frame allows you to more accurately assess the overall exposure of the subject (we have enough sky and enough land in the frame). Also, when shooting vertical frames, it is much more convenient to use gradient filters.

"Multi-story" panoramas. Often, in order to obtain a sufficient viewing angle when shooting, stitching several vertical frames in a row is not enough. Gluing multi-row panoramas allows you to seriously expand the capabilities of a panorama. This method is not much different from the one described above. It’s just that during the shooting process we take not one row of frames, but several. This way you can achieve any viewing angle. The advantage of a multi-row panorama is the ability to significantly increase the viewing angle when shooting, as well as the resolution of the finished image. But there are also disadvantages. For example, when shooting a multi-row panorama, it is much more difficult to use gradient filters.

Multi-row panoramas are somewhat more difficult to shoot and stitch together. Therefore, I advise you to first practice with single-row panoramas and only then move on to more complex, “multi-story” options.

An example of a multi-row panorama.
Exposure options, bracketing and HDR. Exposure parameters for panoramic shooting are adjusted in the same way as when working with single frames. Only one thing is important: all panorama frames must be taken with the same exposure parameters. Therefore, the panorama must be shot in manual mode (M), with the automatic ISO detection function disabled. Otherwise, the final pictures will turn out different in brightness, and you will be tortured to make them look the same.


Please note that your panoramic scene will most likely have a large difference in brightness: it may happen that in some panorama frames there will be only earth and shadow, while in others there will be a colorful sky with the dawn sun. But the exposure parameters, as we have already said, should be the same everywhere. Therefore, it is important to adjust the exposure so that the details in both the lightest and darkest areas of the panorama are well developed. Modern devices Nikon D810, Nikon D750, Nikon D610, and even simpler models have the widest dynamic range. This means that with proper exposure, you can often extract details from both dark and light areas from one frame. However, this requires expertly fine-tuning the exposure, which is not always possible in the field. To insure yourself against mistakes, I recommend shooting each frame of a future panorama with exposure bracketing (when the camera takes a series of pictures with a certain exposure step). The result will be a series of frames with different brightnesses. If the circumstances are right, you can easily extract all the details from the most successfully exposed frame of such a series. Otherwise, you can stitch together an HDR image from this series, and then assemble a panorama from the prepared HDR images. In addition, gradient filters will help to properly expose the frame: they can darken the bright sky without affecting the rest of the frame.
RAW or JPEG? Since panoramic shooting involves computer image processing, of course, it will be more convenient to work with the RAW format. However, if you just want to practice panoramic photography, you can work with JPEG, but then it is recommended to enable lens distortion and vignetting correction in the camera menu so that later your images match one another. Note that such correction through the device menu will be available only when using native Nikon optics.
By the way, when working with the RAW format, you can also correct optical distortions in one click. This mechanism is implemented, for example, in the RAW converter for Nikon Capture NX-D cameras.

White balance. If you suddenly decide to shoot a panorama not in RAW format, but in JPEG, make sure that the white balance in all photos is the same. I definitely recommend shooting panoramic shots in RAW: this format is much more flexible in processing, and it will allow you to adjust the white balance after shooting, when working with images on a computer.
Focusing. As with frame exposure, focusing when shooting panoramas can be done in the same way as when working with single shots. And in the same way, the focus should be the same on all frames of the panorama. If the focus “walks”, most likely it will not be possible to glue them together. Therefore, having focused once, immediately before shooting a specific panorama, it is better to turn off autofocus altogether. And be careful not to accidentally move the lens focusing ring. If the focus is lost, it is better to reshoot everything from the very beginning. When shooting a landscape panorama, it is convenient to focus at the hyperfocal distance. If you want to take a panoramic portrait with a shallow depth of field, then, of course, the focus should always remain on your subject.

Panoramic photography is a very powerful technique in a photographer’s arsenal, but there are scenes that are very difficult to shoot as a panorama. Remember: if there is a lot of movement in your frame, especially in the foreground (for example, if you are filming a forest and a strong wind is blowing, swaying the branches of the trees), then it is better to shoot such a scene without panoramic stitching, in one frame. Otherwise, it will be difficult to bring together branches that appear in different positions in different frames. The same applies to scenes with dynamic water, surf, people and animals. If you shoot waves, they will look completely different in different frames and it will be extremely difficult to stitch them together. There are exceptions to this rule. For example, frames with mirror-like water surface can be easily stitched together. Another exception is water that moves evenly, without changes. If in the sea surf the oncoming waves vary slightly in their strength and height, then the flow in a mountain river moves absolutely stably, without sharp changes in its movement. This allows you to shoot together footage of mountain rivers and waterfalls without any problems.

A simple solution to the motion problem is to place the moving object within one panorama frame so that it does not fit entirely within it. We can take his image from this frame and avoid the problems described.


In addition, you should not shoot panoramas using polarizing and neutral gray filters with variable density. Such filters on wide-angle optics can result in uneven darkening of the frame: as a result, in the final panorama you can get, for example, a spotted sky.
Before plunging into the theoretical jungle, I’ll say: you can start shooting panoramas without all the devices described below! They are not always needed; in most cases, all you need is a camera, a tripod and your inspiration! Modern panorama stitching programs, in most cases, perfectly “digest” parallax frames and produce decent results. Also, minor flaws in the gluing can be corrected by retouching the photos in a graphics editor.
Parallax is a change in the apparent position of an object relative to a distant background depending on the position of the observer. This effect can play a very cruel joke on the photographer. If the scene includes a close foreground, its details in different frames may change their position relative to objects in the background. All this threatens that the final panorama will be assembled with errors or will not be assembled at all.


Gluing errors caused by parallax
How to be? There is a common stereotype that parallax can only be combated with the help of special panoramic tripod heads. However, such heads are difficult to use, bulky, and expensive. Yes, they will help get rid of parallax, but using them in the field poses a huge number of difficulties. However, they are really needed only in very complex cases: for example, when creating spherical panoramas with a 360-degree view.


Hello, friends. Today we will learn how to make amazing panoramic photos two clicks of the mouse. A free, easy program from Microsoft. Yes, you read that right, this is the manufacturer of the Windows operating systems itself. You can imagine how well thought out and reliable this program is.
What will be required of you? Several photographs of one area, taken “in a circle”. It is not at all necessary to turn in all directions with the camera. When taking a photo (for example, a group shot near a fountain), it is enough to take a couple of frames, shifting the angle a little to the side, to the right and left.
I just returned from a small photo shoot - I took pictures specifically for this article on a regular mobile phone. Let's see together what comes of all this. You can see what result we are striving for by following this link.
Now all we have to do is “throw” our photos into the program and it will edit them into one panoramic photo. You won’t see any seams or transitions - brightness, contrast, shades... everything will be selected and smoothed by our program. She's doing great panoramic photos, automatically - that's what it was created for.
We are not afraid that the program is in English. You and I have already seen that it doesn’t matter if you do it morphing photos.


Installed. Now the main program window will open...


We select a pack of our photos and click “open” - the process of loading into the program has begun. It lasts seconds...

And immediately, next comes the process of gluing and processing...


Now let's press...

After that, slightly adjusting the boundaries of the panorama with the mouse cursor and setting the quality level to maximum...


We save the result of our puffing...

We select a place on the disk where our panoramic photos and that's all, actually.

Result 1
Result 2
Let's summarize. By spending more than a couple of minutes shooting, taking pictures below and above, you can get a “wow” panoramic photo. The wider the panorama you want to make, the more distorted it will be in perspective. When taking a regular group photo, it’s enough to take several pictures to the right and left, as well as above and below. This will be just a cool panoramic photo. And if you use a professional camera...

This article will be devoted to creating a panorama from ready-made photographs.
How to create panorama photos using panoramic head or doing without it, you can read the previous article: “How to create a 3D panorama. Part 1: theory and photography.”
For this lesson you will need the Autopano Giga program (link to trial version). The examples will use version 2.0.6. Version 2.5 is currently available. Of course, she has differences, but they are not so significant. Therefore, with the help of this article you can also understand it.
To describe the work of creating a 3D panorama from a practical point of view, the source files for the panorama of the Cherek Gorge (Elbrus region) were posted.
You've probably already tried to photograph a panorama as described in the previous article and got the first results. You can try to work with your own materials, but it is better to use the photographs provided.
These images are well stitched into a panorama, but they have some typical problems that will be discussed in this and the next article.
In addition, there is no zenith shot here. Or rather, it was originally there, but it was not specifically put in the archive in order to show in a subsequent lesson how to complete the zenith of the panorama.

As you can see, this panorama was photographed in 2 rows, plus a nadir image was created. The nadir photograph was taken handheld and is therefore somewhat inaccurate.
Plus, unnecessary elements (lower limbs) are visible. But in most cases, Autopano Giga handles these elements well, and they don't show up in the finished panorama.
This step has already been done in the source files; the necessary already processed files are posted in the archive.
When working with your files, you need to do the following:
Open Autopano Giga. When starting for the first time, it is advisable to carry out the basic settings of the program.
Select Main menu -> Edit -> Options

Specify a temporary folder on a disk where you have 10 GB or more of free space.
When you work with uploaded files of the Cherek Gorge, this parameter is not critical (their resolution is reduced). But when you work with real photographs, the more pictures you have and their resolution, the more free space you will need for the program to work.
Also select some folder with a simple path. Autopano Giga may not complete the job correctly when creating a panorama (unfortunately, this sometimes happens). In this case, it does not delete temporary files. You will then have to manually clean out this folder.
If you have a powerful enough video card, then activate GPU processing. Click the button Check and in the tab Render check the picture GPU processing. If she repeats Reference picture, then your video card is supported.

In the tab Creation, select high Detection quality. In this case, image processing will take longer, but the stitching quality will be better
You can also install Control Points to a value of about 100.
These are the basic settings adjustments. Later, if desired, you can change the remaining settings to suit your needs.
Restart the program to activate the settings.
So, you have the main window of the Autopano Giga program open.

Add a group of pictures.
A new group
Select all the photos of the Cherek Gorge in Explorer or file manager and drag them to the currently empty group area.
After adding pictures, click -
After calculation, the program will stitch all the images into a single panorama.

Let's click the edit button and analyze the quality of the panorama stitching.

On the left are the main information elements of the menu.
Item “Information”
Build quality is expressed as average RMS. This number is calculated as the average error when analyzing general areas of photographs. Ideally, it is between 0.0 and 1.0, which is rare.
To obtain such RMS, it is necessary to adjust the panoramic head very well (the nodal point is located exactly on the axes of rotation, the rotating elements of the head are not loose and there is no deflection of the head from the weight of the equipment), shoot panoramas without moving objects, and photograph the zenith and nadir using additional equipment.
Fortunately, such low RMS is not required. Panoramas are stitched well with RMS up to 5-7. As a last resort, errors, in most cases, can be quickly corrected in Photoshop.
Item “History”
Shown here are panorama thumbnails and editing history. Using the Create Image button, you can actually create an additional image to compare with the previous one and evaluate how positive the changes made to the panorama are.
Item “Layers”
Shown here in the form of a drop-down list are the photographs that participated in the creation of the panorama. You can group them according to certain characteristics (shutter speed, focal length, etc.). You can also view snapshot properties and add or remove specific snapshots.
If you are going to add new photos to the panorama, be sure to save the current project. This function is sometimes unstable and can cause the program to crash.
The top menu contains the following control elements:
Saving a project
Cancel/Revert changes made to the panorama
Projection type
Mercator– will be used if you stitch together several images to create a photograph with a large viewing angle horizontally and vertically (but if the vertical angle is close to 1800, you must select the “Sphere” projection type).
Plane– necessary if you are creating a general shot with an average viewing angle horizontally and vertically. If you see that strong distortions are obtained, then try the “mercator” or “cylinder” projection type.
Cylinder– used to create 3D panoramas with large horizontal angles and medium vertical angles (about 600)
Sphere– necessary for creating an interactive 3D panorama with large viewing angles horizontally and angles close to 1800 degrees vertically
Ideally, to create a 3D panorama, panoramas with viewing angles of 3600 horizontally and 1800 vertically are used, i.e. with a full view of the space.
How to evaluate the resulting viewing angle?
The lower right corner of the window shows the numbers of angles Phi And Theta
In this case:
Theta Min/Max (-180/180), i.e. we have a complete horizontal view of 360 degrees (addition modulo the Min and Max values)
Phi Min/Max (-90/76.70). It can be seen that there is complete filling vertically from nadir to horizon, but not from horizon to zenith. Those. What's missing is just a photo of the zenith. Later we will restore the missing photo in Photoshop.
![]() Three buttons to rotate the panorama by 180 and 90 degrees.
Three buttons to rotate the panorama by 180 and 90 degrees.
Button for changing the angle of rotation, tilt, rotation of the camera./p>
Fit mode enable button. The size of the panorama is adjusted so that the minimum possible empty spaces remain at the edges of the panorama.
Manual panorama cropping button.
Central point. Allows you to change the position of the center of the panorama. Ideally, the center point should be on the horizon line in the center of the panorama.
Auto horizon button. The program will try to determine the horizon based on image analysis. This function does not always work correctly, especially when the horizon line is clearly not visible. This is exactly the case in the current panorama.
“Set verticals” button. If you see that some objects in the panorama are not positioned vertically, then use this tool to set the verticals and press Enter.
Layer mode. Shows how your pictures are arranged in the panorama, what their serial number is and what changes are made to the picture based on the selected projection.
Each image in the program is assigned a serial number. And if you want to perform some operation on it, for example, remove it from the panorama, then you can easily find it using this number at the bottom of the window in the “Layers” menu section.
Image moving mode. If you have GPU processing mode enabled in the settings, then here you can use the mouse to change the position and orientation of the panorama.
Link editing mode. One of the most necessary modes when working with panoramas. When you click this button, a window opens with a list of photos used in the panorama and their connections to each other. In this case, the previous window shows all connections and their RMS.

Based on the numerical values and color of the links, you can estimate where the largest errors are in the panorama. It can be seen that in this panorama the most errors occur when matching the nadir with other images. The reason for this error is that the nadir photograph was taken handheld.
In this lesson we will not dwell on editing links. Everything comes together quite well in this panorama.
Panorama color correction. You can choose from several correction types.
LDR (Low Dynamic Range)– in places where photographs intersect, the color of the pixels is processed using special algorithms for changing the brightness of the images in order to equalize the exposure of the entire panorama.
HDR (High Dynamic Range)– maximum elaboration of the image is of paramount importance. A calculation occurs in which of the photographs has a more detailed fragment of the image. It is this fragment that is used in the panorama.
No color correction– natural colors of photographs are shown. At intersections, color averaging occurs.
Auto mode uses LDR as a color correction method. Usually in this mode the panorama turns out to be more contrasting than with the HDR method.
In fact, using the described method of assembling a panorama, it does not matter which method you use.
Color anchor edit button
Quite a broad topic. Briefly described, anchors allow you to specify which image is the base one. All other photos in the panorama are color corrected to match the brightness of this photo.
Changing the type of anchors occurs by selecting a menu item with a right mouse click.
The following scheme is usually used:
Let's apply the same scheme to this panorama. We obtain the following distribution of anchors.
Using this scheme, overexposed areas of the panorama are minimized.
At the same time, if the photographs were initially taken with errors (the exposure was set incorrectly or the exposure in adjacent photographs changed too much), then such a scheme can give a highly contrasting panorama. In this case, it is better to use a fixing anchor to mark the less illuminated shot.
Here is a typical histogram of the image. Brightness is plotted horizontally (black on the left, white on the right). The height of the bars shows the number of pixels of this brightness.
In a separate lesson, I will try to examine in more detail how to work with histograms in relation to image analysis and processing. For those especially interested, there are quite a lot of lessons on this topic on the Internet.
At this point, we have covered the main tools of Autopano Giga. It may seem that there is too much technical information and it is difficult to understand it all. First, try just shooting panoramas and stitching them in this program without delving too much into the settings. In most cases, Autopano Giga automatically provides acceptable results. By creating your own panoramas, you will gradually master the functionality of this program.
Well, now we make sure to save the project and run the panorama for rendering (calculation).
Click the “Collect” button.

The size of the panorama that will be obtained as a result of rendering is shown at the top.
We will not analyze the algorithms in this article. In general, the default settings give good results.
Format
If you are using a panorama for posting on the Internet, you can use the jpg format. If you plan to use a panorama in printing, then it is better to choose formats without loss of quality (tif or png). In this case, we assume that we need a panorama for the Internet.
Layers
Layers are photographs that have been adjusted to the projection used and used to create a panorama.
It is better to use the “one per file” setting. In this case, if any problems arise in the panorama, you can try to eliminate them using material from the resulting layers.
If you select the PSD format, you can pack the layers into the file itself (using the “Inside” setting). At the same time, in this case, the result will be a very bulky panorama file, and quite difficult to edit in Photoshop.
Output file
Here we indicate the output folder of the file.
In the file name we write the string “%a%l”. This will give the program a template for generating file names so that a unique name for the panorama and layer files is obtained.
Click the “Assemble” button and after a while we will get the finished panorama.

The next lesson will show how you can complete the zenith of a panorama, how to work with projections and how to ultimately get an interactive 3D panorama.
Good luck assembling panoramas.
Author of the article: Alexander Slobodenyuk
Website: 1panorama.ru
Mail: [email protected]
1panorama.ru - Photography of panoramas. Creation of interactive virtual tours.
Other parts of the article:
Hello, friends. In this material I will briefly outline the main points of creating a 3D panorama at home. We will walk you through the process of creating a cylindrical panorama from individual photographs using a real example. And to begin with, I would like to load you with at least the basic theoretical part on this topic. Any cylindrical panorama is a large-format photograph with an angle of 360 degrees horizontally. Below you can see an example of such a panorama.
In full screenCreating panoramas usually takes place in several stages. The first thing you need to do is prepare your photos. For this we need a camera or smartphone. Ideally, a DSLR, but if you don’t show off, then any point-and-shoot camera will do. We fix the device on a tripod and take pictures around its axis. The smaller the step, the better the quality of the panorama. It is very important to carry out all actions with a tripod. It’s unlikely that you’ll be able to shoot high-quality material hand-held. As a result, you should have a folder with similar photos.

Next we need to stitch all these images into a single panorama. To do this, we will use the popular software product PTGui Pro. This program will allow us to easily merge our frames into a single file. After that, we will convert the panorama to Flash format. This conversion is needed in order to make a full-fledged cylindrical panorama from our image. It is after processing in the second Pano2VR program that our work will take on its final form and become available for viewing in 3D mode. You can download all the necessary programs link or find them yourself on the Internet.
Step 1. Run the file fo-pt10.exe and click on “Next” in all windows. We wait for the installation process to complete and click “Finish”.

Step 2. Next, we need to prevent the program from accessing its home site and checking the activation status. To do this, you need to make changes to the “hosts” file. First, go to the following path “C:\WINDOWS\system32\drivers\etc\”.

Step 3. Next, launch notepad and drag the “hosts” file onto the notepad work area to make changes. This is one of the simplest ways to open this file. We indent and add 2 lines at the end of the document:
127.0.0.1 ptgui.com 127.0.0.1 www.ptgui.com

Step 4. Great. Now PTGui will not once again break into its servers. And we proceed directly to activating the program. We launch the shortcut of the same name on the desktop, accept the license agreement and copy the data from the reg.txt file in the registration window. It is in our installation folder. If you do everything correctly, you will see the inscription: "Thanks! Your cope of PTGui Pro is now registered." Click “OK” and move on.

Step 5. After opening, the program will offer to update to the latest version. This should not be done. We put a tick in the box stating that there is no need to check for updates in the future and click on “No”.

That's all. Installation of the first program necessary for stitching photos into panoramas is complete. Let's move on to installing Pano2VR. This software will allow us to create 3D panoramas from simple JPG images.
Step 1. From the folder “Pano2VR Pro v4.5.0.10633 Final” we launch the installation file depending on the bitness of the operating system. I have 64-bit Windows 7, so I boldly click on “pano2vr_install64_4_5_0.exe” and, without further ado, click “Next” in all windows. The installation is quite long, so you will have to be patient.

Step 2. The next step is to activate the program. Everything here is much simpler than with PTGui Pro. To activate Pano2VR, just replace one file in the folder with the installed program. Having opened the BEAN folder, select the desired bit depth and copy pano2vr.exe to the following path “C:\Program Files\Pano2VR”. If you request a replacement, we agree immediately.

This completes the installation of the necessary software to create a virtual tour. We proceed directly to the first stage of work - gluing photographs into panoramas.
Step 1. Open the PTGui shortcut and click on the “Load images...” button

Step 2. Select the folder with the original photos for the future panorama. As an example for this material, I prepared photographs of the teachers’ room in my educational institution. If you don’t have your own photos yet, you can use these. Select all the photos from the folder and click “Open”.

class="eliadunit">
Step 3. After loading all the photos, click on the “Align images” button and wait for the program to process each image and create a single panorama.

Step 4. If the gluing is completed successfully, click “Create panorama...”.

If the gluing attempt fails, repeat the operation again
Step 5. In the new window, click on “Create panorama” again.

The finished panorama will appear in the folder with the original photos and will be labeled “Panorama”.

Step 1. Launch Pano2VR and in the main program window click on the “Select” button.

Step 2. In the window that appears, indicate the path to our first panorama and in the settings of its type, set the “Cylindrical” parameter.

Step 3. Great. Now let's move on to saving our 3D panorama. To do this, in the “Export” section, select “Flash” as the format and click “Add”.

Step 4. In the window that appears with many settings, we do not touch anything. Just click on “OK”.

Step 5. We agree to export the file.

Step 6. Before outputting the panorama to the finished swf file, we are asked to save the project. Click “OK” and select the desired folder. I'll probably indicate the root folder with the original photos.

Step 7 After waiting for the tour to be saved, go to the output folder and look for a file with the extension “.swf”. Open it in any browser.

By moving the cursor you can look around you. So, before our eyes, a simple set of photographs in 10 minutes turned into a beautiful 3D panorama, which conveys the feeling of the space around much better than simple photographs. In our educational institution, such panoramas are even used to create a 3D tour of classrooms and workshops. However, creating such a tour requires a lot of effort. A slightly different software package is used. The creator must have basic skills in Photoshop and several other editors.
However, in general, implementing a 3D tour within the same building, street or even city is a very interesting activity. In the near future I will try to make an issue in which I will outline in detail the basic principles of creating a virtual 3D tour using the example of an educational institution. Interesting? Then don't forget to subscribe immediately after watching. There are still many instructive stories ahead. Give thanks with a like if you liked the video. Denis Kurets was with you.. See you in a week. Bye bye!
class="eliadunit">
In 2018, the Nativity Fast will begin on November 28. During this period, Orthodox believers prepare to celebrate Christmas...

Starting a family is the dream of most women. They want to have a loving husband and a bunch of kids. But it's not always a relationship...

This article contains: the most powerful prayer for divorce - information taken from all over the world, the electronic network and...

Information site about icons, prayers, Orthodox traditions. Prayer for scandals and quarrels in the family, with husband, with children...

What would New Year be without champagne, tangerines, Olivier, aspic and everyone’s favorite “Herring under a fur coat”. With the last one...
Let's prepare the necessary ingredients for the cookies. The first thing to do is put the water to boil. We need...
Is it possible to register an employee for the position of financial director - chief accountant? The chief accountant claims...
The head of a small business can easily manage the budget independently. CHECKED! If you manage...
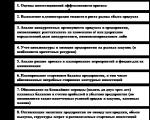
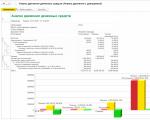
The creation of new projects involves a preliminary economic justification for their feasibility, subsequent...
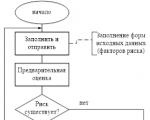
Reporting is generated by the RM, is agreed upon (approved) by the Risk Committee under the Management Board and transmitted to...

At the edge of a large, very large meadow, on a long emerald blade of grass lived a tiny Ladybug. God's little...

Nowadays, it is quite common for people to turn to the stars. With the help of a horoscope a person can find out...

Business or friendly. If you were pursuing a stranger, it means your level of trust in the female sex...
according to Freud's dream book If you dreamed about how you were fishing, it means that in real life you can hardly switch off...

Starting a family is the dream of most women. They want to have a loving husband and a bunch of kids. But it's not always...

This article contains: the most powerful prayer for divorce - information taken from all over the world, electronic...