What is possible and not possible during the Nativity Fast?
In 2018, the Nativity Fast will begin on November 28. During this period, Orthodox believers prepare to celebrate Christmas...
Sometimes you really want to watch the night sky, take a closer look at the stars or look at a flying comet, but there is no opportunity to do this. Because telescopes are quite expensive. And we only want to look at the stars sometimes. There is a way out of this situation; you can assemble a telescope with your own hands.
The cost of assembling a simple refractor telescope of the Galileo system was only 5 dollars.
To do this you need:
- magnifying glass with a diameter of 100mm;
- a lens with a diameter of 25-50mm, minus 18 diopters, we will use it as an eyepiece;
- plastic pipe with a diameter of 100 mm;
- plastic adapter;
- a small piece of automobile rubber pipe;
- two sealing rings of different widths made of 100mm plastic pipe;
- scotch;
- screwdriver;
- stationery knife;
- hammer;
- scotch.

Two fasteners for open-laying plastic pipes are put on a piece of plastic pipe.


This article is intended for those amateur astronomers who have already played with binoculars and a refracting telescope, looked at the phases of Venus, the rings of Saturn and the moons of Jupiter, and want something less boring and more stunning. For example, 1000x with a huge lens. It is impossible to do this with lenses alone: they produce so-called chromatic aberration, which manifests itself in the form of rainbow halos around objects, the stronger the stronger the magnification of the telescope.
Therefore, the task arises to collect homemade reflecting telescope, that is, a telescope on mirrors. In its simplest form, it consists of two mirrors (objective and diagonal) and one eyepiece lens.
The main mirror-lens of a reflecting telescope is its most important and critical part. And it is also the most difficult to manufacture. Finding a ready-made mirror of this type is almost impossible.
Although there is one way: you can make this from a concave or convex-concave lens. Find the largest concave or convex-concave lens you can find. It is important that focal length was as high as possible, and, therefore, the concavity as small as possible: from too powerful concave lenses, what is required is not a spherical, but a parabolic shape, and this is a completely different deficiency that cannot be improvised in any way.
The most reliable calculation is to find a plano-concave one with a diameter of 10-12 cm and an optical power of 1 diopter. Look for it in optical stores. Thus, a homemade telescope of 1000x will not work, but you can do something with it.

Then you need to do silvering to get a mirror. Prepare a solution called Tollens' reagent. In order to prepare this reagent, you need: silver nitrate (lapis), caustic soda (caustic soda) and ammonia solution.
This reagent kit also includes formaldehyde (formaldehyde solution). Dissolve 1 g of silver nitrate in 10 ml of water, and 1 g of sodium hydroxide in another 10 ml of water. Mix these solutions, a white precipitate should form. Add ammonia solution until the precipitate dissolves. This solution is Tollens' reagent.
To use it for silvering, you should pour it into the concave part, which has previously been thoroughly cleaned of any contaminants. If the concavity is very weak, you should make a barrier of wax or plasticine along its edge.

Having poured the reagent, you should begin to add formaldehyde to it in frequent drops. Soon a film of silver will form and it will turn into a concave mirror. Keep in mind that Tollens' reagent does not have a long shelf life; it must be used immediately after it is prepared.
There are also ways to make a concave surface yourself, first of all - grinding the concave surface on glass circles. However, these methods are too complicated and are not recommended for use by beginners.
A diagonal mirror should be made in the same way as a concave one. It should be perfectly straight; For its manufacture, the flat side of any plano-convex or plano-concave is suitable.

Now you can start assembling your homemade one. You will need a tube exactly the length of the focal length (if you used a 1 diopter plano-concave lens for manufacturing, then take a tube 100 cm long, +0.5-1 cm adjustment for thickness).
The pipe should be open at one end and closed at the other, and painted inside with the blackest paint you can find. The diameter of the pipe should be 1.25 times the diameter of the refractor mirror; if you used a lens with a diameter of 100 mm to make it, take a pipe with a diameter of 125 mm.
Attach the lens mirror to the bottom of the pipe, exactly in the center. To make it convenient to do this, it is better to provide a removable bottom. You can attach the lens to the bottom, for example, with superglue.

Make a hole closer to the open end of the pipe. To calculate the desired position for the hole, measure its radius from the open end of the pipe. This is where the center of the hole should be. The eyepiece will be fixed in this hole (perpendicular to the pipe).
It should hang on the optical axis at an angle of 45 degrees. If the angle is maintained correctly, then when you look through the eyepiece you will see the image. If you don't succeed the first time, experiment with the angle.
A factory-made telescope is quite expensive, so it is advisable to buy it if you are seriously interested in astronomy. And amateurs can try to assemble a telescope with their own hands.
As you know, there are two types of telescopes:
The design of a refracting telescope is quite simple. At one end of the device there is a lens - a lens that collects and focuses light rays. At the other end there is an eyepiece - a lens that allows you to view the image that comes from the lens. The lens is placed in a main tube called the tube, and the eyepiece is placed in a smaller tube called the eyepiece assembly.
To take interesting photographs of the starry sky, you can attach a webcam to a telescope.
From ordinary eight-power binoculars you can build a telescope that provides magnification of over 100 times. Pipes can be glued together from whatman paper. Lenses are suitable from old filmoscopes or similar in magnification. We use the calculation of a simple telescope, and select the length of the device and the distance between the eyepiece lenses experimentally.
There is no need to disassemble the binoculars - the tubes are put directly on it. For ease of use, you can make a tripod. Such a telescope from binoculars allows you to see mountains and craters on the surface of the Moon, satellites of Jupiter, etc.
Making a homemade telescope at home is not particularly difficult. Even a high school student can do this kind of work. For a child, a device with a magnification of 30–100 times will be sufficient.
However, there are home craftsmen who can independently assemble three hundredfold quality telescope. Such skills come with experience and can be useful to those who are seriously interested in astronomy.
Let's try to make a telescope. In order to make a simple but fully functional telescope yourself, you need whatman paper, black ink, office glue or paste and two optical lenses. We present telescope options with magnifications of thirty, fifty and one hundred times. They differ only in extended length and objective lenses.
To begin with, it is best to make a telescope with a magnification of 50 times.
From a suitable sheet of whatman paper, roll up a tube 60 - 65 cm long. The diameter should be slightly larger than the diameter of the objective lens - about 6 cm if you are using a standard spectacle lens. Unfold the sheet and ink ink the part of the sheet that will become the inner surface of the telescope.

Otherwise, rays that enter the tube from a source other than the object of observation will be reflected many times and enter the eyepiece lens and veil the image.
After inner surface blackened, you can roll and glue the pipe. Attach an objective lens of +1 diopter (you will find it in the Optics store) to the end of the pipe as shown in the figure - using two cardboard rims with paper teeth.
The second tube with eyepiece lens 2 should move with little effort, but quite freely, in the first one.
You will most likely find the lens for the eyepiece in the photographic goods department or remove it from a binocular that is “permanently” broken. The lens should be selected as follows: direct light at it from a distant source, for example Sunbeam, and watch where they come into focus. The distance from the lens to the focus is called the focal length of that lens (f). For our purposes, the eyepiece should have f=3-4 cm. As a rule, such lenses have a small diameter, therefore the eyepiece lens mount is somewhat different from the lens mount.
Roll a cardboard tube 6 - 7 cm long with such a diameter that the lens you selected fits tightly into it. If it is equipped with a wide metal rim, it does not fall out of the tube and does not require additional fastening at the edges.
The tube with lens 2 is secured inside the much wider tube of the telescope using two cardboard circles with holes in the middle and teeth made of less dense paper.

30 mm. The same, plus Jupiter's moons Europa, Io, Callisto and Ganymede. In a very fortunate coincidence - Saturn's satellite Titan. Stripes on the disk of Jupiter. Planet Neptune - in the form of a star.
40 mm. The double star Castor - Alpha Gemini separates. The Great Orion Nebula and open star clusters in the constellations Perseus, Auriga, and Canis Major and Cancer.

80 mm. Shadows from Jupiter's satellites are visible as they pass in front of the planet's disk. The ring nebula M57 has a dark hole at its center. Several satellites of Saturn. The Cassini gap in the rings of Saturn.
100 mm. The satellite of Rigel - Alpha Orionis - and the North Star - Alpha Ursa Minor are visible.
120 mm. Saturn's moon Enceladus. Details on the disk of Mars during oppositions are seas and polar caps made of carbon dioxide.
150 mm. Duality of Epsilon Bootes. Division of the globular cluster M13 into individual stars.
200 mm. The Encke division in the ring of Saturn is several concentric rings separated by spaces. Spirals in the Andromeda Nebula.
250 mm. Pluto. Satellites of Uranus.
300 or more. Horsehead Nebula. Satellite of Sirius. Galaxies in detail. The central star in the ring nebula M57. Ball star cluster in the M31 galaxy.
And so we summarize - in order to build a simple refracting telescope, you need only two collecting lenses - a long focal length (low optical power) for the objective and a short focal length (strong magnifying glass) for the eyepiece.
You should look for them at flea and radio markets, in stores spectacle optics at worst.
The first lens - the lens of a telescope, if you point it without anything else at some distant object, will create an inverted image of it behind itself, at a distance approximately equal to its focal length. This image can be seen on frosted glass or paper or, without any glass, by simply standing behind the lens at a distance greater than the focal length and looking in the direction of the lens.

Please note that in the latter case the eye will have to accommodate not “to infinity,” as when considering the horizon line, but as when considering a certain material object located from the eye at the same distance as the image plane. You will see a magnified inverted image of a distant object, with the magnification factor being equal to the focal length of the lens in cm divided by 25 - distance best vision human eye. If the focal length of the lens is less than 25 cm, the image will be reduced. The simplest telescope is basically ready!
The objective and eyepiece lenses should be installed into the tube as coaxially as possible. The lens must be glass. What is visible: at 28 mm 40 times outside the city, stars up to the 9th magnitude, the ring of Saturn and the gap between it and the disk, satellites and two dark stripes on Jupiter (they appear rather orange), the phase of Mars when it was 6 seconds in diameter, craters on the Moon, spots on the Sun (only when projected with an eyepiece, do not look with the eye!!!).
The conclusion is this: in terms of detail visibility, this product, if assembled well, will surpass 8x binoculars.
Just in case, we remind you that a +1 diopter spectacle lens has a focal length of 1 meter and it is quite sufficient for such a simple telescope. You should not follow popular recommendations and make a lens from a pair of identical lenses +0.5 diopters (concave to each other). This is a “Periscope” scheme, which has some advantages only in fields of 30-50 degrees, which is not relevant for telescopes with their fields of half a degree.
It's safe to say that everyone has dreamed of taking a closer look at the stars. You can use binoculars or a spotting scope to admire the bright night sky, but you are unlikely to be able to see anything in detail through these devices. Here you will need more serious equipment - a telescope. To have such a miracle of optical technology at home, you need to lay out a large sum, which not all lovers of beauty can afford. But don't despair. You can make a telescope with your own hands, and for this, no matter how absurd it may sound, you don’t have to be a great astronomer and designer. If only there was a desire and an irresistible craving for the unknown.
We can definitely say that astronomy is a very complex science. And it requires a lot of effort from the person doing it. A situation may occur that you purchase an expensive telescope, and the science of the Universe will disappoint you, or you simply realize that this is not your thing at all.
In order to figure out what’s what, it’s enough to make a telescope for an amateur. Observing the sky through such a device will allow you to see many times more than through binoculars, and you will also be able to figure out whether this activity is interesting to you. If you are passionate about studying the night sky, then, of course, you cannot do without a professional apparatus.
Descriptions of how to make a telescope can be found in many textbooks and books. Such a device will allow you to clearly see lunar craters. With it you can see Jupiter and even make out its four main satellites. The rings of Saturn, familiar to us from the pages of textbooks, can also be seen using a telescope made by ourselves. In addition, many more celestial bodies can be seen with your own eyes, for example, Venus, a large number of stars, clusters, nebulae.
The main parts of our unit are its lens and eyepiece. With the help of the first part, the light emitted by celestial bodies is collected. How distant bodies can be seen, as well as the magnification of the device, depends on the diameter of the lens. The second member of the tandem, the eyepiece, is designed to enlarge the resulting image so that our eye can admire the beauty of the stars.

Now about the two most common types of optical devices - refractors and reflectors. The first type has a lens made of a lens system, and the second has a mirror lens. Lenses for a telescope, unlike a reflector mirror, can be found quite easily in specialized stores. Buying a mirror for a reflector will not be cheap, but self-production will be impossible for many. Therefore, as has already become clear, we will be assembling a refractor, and not a reflecting telescope. Let's finish the theoretical excursion with the concept of telescope magnification. It is equal to the ratio of the focal lengths of the lens and eyepiece.
In order to start assembling the device, you need to stock up on a 1-diopter lens or its blank. By the way, such a lens will have a focal length of one meter. The diameter of the blanks will be about seventy millimeters. It should also be noted that it is better not to choose spectacle lenses for a telescope, since they generally have a concave-convex shape and are poorly suited for a telescope, although if you have them on hand, you can use them. It is recommended to use long-focal lenses with a biconvex shape.
As an eyepiece, you can take a regular magnifying glass with a thirty-millimeter diameter. If it is possible to get an eyepiece from the microscope, then it is certainly worth taking advantage of. It is also perfect for a telescope.

What should we make the housing for our future optical assistant from? Two pipes of different diameters made of cardboard or thick paper are perfect. One (the shorter one) will be inserted into the second, with a larger diameter and longer. A pipe with a smaller diameter should be made twenty centimeters long - this will ultimately be the eyepiece unit, and it is recommended to make the main one a meter long. If you don’t have the necessary blanks at hand, it doesn’t matter, the body can be made from an unnecessary roll of wallpaper. To do this, the wallpaper is wound in several layers to create the required thickness and rigidity and glued. How to make the diameter inner tube, depends on what lens we use.
Very important point in creating your own telescope - preparing a special stand for it. Without it, it will be almost impossible to use it. There is an option to install the telescope on a camera tripod, which is equipped with a moving head, as well as fasteners that will allow you to fix different positions of the body.
The lens for the lens is fixed in a small tube with its convex outward. It is recommended to fasten it using a frame, which is a ring similar in diameter to the lens itself. Directly behind the lens, further along the pipe, it is necessary to equip a diaphragm in the form of a disk with a thirty-millimeter hole exactly in the middle. The purpose of the aperture is to eliminate image distortion caused by the use of a single lens. Also, installing it will affect the reduction of light that the lens receives. The telescope lens itself is mounted near the main tube.
Naturally, the eyepiece assembly cannot do without the eyepiece itself. First you need to prepare fastenings for it. They are made in the form of a cardboard cylinder and are similar in diameter to an eyepiece. The fastening is installed inside the pipe using two disks. They are the same diameter as the cylinder and have holes in the middle.
The image must be focused using the distance from the lens to the eyepiece. To do this, the eyepiece assembly moves in the main tube. Since the pipes must be well pressed together, the required position will be securely fixed. It is convenient to perform the tuning process on large bright bodies, for example, the Moon; a neighboring house will also work. When assembling, it is very important to ensure that the lens and eyepiece are parallel and their centers are on the same straight line.

Another way to make a telescope with your own hands is to change the size of the aperture. By varying its diameter, you can achieve the optimal picture. Using optical lenses of 0.6 diopters, which have a focal length of approximately two meters, you can increase the aperture and make the zoom much closer on our telescope, but you should understand that the body will also increase.
By the standards of the Universe, our Sun is far from the most bright Star. However, for us it is a very important source of life. Naturally, having a telescope at their disposal, many will want to take a closer look at it. But you need to know that this is very dangerous. After all sunlight, passing through the optical systems we have built, can focus to such an extent that it will be able to burn through even thick paper. What can we say about the delicate retina of our eyes?

Therefore, you need to remember very important rule: you cannot look at the Sun through zooming devices, especially a home telescope, without special means protection. Such means are considered to be light filters and a method of projecting an image onto a screen.
If for some reason it is impossible to assemble a homemade telescope, then do not despair. You can find a telescope in a store for a reasonable price. The question immediately arises: “Where are they sold?” Such equipment can be found in specialized astro-device stores. If there is nothing like this in your city, then you should visit a photographic equipment store or find another store that sells telescopes.
If you are lucky - there is a specialized store in your city, and even with professional consultants, then this is definitely the place for you. Before going, it is recommended to look at an overview of telescopes. First, you will understand the characteristics of optical devices. Secondly, it will be more difficult to deceive you and slip you a low-quality product. Then you will definitely not be disappointed in your purchase.

A few words about buying a telescope through the World Wide Web. This type of shopping is becoming very popular nowadays, and it is possible that you will use it. It’s very convenient: you look for the device you need, and then order it. However, you may come across the following nuisance: after a long selection, it may turn out that the product is no longer in stock. Much more unpleasant problem- This is the delivery of goods. It's no secret that a telescope is very fragile thing, so only fragments can be delivered to you.
It is possible to purchase a telescope by hand. This option will allow you to save a lot of money, but you should be well prepared so as not to buy a broken item. A good place to find a potential seller is astronomer forums.

Let's look at some price categories:
About five thousand rubles. Such a device will correspond to the characteristics of a telescope made with your own hands at home.
Up to ten thousand rubles. This device will certainly be more suitable for high-quality observation of the night sky. The mechanical part of the body and equipment will be quite poor, and you may have to spend money on some spare parts: eyepieces, filters, etc.
From twenty to one hundred thousand rubles. This category includes professional and semi-professional telescopes. Surely a beginner will have no need for a mirror camera with an astronomical cost. This is simply, as they say, a waste of money.

As a result, we met important information about how to make a simple telescope with your own hands, and some nuances of buying a new device for observing the stars. In addition to the method that we have considered, there are others, but this is a topic for another article. Whether you've built a telescope at home or purchased a new one, astronomy will take you into the unknown and provide experiences you've never experienced before.

In 2018, the Nativity Fast will begin on November 28. During this period, Orthodox believers prepare to celebrate Christmas...

Starting a family is the dream of most women. They want to have a loving husband and a bunch of kids. But it's not always a relationship...

This article contains: the most powerful prayer for divorce - information taken from all over the world, the electronic network and...

Information site about icons, prayers, Orthodox traditions. Prayer for scandals and quarrels in the family, with husband, with children...

What would New Year be without champagne, tangerines, Olivier, aspic and everyone’s favorite “Herring under a fur coat”. With the last one...
Let's prepare the necessary ingredients for the cookies. The first thing to do is put the water to boil. We need...

Is it possible to register an employee for the position of financial director - chief accountant? The chief accountant claims...
The head of a small business can easily manage the budget independently. CHECKED! If you manage...

The creation of new projects involves a preliminary economic justification for their feasibility, subsequent...
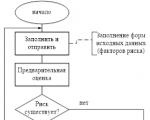
Reporting is generated by the RM, is agreed upon (approved) by the Risk Committee under the Management Board and transmitted to...

At the edge of a large, very large meadow, on a long emerald blade of grass lived a tiny Ladybug. God's little...

Nowadays, it is quite common for people to turn to the stars. With the help of a horoscope a person can find out...

Business or friendly. If you were pursuing a stranger, it means your level of trust in the female sex...
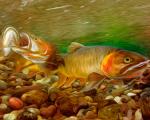
according to Freud's dream book If you dreamed about how you were fishing, it means that in real life you can hardly switch off...

Starting a family is the dream of most women. They want to have a loving husband and a bunch of kids. But it's not always...

This article contains: the most powerful prayer for divorce - information taken from all over the world, electronic...