What is possible and not possible during the Nativity Fast?
In 2018, the Nativity Fast will begin on November 28. During this period, Orthodox believers prepare to celebrate Christmas...
No one is immune from disease. The cat is no exception. She could get hurt, get into a fight, or have surgery. Animals in wildlife lick wounds for cleansing, but domestic cats are capable of surrendering to instinct with exaggerated zeal.
You need to apply the ointment, but the free-spirited furry personality persistently licks the medicine or tears the fixing bandage. The cat protests, actively expressing dissatisfaction and indignation... A protective Elizabethan collar, which received its second name for its resemblance to the lush trim of the dresses of the times of Queen Elizabeth I of England, can help in this case.
Protection is indispensable:
The collar prevents licking and scratching, facilitating healing. By limiting access to the head, paws and torso, it prevents additional injury to the cat during the recovery period.
The collar can be bought at a veterinary pharmacy, pet store, or made with your own hands from available materials (cardboard, plastic kitchen napkins and flower pots, buckets small size). It is important that the collar is reliable, safe and comfortable.
The stores offer three types of Elizabethan collars from different manufacturers: plastic, inflatable and soft.

Plastic It is a truncated cone with tapes for fixing on a collar or bandage holders. Some manufacturers separate modifications for cats and dogs. Cat guards are generally lighter and smaller in size.
Plastic collars may have processed soft cloth edges, which reduces wearing discomfort, and Velcro for fastening. The cone-shaped shape does not interfere with eating and allows sleep, so most animals get used to the need to wear protection for two to three days. For particularly capricious cats that refuse to eat or drink, the collar can be removed for a short time, giving the animal a short rest.
When purchasing, you must take into account that the opaque plastic blocks the cat’s side view, interfering with orientation in space. This unnerves the animal and causes even more stress.
Plastic collars are practical, easy to disinfect, cheap, but not very comfortable and make noise when in contact with furniture and the floor.

Inflatable collars are made in the form of a roller or a circle. They are easy to use, do not cause irritation or allergies, are easy to clean and do not interfere with your view. Such collars cause less inconvenience compared to plastic ones, but their cost is much higher and they have less wear resistance. Sharp cat claws can damage the surface, so you should give preference to models with an additional durable nylon cover. Inflatable collars, as a rule, are used for long-term treatment.

Soft cone-shaped collars are made of non-woven water-repellent materials. They are as comfortable as possible, non-allergenic, affordable, but least practical. Active cats crush even thick fabric and easily get to a wound or scratch.
Sizes range from very small (for kittens) to large (for large cats) and are selected individually depending on the structure and weight of the body. When choosing, you should focus on the circumference of the neck - the collar should not be too loose or tight. The optimal size is with a small gap in cervical spine, equal to the size of two fingers.
The pattern can be printed on a printer and then transferred to flexible plastic.
You can download pattern files (full size) for AutoCAD in (34 kB) or (20 kB) format

It is quite possible that you will be able to get the desired piece from a large plastic bottle with smooth walls. In this case, the printed pattern is placed under plastic and outlined with a felt-tip pen or marker. When using plastic bottle material, please pay attention Special attention on the edges and edges of our collar. They should not be sharp and should not scratch or injure the animal. To do this, the edges of the plastic can be covered with tape or adhesive tape. The original collar used white opaque plastic of greater thickness compared to the bottle one, which made it possible to dull the sharp edges.

Three radial strips are folded around the harness or collar and inserted into the slots. Then a harness or collar with a “collar” attached to it is put on the cat, and the last (long) strip is also folded and inserted into the slots.
During the reign of Queen Elizabeth, she introduced into fashion a ruffled and incredibly fluffy collar made of highly starched lace. This item of clothing caused nothing but inconvenience: the head rested on it like on a serving dish, and it was completely impossible to turn the neck. It’s good that it was unbecoming for the courtiers to move around; it was considered the height of indecency and bad manners.
It is not known what happened next with this invention of court tailors and fashion designers, but some savvy pet owner adapted to use a collar in order to limit the ability of their pets to lick and brush open wounds. His discovery very quickly became popular among the common people, and even survived to this day. Now it is often called the Elizabethan collar, since any animal dressed in such a device instantly looks like a pompous court nobleman.
In specialized stores the product is called less pompously - simply E-collar.

A dense cone, most often made of plastic, wraps around the animal’s neck and protects unhealed wounds or surgical sutures from licking and scratching.
This is especially true for a cat who has undergone castration: after using the toilet, he will definitely want to clean out all his painful places with his tongue, preventing them from prolonging as quickly as possible, or worse, provoking an infection.
The collar is also indispensable in a situation in which the pet urgently needs to treat the skin or coat against bacteria, fleas or skin mites.
For this purpose, fairly toxic sprays, creams, hormonal ointments and other products that should not enter the animal’s gastrointestinal tract.
There is no need to even doubt whether the cat needs this creepy collar after castration.

During this difficult period, when the pet is irritated, has suffered severe stress and demonstrates deliberate disobedience, the right remedy protection of the surgical suture is extremely necessary. It is important that the device does not rub anywhere, does not wrinkle, clasps the neck tightly and softly, and does not make breathing difficult.
It is worth noting that not every pet store or veterinary clinic will offer you the collar you need for a dog or cat. Usually the choice of such products is extremely limited, and involves only a few standard sizes and one material is hard plastic.
On top of everything else, there is the high cost of a useful accessory, which will not be used for long and infrequently. Again, the need for a collar can arise quite suddenly, when the shops are closed and there is not a single extra penny in your pocket. In such situations, it will be useful to know how to personally make a collar for domestic cat with your own hands.
This collar is for fluffy cat The female one is made with your own hands from soft materials, and therefore more closely resembles a bedding or pillow. It is soft, comfortable and pleasant to sleep on, cozy and light.
To create it you will have to work a little:

The only drawback of such an accessory is that it is unknown how long it will be able to withstand the cat’s demands, and how quickly it will crumble. Because of this, the cap fabric has to be replaced with the same plastic. The cheapest version of the rigid layer is purchased, on which a strip of fabric is applied on both sides. It is “sewn on” like this: holes are burned around the entire perimeter, and a thread and needle is pulled through them. Don’t forget about the holes for lacing; you definitely won’t be able to get by with Velcro.

Again, the cone is cut from a bottle, plastic bucket or seedling pot. Its design should include straps that wrap around the collar and form loops. There should also be a clasp, or better yet, a harness.
It will reduce the load on the neck and provide additional support to the head. Make sure that all cuts are smooth, even and rounded, which will eliminate chafing and inconvenience during use.
You need to sew harnesses from strips of soft but dense fabric, and then the edges of the collar will stop cutting into the animal’s neck.
Now the most interesting thing: how to put the resulting collar on the cat: the “steering wheel” is circled around the neck, the clasp is threaded through its slots, the harness ribbons are passed under the collar, folded, and passed through the slots again.
So, for the craft you will need cardboard box or a small container household appliances. For large and massive animals, it is better to use large box paper.
After you get the right material, proceed as follows:

Remember that no matter how long a cat needs to wear a collar after castration or another procedure, he needs to be given a break. Remove the accessory briefly, but do not leave the animal unattended. Sensing freedom, it will clearly rush to inspect and lick what is left after castration.
Making a protective Elizabethan collar for a cat with your own hands
When a veterinarian recommends barrier therapy, inexperienced owners they are horrified: “Forbid a freedom-loving cat from doing what she wants. Ban itching? Lick your fur coat? It’s not scary if you know how to make a collar for a cat so that your pet experiences a minimum of inconvenience and quickly gets used to the strange thing that covers its neck.
A dense cone around the head will protect stitches and healing wounds from the teeth of a mustachioed fidget, and will not allow the cat to scratch its ears or face. After the toilet, the cat always licks intimately: what will happen when the pet licks with the same tongue surgical suture or an unhealed wound? The Elizabethan collar is indispensable when there is a need to treat wool or skin with toxic agents - flea spray, hormonal creams, ointments for skin mites or bacteria.
The right collar for cats is, first of all, protection from self-harm for your pet during the recovery period, when even without a terrible thing there is a reason for stress, irritation and demonstrative disobedience. Therefore, it is extremely important that the collar is safe for the cat, reliable - does not come off, does not sag, comfortable - does not make breathing difficult, does not rub the neck. Unfortunately, finished products from pet stores (and in small towns this is a real problem) rarely meet all the requirements.
But making a collar, even for a cat with the character of a real queen, is not so difficult:
Option 1, for gentle predators

This veterinary collar is extremely comfortable – light, soft, even cozy. And it’s comfortable to sleep in – almost like on a pillow or bedding. The photo shows the finished model, but it’s easy to sew:
two main parts made of chintz, linen, cotton, etc.;
A layer of thick cap material is sewn inside, which holds its shape well. You can fold any fabric in several layers and stitch it with small diamonds to create a solid fabric;
the piping along the outer perimeter should also be tight, it helps the collar keep its shape;
Velcro along the entire width of the edge of the “steering wheel” is reliable and strong. To ensure that the cat does not remove the collar, you can replace the Velcro with lacing. The cone will fit securely around the neck if a wide, not too tight elastic band is sewn along the collar area.
This cone has a significant disadvantage - active cat It will crush even dense fabric and still get to the wound with its teeth. Therefore, the postoperative collar will have to be reinforced with a hard layer, replacing inner layer cloth with a piece of flexible plastic. If suitable plastic is not at hand, buy this collar:

This hellish horror costs a penny and is sold everywhere. Just cut off unnecessary straps, use scissors to adjust the length and width of the “steering wheel” and hide it under dense soft material. To sew the fabric to the plastic, make holes around the perimeter with a hot nail or awl. Don't forget the holes for lacing.
Option 2, for tolerant cats

Again, you can buy a ready-made plastic cone or cut it from a suitable piece of plastic (bottle, seedling pot, baby bucket, etc.). It is advisable that the plastic be transparent - limited visibility makes cats nervous.
Number 1 – straps that cover the collar, forming loops.
Number 3 – collar clasp. Instead of a collar, it is better to use a harness; it provides additional support and eases the load on the neck.
Number 2 is a sharp edge that rubs the skin and fur. To make the Elizabethan collar look royally comfortable, the four edges from strap to strap need to be hidden (the photo shows the collar unfolded).
We cut out strips from thick soft fabric, length from strap to strap, 2-3 cm wide. The strip of fabric should not cover the slot for the strap;
fold the strips lengthwise and iron them;
make holes in the edge of the collar;
Apply strips of fabric to the edge and sew.
This is what a cat looks like in a harness and collar, but only the edges of the cone will not cut into the neck. From the photo it is clear how to put a collar on a cat: we draw the “steering wheel” around the neck, thread the clasp through the slots, pass the ribbons under the collar, bend them and also pass them through the slots:

Option 3, quick fix
This option is suitable for emergency cases when there is no time to bother with sewing. It turns out to be frankly inconvenient and not very reliable, but until something more decent appears, it will definitely last. And such a collar can also be used as protection while processing leather and/or wool: use it and throw it away, no regrets.
You will need cardboard - a shoe box or packaging from small household appliances. Thick cardboard, from which large boxes are made, is suitable only large dogs. So:
draw and cut out a semicircle, with a margin;
carefully roll the cardboard into a tube so that the collar does not turn out too rigid;
try it on the cat, cut off the excess;
We cover the sections with tape in several layers. You can cut strips of fabric and glue them to tape so that the edges of the Velcro remain uncovered. Now we simply apply tape thickened with a strip of fabric to the cut and glue it;
if the collar is needed for protection during processing, you can immediately put it on the cat and secure it with the same tape. If your pet will wear the collar for several hours, make holes in the cardboard and lace the edges.

And even such a cat collar can be made more convenient with your own hands by attaching loops at the edge. They can be cut from thick paper or fabric, thin elastic plastic and any other material that can withstand pressure cat claws. The loops are simply attached with tape or lacing. Now you can thread a collar through the loops, which will not allow a persistent cat to remove the collar over its head.
Don’t forget that the collar needs to be removed from time to time so that your recovering pet can rest. Of course, you cannot leave a cat unattended. Many pets refuse to drink and eat while they are wearing a protective collar - in this case, the cone will have to be removed regularly so as not to disturb the usual regime of the mustachioed stubborn dog.
More information
Dogs, like people, also get sick, but unlike people, animals do not understand that they should not disturb a wound, comb problem areas of the skin, or lick postoperative stitches.
Therefore, to speed up the healing process of damaged areas of the body and prevent infection, animal owners have to resort to using a special protective collar for dogs.
A protective collar may be needed during eye and eye treatment. ear diseases, diseases skin, as well as for the period of healing of cropped ears, wounds from burns, during the period of false pregnancy, so that the bitch does not lick the nipples and does not stimulate the mammary glands, which leads to an increase in milk production, but this should not be allowed.
Classic option - Elizabethan collar, which in shape is frustum(shade). Made of flexible, transparent, non-obstructive, translucent or colored plastic. Plastic collars for dogs are easy to clean, low cost, perhaps these are the most important advantages. The disadvantages are that plastic models make noise when they come into contact with other objects, crack or break over time, and most dogs do not feel comfortable wearing them. Attached to a collar or harness using 3 or 4 plastic fastener strips. The circumference is adjustable using special fastener tabs.

There is another variety plastic collar, which represents plastic tube, closed in a circle, on top of which a protective removable cover is put on. It limits the mobility of the neck, thereby preventing the animal from reaching with its head to damaged areas on the body and licking them.
Exist soft cone collars for dogs, made of durable water-repellent non-woven material, non-toxic and non-toxic allergic reactions. Lightweight and flexible, they do not interfere with the free movement of the neck; the animal can eat, sleep and not experience discomfort. The advantages include increased wear resistance, because such models will not tear even when chewed by animals. In addition, after use, the soft collar can be compactly folded and stored away. However, not all soft models are suitable for big dogs which have strength, long limbs and can reach the head with their paw or the body with their tongue, crushing an unreliable barrier. Soft models are not suitable for dogs with long necks because they do not cover the head enough.

Another type of soft collar is also a cone, made of soft, water-repellent nylon fabric, but with a plastic insert inside that is about half the size of the cone. A plastic insert at the bottom of the cone adds rigidity, which prevents the animal from bending the barrier. For convenient and reliable fixation to the collar there are Velcro.
Inflatable collars for dogs there are different types and are classified according to the type of material from which they are made. All of them are shaped like an inflatable Lifebuoy. Flexible and soft material is used for manufacturing. There are transparent models and models with nylon removable covers. Inflatable barriers are easy to use, cause the least discomfort, do not obstruct vision, and at the same time perform a protective function by limiting neck mobility. However, they are less wear-resistant, since dogs can tear through the collar with their claws when trying to reach the head with their paw. But when using an inflatable model with a durable nylon cover, there are no problems with damage to the material. Effective when used for dogs with short limbs who are physically unable to reach the protective barrier with their paws.

Elastic protective neck corsets made from soft foam are no less effective than other types of collars. They are worn around the neck and secured with Velcro, preventing neck movement. Convenient in cases where there are injuries on the animal’s body, and not on the head.
The main thing is to choose the right size, as well as the model, depending on the breed and purpose of use (limiting the animal’s access to the body or head). The choice should be made according to the width of the protective field, which is most often 7.5, 10.5, 12, 15, 21.5, 25 cm. Among existing options You can easily choose the right collar for a dog of a specific breed and any age. An incorrectly selected barrier can obstruct vision, cause inconvenience when eating, sleeping, playing, and can also slide down to the shoulder blades, thereby not providing any protection.
The price of a protective collar for a dog depends on its size, type, and manufacturer. So, an ordinary Elizabethan collar costs from 90 rubles, the cost of other types varies between 200-1000 rubles. Soft collars are more expensive, for example the Procone model costs 840-1000 rubles, and the cost of the Procone elastic neck corset exceeds 1500 rubles.
If it is not possible to purchase a ready-made protective collar, you can make it yourself from available materials, but at the risk of causing the animal even more discomfort.

For dogs small breeds the collar can be based on X-ray, and for larger breeds - a plastic kitchen napkin, thick or corrugated cardboard. The workpiece is given the shape of a cone, and the edges of the lower and upper diameters should be wrapped in soft cloth (gauze), secured with tape, or covered with adhesive tape to avoid injury to the animal’s neck.
The bottom circle should be equal to the diameter of the fastened collar. The width of the collar is the length from the neck (where the collar is) to the tip of the nose and an additional 5 cm.
Some dog owners simply wrap a towel around their pet's neck, securing the edges with a bandage or tape to prevent the towel from falling apart. The towel acts as a neck brace, preventing the neck from turning.
Many dogs express their reluctance to wear something they don’t understand, which causes discomfort, by numerous attempts to pull off the collar. Therefore, if it is known in advance that the pet will barrier therapy, for example, after surgery, then the animal should be prepared before the operation.
To begin with, the collar should be placed next to the pet so that he can sniff it and understand that the item is safe. Then you should put the barrier on the animal for a short time and try to engage the dog in a game, give a treat, pet it or otherwise encourage it in order to evoke positive associations. Animals usually get used to wearing the barrier within a few days.

In 2018, the Nativity Fast will begin on November 28. During this period, Orthodox believers prepare to celebrate Christmas...

Starting a family is the dream of most women. They want to have a loving husband and a bunch of kids. But it's not always a relationship...

This article contains: the most powerful prayer for divorce - information taken from all over the world, the electronic network and...

Information site about icons, prayers, Orthodox traditions. Prayer for scandals and quarrels in the family, with husband, with children...

What would New Year be without champagne, tangerines, Olivier, aspic and everyone’s favorite “Herring under a fur coat”. With the last one...
Let's prepare the necessary ingredients for the cookies. The first thing to do is put the water to boil. We need...

Is it possible to register an employee for the position of financial director - chief accountant? The chief accountant claims...

The head of a small business can easily manage the budget independently. CHECKED! If you manage...

The creation of new projects involves a preliminary economic justification for their feasibility, subsequent...
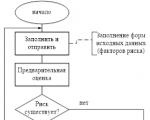
Reporting is generated by the RM, is agreed upon (approved) by the Risk Committee under the Management Board and transmitted to...

At the edge of a large, very large meadow, on a long emerald blade of grass lived a tiny Ladybug. God's little...

Nowadays, it is quite common for people to turn to the stars. With the help of a horoscope a person can find out...

Business or friendly. If you were pursuing a stranger, it means your level of trust in the female sex...

according to Freud's dream book If you dreamed about how you were fishing, it means that in real life you can hardly switch off...

Starting a family is the dream of most women. They want to have a loving husband and a bunch of kids. But it's not always...

This article contains: the most powerful prayer for divorce - information taken from all over the world, electronic...