Herring under a fur coat - a classic recipe
What would New Year be without champagne, tangerines, Olivier, aspic and everyone’s favorite “Herring under a fur coat”. With the last one...
Growing a rich harvest of apples is only half the battle. You need to keep it tasty for the winter, and without losing its beneficial properties and vitamins. Drying is perfect for this purpose. This method allows you to store apples for a long time. Dried apples can be cooked in a conventional oven.
For drying, you need to choose sour or sweet-sour varieties. Don't choose sweet apples. When cooking compote or other heat treatment, they lose some of their taste. If the apples have not yet fully ripened, they are unsuitable for drying. The most successful varieties are: Simerenko, Antonovka, Aport, Orleans, Renet. After soaking (3-5 minutes), air dry the apples. You can dry it with a napkin or towel. Then place on a baking sheet lined with parchment paper. Try to lay everything out in one layer. Place the baking sheet in a warm oven. No more than 70 degrees.
  Dry the apples for the first 2-3 hours at a temperature of 70 degrees. During this time, the pieces will dry out a little. Next, reduce the oven temperature to 50 degrees. Stir or turn the apples every two hours. This will help speed up the drying process.
  To determine readiness, fold the slice in half. It should be elastic and bend easily. The color of dried apples should be yellow-orange.
  It is better to store finished dried apples in a cool, dark room in paper bags or boxes. Clean, dry wooden boxes may work. If there are only a few apples, you can wrap them in parchment paper and store them in a dark place.

How to dry apples in the oven is, at first glance, a simple task. Cut it, place it in the oven and then take it out. But there are also little tricks. For preparations you need sour or sweet-sour varieties, only sweet ones are not suitable. Process the fruits in portions so that they do not oxidize. The optimal temperature for drying is up to 70 degrees.
Dried apples in the oven for the winter are the easiest way to provide your family with vitamins, since with this method the fruit retains all its beneficial properties. To avoid darkening during slicing, the slices should be dipped in a saline solution for 5 minutes. Place the pieces evenly on the baking sheet so that the liquid leaves faster.
Ingredients:
Preparation

It is much more convenient to dry apples in an electric oven, since it is more reliable in maintaining a stable fire. This device also retains more nutrients in fruits than a gas device. The core of the fruit does not need to be removed. Good varieties for drying are Simerenka, Orleans, Antonovka, Aport, and Ranet.
Ingredients:
Preparation

Drying apples in a gas stove oven is much healthier on a wire rack than on a baking sheet. The slices are processed more evenly, and the process will take less time. It is very important that in such fruits, which are not subject to heat treatment, vitamins are stored for up to 10 years, if properly preserved.
Ingredients:
Preparation

Drying apples in the oven at home is much easier and faster if there is convection. It is very important to choose the right fruits for harvesting; they should not be shaken off the tree, only picked, so as not to damage the pulp. All damaged areas must be removed during cleaning. The thinner the slice, the faster the apples will be ready.
Ingredients:
Preparation

Many housewives prepare fruits with spices; dried apples with cinnamon are very tasty. You can add a lemon flavor to it by placing the slices in a solution of citric acid: 1 teaspoon per 1 liter. Fresh lemon juice will add a brighter taste. The fruits are cut into slices or slices; the core and skin do not need to be removed.
Ingredients:
Preparation

Experienced housewives share advice on how to dry apples in syrup in the oven. It is better to use a special device to remove the core. This is a very tasty treat; its beautiful appearance depends on how you dry the apples in the oven. They must retain color and remain elastic. If they break, then you need to keep them in the oven for more.
Ingredients:
Preparation

A steel knife will also help protect apples from oxidation. It is recommended to prepare fruits in portions. A very healthy snack for the winter - these are the same dried apples in the oven. It is best to take fruits with dense pulp; the Gala variety is good. Citric acid will protect the fruit from darkening and add a slight sourness.
Ingredients:
Preparation

How long to dry depends on the stove. In a gas oven this can take up to 7 hours, in an electric one – up to 6. You can do without an oven and prepare an amazingly delicious drying in sugar or caramel. This is a great dessert for any party and an original treat for Apple Spas. You need apples that are firm and slightly sour; good varieties are Granny Smith, Ranetki Sokh, and Antonovka.
Ingredients:
Preparation

For variety, you can use dried apples. They taste like sweet and sour candies, it is something between dried fruit and fruit from five-minute jam at the beginning of its cooking. Suitable for filling pies. The optimal thickness of the pieces is 5-7 mm, you need to try to cut them so that they turn out the same.
Ingredients:
Preparation

At home it is very simple, the main requirements are dryness and darkness. You cannot keep supplies near heat sources; drying does not like polyethylene and plastic, because it deteriorates without access to oxygen. Cardboard boxes, baskets or wooden containers are suitable. Thick or waxed paper is placed on the bottom.
Important rules:
The fashion for healthy eating is becoming widespread, and this is good news. Surely both you and your friends are ready to replace some familiar, but not very healthy dishes with something easier. Even quick food becomes better: dried fruits instead of chips, nuts instead of sweets, yogurt instead of lemonade. As for the younger generation, it is much more difficult to persuade children, and especially teenagers, to do this. Their priorities, including food, are in a completely different coordinate system. But this doesn’t mean you can’t offer your child a healthy alternative to store-bought snacks. And although today dried fruits can be bought in any supermarket, we suggest you learn how to dry apples in the oven yourself.
Such preparations are well known to older housewives, while the younger generation prefers to save time and buy ready-made dried fruits. This makes sense if your life schedule is really very busy. Then the choice of an apple instead of a cake in itself is already commendable. For everyone else, it’s better to spend a little time in the kitchen and prepare dried apples yourself. This way you will be confident in the quality of the raw materials and the benefits of the finished product. Moreover, there is nothing complicated about it and the whole process takes place almost without your participation. Having properly prepared the raw materials, all you have to do is wait for the dried fruits to be ready.
If you have a choice, give preference to sour apple varieties. According to experienced housewives, they are easier to dry and ultimately turn out tastier. The structure of fibers of different varieties also plays a role. This does not mean that red sweet apples are not good for us! You can even mix several varieties, the main thing is to thoroughly wash all the apples and wipe dry with a towel. Remove the tails immediately.
Let's move on to cutting apples. It comes in at least two types and ultimately only affects the shape and appearance of fruit chips. So:
Step-by-step instructions for drying apples in the oven
Improved dried fruits
So, place the apples cut into slices or slices into the pan. There is no need for special care here, the main thing is that everyone fits. In a second saucepan, boil water with sugar, that is, prepare classic sugar syrup. Pour the hot syrup over the apples until the liquid covers them completely. There is no need to boil the fruit in syrup, just leave it until it cools completely.
This will take about a day, after which use a spoon to remove the dried fruit from the syrup and place evenly on a wire rack or baking sheet. The further process is no different from the previous basic recipe. In the same way, turn the apples over from time to time and monitor the temperature. After approximately 6 hours, monitor the readiness so as not to overcook and achieve the desired condition.
We really hope that after such detailed recommendations, your preparations will turn out great. Despite how easy they are to prepare, they really come in handy at home, when traveling, and just in the daily hustle and bustle. Dried apples store well and take up relatively little space. When planning drying, keep in mind that 10 kg of fresh fruit will yield about 1 kg of dried fruit. In this case, all minerals, pectins, fiber will remain in place - they will simply take a much more concentrated form. Apple chips are an excellent substitute for both popcorn and cookies - and they have incomparably more benefits. Don’t persuade your household - just next time, instead of sweets, put a plate of dried apples in front of the TV.
Apples are the most affordable fruits that can always provide vitamins. The beneficial qualities even when dried are preserved for 10 years. Contrary to the belief that dried fruits are only good in compote, they can be eaten raw or added to baked goods, salads, cereals, etc.
If you know how to dry apples, preparing them will not be difficult. For this, varieties that are not very juicy, with thin skin and a minimum of seeds inside are suitable: aport, white filling, Antonovka, pepin.
 Before drying apples at home, they are washed and prepared by removing moisture. Then the core is removed, damaged areas are cut out, and the peel is peeled. They are cut into slices with a thickness of 5 to 7 mm. The slices should be approximately the same size so that drying occurs evenly.
Cut apples oxidize, losing color very quickly. To prevent apple slices from darkening, there are protection options:
Tip: self-grown apples that are planned to be dried are picked from the tree on a dry, not very hot day. You can't shake the apple tree. When falling, the fruits receive damage, which, although unnoticeable, is still harmful. These are not suitable for storage. Sour and sweet and sour ripe fruits are selected.
If you have any doubts about how to properly dry apples, you should choose a convenient method for the conditions where it will take place.
Previously, apples had to be dried at home, especially in places with a humid, cold climate and little sunlight. And they did the same with fruits that were ripe in the fall. They were laid out on a Russian stove, lit for cooking, heated during the day and cooled slowly at night. In hot sunny climates it was easy to dry in the fresh air.
 The advantage of drying apples in the sun nowadays is that there is no need to waste paid energy. It’s good that large volumes of workpieces can be made this way. Dry in the open air, laying out the slices in one row, away from each other. Place them on nets, baking sheets, grates covered with cloth, protecting them from insects with a gauze cape on top. You can string it on a strong thread and hang it where the sun's rays reach the maximum. It is necessary to dry in a shaded place, if there is no moisture, the apples will dry well too, but it will take more time. Under no circumstances should the harvested raw materials be exposed to rain. This is a minus, because tracking is required, you need to remove it in time, then put it away again, etc.
If you can’t dry apples in an apartment, especially a city apartment, without a balcony, then kitchen appliances will come to the rescue.
 The fastest way is to dry apples in microwaves. Before drying in the microwave, a portion of apples (as many as can fit in one layer on a plate) is washed, cut, and freed from moisture. You can grate it into circles with a special grater, like chips. Cover the plate with a plain cloth and place the apples. With a power of 200⁰, it will be ready in 3 minutes. If not enough, add 30 seconds at a time. When ready, the color changes, the skin wrinkles, and stickiness appears. If the color was not preserved previously, now you can sprinkle with lemon juice to keep it creamy.
 To dry apples in the oven without getting burnt, there are little tricks. First, you should familiarize yourself with the differences in the cooking process with an electric and gas appliance:
| In an electric oven | In the oven of a gas stove |
|---|---|
| Preheat to 60⁰, gradually increasing to 80. | Turn on and heat to 220⁰. |
| Place the apples loosely on baking paper in one layer. | Line a baking sheet with parchment and lay out the slices. |
| Place the paper on baking sheets or oven racks. | Be sure to place it on the lowest tier. |
| Towards the end of cooking, reduce the temperature as necessary. | Dry for 60 minutes. on each side (120 minutes - to get a crispy dried treat like chips). |
| After 2 hours, turn the slices over. | |
| Dry for 6 hours (sour, hard - longer). |
Another important detail: the door of any type of oven must be left ajar to prevent moisture from accumulating. At the end of the process, dried apples must be cooled naturally.
 Electric drying of apples has its own rules:
There are various recommendations at what temperature to dry apples. If it is possible to immediately set the temperature regime in the electric dryer, then it is better to decide on 75 degrees. Of course, the temperature can be increased to +110⁰, but we must remember that the higher it is, the less beneficial properties dried fruits will retain. It is also important not to leave dried apples in the dryer with the lid closed. So they will grab moisture again and you will have to start all over again.
 Despite the fact that the drying process in an air fryer is very similar to using an electric dryer, it proceeds much faster - 60–90 minutes, which saves time. In addition, apples prepared in this way for the winter are better stored. They need to be grated to a thickness of 3 mm and placed on the grill of the device. At t +110⁰ with lower blowing mode, everything is usually ready for an hour. You need to check and make sure that there is no moisture left at all, otherwise the product will become moldy. The dried fruit feels like a raisin: if you squeeze it, it should not feel cool or damp.
 A small amount of apples can be dried in a slow cooker at a time or in portions over several uses. The advantages here are that she will do everything herself quite quickly and without much fuss. To do this, the apples are laid out loosely on the bottom of the bowl, in one layer. The baking mode is turned on for 1 hour. The readiness is checked and the slices are turned over to be sure. For another 10 minutes, the same mode is turned on for the other side.
Tip: it is better to dry in an open place on the southwest side, turning it over periodically. On the balcony they turn over up to three times a day. You don’t have to peel homemade apples; besides, summer varieties are recommended to be dried with the skin on, while store-bought fruits should be peeled. It is advisable to cut into slices, not circles, as this will dry faster. You need to prepare the fruits in parts, so they do not have time to oxidize. Ready-made dry apples can be ground with a coffee grinder into apple flour and added when baking.
How to dry apples is not a problem when you know that in almost any conditions it is possible to prepare them for future use.
Drying apples is an excellent way to preserve beneficial properties and vitamins in fruits, which has been known since ancient times. With the right approach to the process, apples do not lose their quality and are used as an independent product or an excellent addition to various dishes.
There are different ways to dry apples at home. Some people prefer to use proven “grandmother’s” methods of natural drying, others prefer the capabilities of modern and special equipment (electric dryers, convection ovens). However, the simplest and most common method is drying in the oven or on a baking sheet.
Regardless of which drying method you choose, in order for ripe fruits to retain maximum of their elements, taste properties and not be damaged during the cooking process, you need to select and prepare the apples correctly. First of all, find the right variety. Experienced housewives recommend using late varieties - Anis, Aport, Antonovka. They are distinguished by the fact that they have a characteristic sourish or sweet-sour taste, thin skin and the necessary structure, which is ideal for drying for the winter.
Other, sweeter, summer varieties can also be dried, however, most often, after processing in the oven or on a burner, slices of sweet varieties become almost tasteless, the sugar evaporates, and their taste properties are lost. Before drying, it is also important to inspect the apples: they must be ripe, whole, without rotten areas and with a good pulp structure that will not crumble when cutting them. If necessary, we remove damaged areas; sometimes they can be peeled (especially if it is too thick).
Next, the apples are thoroughly washed and sorted; it is better to use fruits of the same size and variety, in which case it will be much easier to monitor the uniformity of drying during the process. Some lovers blanch apples before drying them, but this takes away some of the beneficial properties, so we do not recommend it.
You can cut the fruits either into slices or circles, but it is important to remember that cut slices darken very quickly due to the high iron content in apples. To avoid darkening, we recommend dipping the slices into salt water (1 tablespoon per liter of water) or moistening them with citric acid.
Drying apples in the oven is a slow process and requires some patience and preparation. You can dry fruits either in an electric oven or on a gas stove, but the first option is still more preferable, especially if the stove is equipped with an additional convection function. In addition, some models of gas stoves do not have additional temperature adjustment, which makes it difficult to control the process of uniform heating.
Regardless of the type of oven, carry out drying in compliance with the following rules:

Too high a cooking temperature or too much heat will quickly turn the juicy slices into small, tasteless coals. After the cooking time has passed, check the readiness of the dried fruits. The slices should be elastic, not break when bent, not release moisture or juice, and they should retain their flavor.
The resulting storehouse of vitamins must be stored in a dry place, protected from light, in glass jars, the bottom of which is previously covered with paper. You can also use food grade paper bags or special linen bags.
Using a device such as an electric dryer, you can dry not only fruits, but also berries, mushrooms, and various herbs. A standard dryer is equipped with two trays (grids), on which apples pre-cut into slices or “donuts” are evenly laid out. It is very important to monitor the thickness of the slices; it is better that it is not more than 6 millimeters.
After the slices are laid out, turn on the device and select the optimal drying temperature. For modern devices, 50-60 degrees is recommended. If the slices are of a standard size, then it will take about 5-7 hours to prepare the finished dried fruits. After this, be sure to check the degree of readiness; if necessary (if juice is released or structural elasticity is lost), let the apple slices dry for some more time.
.jpg)
Many modern housewives use standard microwave ovens to prepare fruit for the winter as an alternative to ovens or electric dryers. It is difficult to judge how useful this method is; we only know that apples dried in the microwave lose some of their vitamins and do not always turn out the same as with the traditional drying method. However, the time for their preparation is reduced several times, and there is no additional need to use parchment paper for a baking sheet and constantly monitor the progress of the process.
Drying apples in the microwave is very easy. They must be peeled and cut into small slices. Then carefully place them in one layer on a special plate and microwave. Set the optimal power to 200-300 W and set the timer for 3-4 minutes. After the time has passed, the fruit must be removed and turned over by hand. Then set the time and power again, and you're done! We check readiness in the traditional way. 
If the microwave drying method does not suit you, and you do not have enough time to monitor the process when cooking in the oven, there are some useful tips on how to speed up the cooking time so that the fruits do not lose their properties. Wash the fruits well, then cut them into slices and put them in boiling water for a few minutes, then cook them for 10 minutes over low heat. Next, remove the slices and immediately cool them under running cold water. Once the apples have cooled, place them in the oven on a baking sheet or wire rack, following the above sequence. With this approach, the drying time will be reduced to approximately 3-4 hours.
Another method involves using steam. Keep the sliced fruit under the intense steam of boiling water using a special strainer or colander. Then also cool them with cold water and put them in the oven. This method is best suited when the fruit is cut into circles rather than slices.

And finally, we will describe several delicious and healthy “grandmother’s” recipes, where the main ingredient is dried apples. Wash a kilogram of juicy fruits, peel the center, cut them into neat circles and place them in a bowl or other container. At the same time, pour 200-300 grams of granulated sugar into a saucepan with water. Boil the water for a few minutes until the sugar turns into syrup and pour it into a bowl of fruit. Let it brew for several hours, and then send the resulting “rings” to dry. The end result will be very tasty and ready-made sugar circles, which will be an excellent dessert in the cold winter.
Dried apples can also be an excellent substitute for sweets, marmalade or regular jam. In addition to juicy fruits, you will also need cinnamon, citric acid and granulated sugar. Place the washed and cut slices on a baking sheet with parchment paper. Then, in a separate container, thoroughly mix the cinnamon, granulated sugar and citric acid. Sprinkle the resulting mixture evenly over the fruit slices and place them in the oven or dryer in a new form. After several hours of baking, remove the dessert from the oven and leave it to dry naturally for a couple of days. Then pack the slices into jars or bags, and your delicious winter treat is ready!

There are many other useful recipes, as well as all sorts of ways to dry such a wonderful and tasty fruit like an apple. But even without additional seasonings, apples dried naturally or traditionally are healthy, tasty and inexpensive!

What would New Year be without champagne, tangerines, Olivier, aspic and everyone’s favorite “Herring under a fur coat”. With the last one...
Let's prepare the necessary ingredients for the cookies. The first thing to do is put the water to boil. We need...

Is it possible to register an employee for the position of financial director - chief accountant? The chief accountant claims that yes, but...

The head of a small business can easily manage the budget independently. CHECKED! If you're budgeting...

The creation of new projects involves a preliminary economic justification for their feasibility, subsequent...

Reporting is generated by the RM, is agreed upon (approved) by the Risk Committee under the Management Board and transmitted to...

At the edge of a large, very large meadow, on a long emerald blade of grass lived a tiny Ladybug. God's little...

Nowadays, it is quite common for people to turn to the stars. With the help of a horoscope a person can find out...

Business or friendly. If you were pursuing a stranger, it means your level of trust in the female sex...

according to Freud's dream book If you dreamed about how you were fishing, it means that in real life you can hardly switch off...

The New Year's whirlwind will spin us around so quickly and rapidly that it's time to thoroughly think through the New Year's...
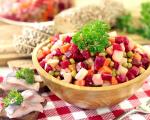
The article offers you some of the most delicious recipes for making vinaigrette. Vinaigrette is a delicious salad...

July 4th, 2015 , 08:33 pm Lately our Nastena has been completely giving up sweets (and thank God), but...
Fragrant, very tasty chocolate cake, it’s impossible to stop eating! The Negro’s Kiss cake is very easy to prepare,...
Let's prepare the necessary ingredients for the cookies. The first thing to do is put the water to boil. Us...

Is it possible to register an employee for the position of financial director - chief accountant? The chief accountant claims...