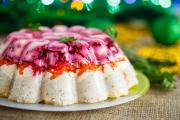
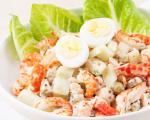
Herring under a fur coat - a classic recipe
What would New Year be without champagne, tangerines, Olivier, aspic and everyone’s favorite “Herring under a fur coat”. With the last one...
Bird feeders in winter help save birds from hunger. However, this is not the only reason why it is worth making them.
The beautiful and original feeders themselves can become a unique decoration for your garden.

And the process of their creation instills in the younger generation a sense of responsibility and care for weak creatures.

In addition, this is invaluable time, which allows parents to spend time with their children with interest and benefit.


There are several types of feeders that can be made from wood. Firstly, these are feeders that look like a base made of plywood or other similar material with sides around the edges that prevent treats for birds from falling apart.

Most often, such a structure is suspended from a tree branch on thick ropes.

But such a feeder has a number of disadvantages. The most obvious thing is that this design does not in any way protect the food poured into it from precipitation and bad weather. It is also quite light and can move or tip over in the wind.

The second version of wooden feeders looks more like a house and has a roof. In such feeders, the food is reliably protected from bad weather. The base of the structure looks the same as in the first version, only there are supports on it that support the roof.

The roof can be either straight or pitched. Any child can make a straight roof, because essentially it is a rectangular piece of plywood, only slightly larger than the base.

A pitched roof has a slightly more complex design, but it is better in that, unlike a straight roof, snow does not accumulate on it and does not have to be cleaned periodically.

There are also original versions of feeders made of wood. For example, a feeder can be made from ordinary logs. To do this you will need a chainsaw, a chisel and a hammer, as well as a chain and rings for hanging.

To begin with, you need to saw off two round pieces of wood on both sides of the future feeder. Then a wedge is cut along the entire log, and longitudinal and transverse cuts are made, not reaching the bark by about 5 centimeters.

This is necessary so that later it will be easier to remove the middle from the workpiece with a chisel. After all the work is done, the previously cut round pieces are nailed on both sides of the feeder.

All that remains is to screw in the rings and attach a chain on which you can hang the feeder.

Plastic bottles are also used as feeders to feed birds. These can be either 5-6 liter containers or small 1.5-2 liter bottles.

Most often, a plastic bottle is turned into a feeder by cutting out several windows in the body.

Then such feeders are hung horizontally or vertically, depending on the design. For the convenience of the birds, cross perches are installed near the bottom of the feeder.

But sometimes you can find quite original feeders that provide automatic addition of feed. These are the so-called bunker feeders.

Such a feeder can consist of two wooden spoons inserted at an angle into through holes in the bottle. Thus, food from the bottle will gradually pour out onto the spoon.

A bunker feeder can be made from a 2-liter bottle. To do this, just cut the bottle in half, make round holes in the bottom, and turn the top over and place the neck down. The top can be covered with a lid or a disposable plate. You won’t need to add food to this feeder for a long time.

The simplest feeder you can come up with is a garland of rowan, pine cone or berries. A treat for birds strung on a rope will decorate young trees in the garden. The only disadvantage of such a feeder is that as the food is eaten, the garland loses its appearance.

An interesting solution would be to make a feeder in the form of lumps of grain or seeds. Such decorations can be placed on benches, tables, or simply hung on trees in nets, in which tangerines are usually sold in stores.

They are based on fat or gelatin. The lard is melted and the main food is added to it. Then the finished substance is poured into molds (this can be baking molds or a regular balloon) and placed in a cold place to harden.

The same goes for dissolved gelatin mixed with grain.

If you have coconut shells lying around idle, then they can also be used to make a feeder.

As a result, such a design will be invisible on the tree. Juice or milk boxes are also suitable for making feeders. Their design itself will not differ much from simple feeders made from plastic bottles.


For birds, you need to have a few simple items and tools.
You can make a feeding trough with your children, but keep in mind that you need to watch every step, since during the construction process sharp things are used - scissors, knives, screwdrivers and even, sometimes, a saw.
There are many options for feeders - made from plywood, plastic bottles, tin cans or cardboard.
Here are the most interesting, popular and original ideas for creating a feeder:
You will need:
1 toilet paper roll
Peanut butter
Small bowl
Plate
A couple of branches
Strong thread or fishing line
Knife (dull or plastic).
1. Connect two branches or sticks together using hot glue or string. You can skip this point if you make 4 holes in the sleeve (see below).
2. Make holes in the toilet paper roll so that you can thread two branches or sticks through them. It is better to make 2 holes: a little higher and 2 slightly lower (see image). This item is not required, because The sleeve can be put on differently.

3. Place the peanut butter in a small bowl and use a plastic knife to spread the butter onto the surface of the cardboard toilet paper roll.

4. Sprinkle the food over the peanut butter sleeve.

5. Repeat steps 3 and 4 for 4 more bushings.
6. Tie a strong thread to the connected branches so that the structure can be hung.
7. Hang all the cardboard tubes on the branch structure, and then hang everything on the tree.

You will need:
Any plastic bottle
Ribbon, thread or fishing line
Awl or drill (for making holes in the bottle and plastic cap)
Bolt and nut
Stationery or simple knife (if necessary)
Deep plastic plate.

1. Prepare a plastic bottle. Remove the label from it, wash it well and dry it.
2. Make a hole in the middle of the lid and plastic plate.
3. Attach the lid to the plate using a bolt and nut.

4. Make a hole in the bottom of the bottle (bottom).
5. Make several holes on the side (4-5), near the neck of the bottle, so that the food can spill out when you turn the bottle over. Holes can be made with a stationery knife if the bottle is not too dense.

6. Take the ribbon, fold it in half, and tie the ends in a knot. Thread the ribbon through the hole at the bottom of the bottle.
Now you can pour food into the bottle, screw on the cap and turn it over. The ribbon will allow you to hang the feeder on a branch.


You will need:
Plastic bottle
Plastic container
Strong thread or fishing line
Screwdriver or nail
Knife (simple or stationery).
1. Remove the cap from the bottle and the cap from the container.
2. Place the bottle cap on the container cap (in the center) and trace with a pen, felt-tip pen or pencil.
3. Using a utility knife, cut a hole in the lid of the container. The hole can be made slightly smaller than the diameter of the bottle cap.

4. Make one hole along the edges of the container lid.
5. Make a hole in the center of the bottle cap. The hole should be large enough to allow bird food to spill out.
6. Place the cap on the bottle and then insert the bottle into the hole in the container cap.

7. Tie a strong thread to the bottle and put the cap on the container.
Now you can pour food into the bottle or pour water and hang the feeder on a tree.


You will need:
Polymer clay
Rope
Thick wire or piece of aluminum
Baking bowl or any other utensil that can be placed in the oven
A small piece of fabric.
1. First roll out the clay on a flat surface until it is about 6mm thick.
2. Carefully place the rolled out clay inside the baking bowl. Trim off any excess pieces so that the clay lies flat. Make 3 large holes in the clay for the rope.

3. Place the bowl of clay in the oven. Read the clay instructions carefully to know how long it takes for the clay to harden in the oven.
4. When the clay has hardened, carefully remove it from the bowl, tie three pieces of rope to it - tie a knot at one end of each rope, and insert the other end into the hole of the clay plate.
5. Tie all ends of the rope and secure them with wire.

6. It is advisable to place a small piece of fabric inside the plate so that the birds do not accidentally peck the clay along with the food.

You will need:
Small pumpkin
Wooden crossbars (even branches can be used)
Thin wire.
1. You need to cut off the top part of the pumpkin.

2. Using a knife or screwdriver, make 4 holes in the pumpkin to insert branches or wooden slats into. Make 2 opposite holes at the same height and two other opposite ones slightly lower - this way you will have one branch slightly higher than the other.

3. Take a thin wire and wrap it around each end of the branches so that the feeder can be hung on the tree. Connect all the ends of the wire so that the feeder can hang evenly. Twist them into a hook.

This feeder is suitable for sub-zero temperatures.

You will need:
Large plastic bottle
Small plastic bottle or small plastic container
Scissors
Coniferous branches
Berries (optional)
Seeds

1. Cut off the bottom of a large and small plastic bottle. First you can make a hole with a knife and then cut with scissors. You will have the base of the feeder.

2. Place spruce branches, berries and seeds in a circle in the cut-out bottom of a large bottle.
3. Place the bottom of a small bottle or small plastic container in the center of the base.

4. Pour earth, sand or pebbles into a small container.

5. Tie strong threads or fishing line to the feeder so it can be hung.
6. If you put the feeder in the freezer overnight, and then take out and remove the plastic parts, you will get an ice feeder.


You will need:
Small glass or plastic bottle (preferably with a cap)
Small saucer or bottom of a plastic bottle
Wire
Saw (if necessary)
Screw half ring (hook).

1. Using screws, connect two small pieces of plywood. In this example, the dimensions of the plywood are 11 x 15 cm and 31 x 15 cm.
2. Using the bottle that you will later attach to the stand, mark the places where you will need to attach two pieces of wire - one at the neck, the other at the bottom of the bottle.
3. The neck of the bottle should be approximately 3-4 cm above the base.
4. Drill holes for the wire, insert your wire through the bottom, wrap it around the bottle and secure it to the back of the plywood (you can twist the wire or secure it with a stapler).
5. Fill the bottle with seeds, screw the lid on so as not to spill the seeds, turn it over and insert the bottle between the wires, place a saucer under it and remove the lid.
6. Screw a half-ring screw into the top of the plywood to hang the feeder.

You will need:
Tin can (preferably with a lid)
Sisal rope (sisal rope) or thick rope
A piece of thin plywood, a branch, or any small metal piece
Hot glue.

1. If you have a jar with a lid, then the lid needs to be bent in half.
2. Take a small branch, piece of plywood, or other small piece that birds can perch on and glue it to the jar.
3. Insert the bent lid as shown in the image (slightly inside the jar and over the metal part) and secure it with glue.
4. Take a thick rope or rope about 80 cm long and start wrapping the can so that the long ends of this rope (30 cm) remain at the beginning and at the end. Use glue to secure the rope to the can.
5. Cut the rope, tie the ends in a knot and secure with glue.

You will need:
3/4 cup birdseed
1/4 cup water
1 packet of gelatin
Twine or strong thread
Cookie pans
Baking paper.
1. Mix gelatin with water (1/4 cup) and bring to a boil, stirring. Make sure the gelatin is completely dissolved.
2. Remove from heat and let cool.
3. Add 3/4 cup birdseed. You can add more if it fits.
4. Place the cookie cutters on baking paper and fill them with the resulting food mixture.

5. Cut a piece of thread and tie its ends into a knot. Partially insert the thread into the mixture.
6. Leave the mixture to dry overnight, trying to turn it periodically when you have time.
7. Remove the molds and hang the food on the tree.


You will need:
3 cans of paint or cans
A piece of branch or wooden stick
Hot glue
Paints (if desired).

You can paint the jars, or you can leave them as is.

1. Glue a piece of branch to a jar for the birds to land and eat.
2. Wrap strong thread or ribbon around the jar and tie the ends in a knot. You can secure the tape with glue so that it sticks better to the jar.
3. Fill the jars with food and you're done!

A DIY bird feeder is a great way to enjoy wildlife. If you live in an area where there are a lot of birds, a few well-placed bird feeders will allow you to get a pretty close look at the birds and enjoy their beauty. You don't necessarily need to buy an expensive feeder. You can easily make it yourself. In addition, feeders can be a lifesaver for birds. Winter is a difficult time for our feathered friends: under the thick snow it is difficult for them to find food. Most types of bird feeders are low cost and will take up very little of your time.
Bird feeders can be quite varied in design and choice of material. But a good feeder must meet several important requirements. The design must have:
 It is also important to choose the right food for the birds and an acceptable place for the feeder.
 Standard feeds for birds are:
You should not limit yourself only to wooden building materials. Feeders for birds can be made from various simple materials at hand. Most feeders do not require complex drawings or special skills. Basically, anything can make a great outdoor feeder.
A feeder made from a tetra bag (juice box) is a simple and cheap design that takes only 10 minutes to make. You will need two washed liter juice boxes, wire or twine, a utility knife and a stapler. The food in this feeder is reliably protected from wind and moisture, and the bright packaging attracts birds. However, there are also disadvantages: the presence of food in the container is not visible. 
 So, let's figure out how to make a feeder from a juice box. One box will serve as a container for food, the second is needed for the roof. Using a knife, cut a rectangular hole on the wide edge of one of the boxes. Let's move on to the second box: on two long and one short sides, draw a line exactly in the middle, along which we cut the box into two parts with a knife. The roof for the feeder is ready. Next, we connect the roof and the feed container using a stapler, wire or rope. Next, for hanging, we also make punctures in the upper part and insert twine or wire through them. The bird house is ready. Now you know how to make an original feeder out of cardboard.
Important! Don't forget to leave strips 6-8mm wide on the long side of the feed box. This is necessary so that the birds can cling comfortably with their paws.over the edges. To prevent water from accumulating in the feeder, be sure to make several holes on the inside of the bottom.

To empty plastic bottle got a second life, find out how to make a bird feeder out of it. A plastic bottle feeder is a spacious house where birds can freely enjoy food. It takes 15 minutes to make such a feeder. You can take a 1-2 liter bottle, but it is advisable to use a 5 liter bottle. Using scissors, carefully make large cutouts (exits) on each side of the bottle. The edges of the holes should be processed. Do not cut off the upper part of each exit all the way so that it can be folded at the top. This way you will have a canopy that protects the feeder from snow and rain.  Make two holes in the bottle cap for string or fishing line. That's the whole process of creating a feeder. This structure is the most common and simplest option for making a bird feeder with your own hands. However, such a feeder is quite light, and any movement of the wind can rock it, so it would be a good idea to put some kind of weight on its bottom.
You can even make a bird feeder from a tin can. The jars are easy to work with and little birds love them. You need to use containers from coffee, cocoa, lemonade or paint. It is worth involving children in the process of creating this version of the feeder. Children can then take this bird feeder to kindergarten to teach their friends the secrets of making it. The work is performed in the following sequence:

Important!You need a tin canhang strictlyin a horizontal position. That's whyIt is advisable to glue the cords to the cans with glue.And then try to make sure that the feeder hangs level.
Designs made from round pumpkins will make unusually original bird feeders for wild birds. Make a wide hole in the pumpkin, which will be the future entrance for the birds. Remove the inside of the fruit. Next, make special holes for hanging. You can use strong rope, wire or chain. All that remains is to choose the right place to place our unusual feeder. For example, a pumpkin can be hung from a tree branch. A bright pumpkin will serve as a magnificent garden decoration. This feeder looks elegant and unusual. 
A feeder “with a reserve” is a so-called bird “dining room” with automatic feed supply. Let's take a look at the features of this design, its advantages and possible disadvantages.
Another option for bird feeders made from plastic bottles are original compositions with spoons that you can make with your own hands. This design is not the most convenient option, but it is easy to construct. You will need a regular plastic bottle (1 L or 2 L) and a wooden spoon. It is necessary to cut slots on both sides of the bottle that can accommodate two wooden spoons. The holes must be parallel. The bottle is then filled with food to the very top. The grains are automatically poured into the spoon in small portions. This ensures a constant feed supply. The birds really like the resulting product. Feathered travelers can sit quite comfortably on a spoon. 
The bunker design is the most convenient, practical and efficient feeder in all respects. This design was borrowed from agriculture. As the bird eats the food, the next portion is automatically added from the hopper. This feeder will last for more than one winter. A homemade bunker feeder for birds can be created from completely different materials: from a cup and saucer, from a box, from the same plastic bottle, from boards, etc. Modern materials allow you to assemble a bunker feeder in just 5 minutes.
Did you know? One of the main advantages of a bunker feeder is that it helps solve the problem of “discrimination” of some bird species by others. Often a flock of the same species, e.g.tits orsparrows, takes an advantageous position in the feeder and tries to prevent other birds from getting to the grains. This is where homemade bunker feeders, also known as “anti-sparrow” feeders, can come in handy.
The bunker structure consists of two parts: a tray and a bunker. First, a drawing is prepared on which all the details are shown in detail. Dimensions of this bird feeder: 40 x 30 x 30 cm. All material must be carefully marked. The base is cut out of boards, the roof is made of plywood, and the racks (30 cm each) are made of 2 x 2 cm timber. The racks are attached to the bottom in a vertical position with a slight indentation inward. A roof made of a piece of plywood is mounted on top of the racks. Our bunker feeder is ready.
A classic wooden feeder is a beautiful and functional mini-house for feathered travelers. The version of the feeder presented below allows the feed to be supplied in portions to the bird’s “dining room”.
For construction you will need the following materials:
In warm weather, the birds will also be grateful to you for the opportunity to refresh themselves. And how many positive emotions you can get if you watch the birds when they flock to the feeder! You can give yourself the pleasure of enjoying the singing of birds, and at the same time take care of the little brothers and make your own bird feeder with your own hands.
Of course, you can spend a minimum of time, go to the store and choose the model of feeder you like. Now you can see on sale various devices for feeding birds made from natural materials - wood, plywood and even straw. You can find specimens made of plastic, plexiglass and even metal. All devices look almost the same and are made in the form of a stand with a roof - this option is considered traditional, it allows the birds to linger at the feeder and “do some chores”.
Round and oval models with holes are also very popular. Such a bird feeder is considered less convenient, but the grain will remain intact inside and will not get wet from snow and rain.

You can save money and make your own feeder. With the onset of cold weather, most of us wonder how to make a bird feeder? There are many different options, ranging from the simplest models that even a child can handle, to complex designs that require skills in working with carpentry tools. Let's look at several options for making bird feeders with your own hands.
Look at this image - such an unusual approach to feeding birds looks more original and decorates the view from the window. For birds, appearance is not so important - the main thing for them is that they have the opportunity to fly to a certain place and enjoy a treat. The main goal in making a feeder is to protect the feed from bad weather.

To make such a treat, you have to try.
What to prepare:
How to make a grain feeder:
Or you can make “glue” for grain using a different recipe - based on gelatin. You need to take a bag of instant gelatin, add water and pour the grain into the warm mixture. The result is a thick mass that can be placed in cookie molds (just insert a string first) or “stick” to the base, and then put in the refrigerator so that the delicacy hardens.

When you don’t have time to cut out the base and fuss with molds, you can fill an old cup with the mixture, wait for it to harden and then hang it on a tree branch by a string.

When making a feeder, you need to consider the following:
Having a lot of empty plastic bottles gives us opportunities to get creative. A good idea is to use a plastic water container to create a feeder.

How to make a simple feeder:

Another simple option for creating a bird feeder with your own hands from a plastic bottle with a capacity of 1.5-2 liters.
Making your own feeder:

Let's make a bottle feeder differently, using old wooden spoons - they will serve as a support for the birds. You can put large supplies of food in such a feeder, without fear that it will become saturated with moisture and become soggy.
Prepare the following materials:
How to make a bottle feeder:
You will get this cute feeder:

Every week we throw away a certain number of juice and milk boxes. They can be used to build an excellent bird feeder. The work will not take much time, and in the process of creating a feeder you will receive only positive emotions.
Before starting work, you must make sure that all items used for the feeder are dry and clean. Look for boxes in tan or green colors. The brighter the feeder, the more attractive it will be to birds.
It is necessary to cut a wide hole in the box with a sharp knife, pour food inside and attach it to a branch.

We suggest making a bird feeder from an ordinary cardboard box. You can take a box of any size - from a small shoe box to a more impressive size, for example, for small household appliances. It is advisable that the cardboard be thick and covered with a protective layer (laminated), this will extend the life of the bird feeder.
The most beautiful feeder will come from a bright box, for example, from a candy box. You need to prepare a box and two bright laces. Make holes for the strings and attach the feeder to the tree. It is advisable to also make a roof so that the food does not get wet. Pour grain into the tray.
You will get this simple feeder:

And from a large mailbox you can make this spacious feeder. It is advisable to additionally glue the roof with adhesive tape or wrap it in cellophane so that it does not get wet from rain and snow.

Inside the box, put not only grain, but also pieces of dry bread and lard - in severe frosts, birds need such a nutritious treat.
A bird feeder made of wood is considered the most reliable. This design made from natural material will last for decades, of course, if you take care of it properly. But first, let's select the material and make a bird feeder design. Traditionally, boards and plywood are used for wooden feeders. Since we have looked at simple models of devices for feeding birds, where you do not need to make a drawing, in this case, arm yourself with a ruler and a pencil and do not be lazy to make a drawing of a bird feeder. On a piece of paper, draw what kind of feeder you want to make and think through everything down to the smallest detail.

A bird feeder should consist of the following elements:
The dimensions of the device for feeding birds are 40 centimeters in length, 30 centimeters in width and height. It is necessary to prepare two identical elements - for the roof and base, and a rack for fastening. According to the drawing, make the most accurate markings so that in the future it will be easy to assemble the parts.
To work, you will need carpentry tools to cut out the necessary parts from wood and plywood. To prevent the feeder from being heavy, it is better to make it a combined one - the base is made of solid wood, and the remaining parts are made of thin timber and plywood.
How to make a wooden feeder:
You cannot open the feeder with varnish or paint it, as the strong chemical smell will scare away the birds.
The feeder should be installed away from windows and roadways. It is necessary to calculate the height so that the space near the feeder is free, and the birds can notice the approach of predators. The permissible height for placing the feeder is 1.5 meters; cats will not be able to offend birds, and children will not spill grain.

Only food that is suitable for birds should be poured into the feeder. To avoid harm, add some seeds (not fried), oats, millet, dry fruits and pieces of dry wheat bread. A fresh bun will harm the bird and it may even freeze.

Banana and citrus peels should not be used. It is undesirable to give rye bread, it can harm birds. You should also not treat birds with pastries and cakes with cream, nuts and chips.
For sparrows, prepare a grain mixture consisting of millet, millet and oats. But titmouses will happily enjoy a piece of unsalted lard. For bullfinches, add rowan and viburnum berries.
Take care of the birds and they will thank you with cheerful chirps!
Winter is approaching and our birds will need to survive it. Let's take care of them! Let's look at several options for making a feeder with your own hands.

You will need: hacksaw, hammer, nails, plywood, 2:2 cm bars, thin wooden board.


We present to your attention several options for drawings for making a bird feeder made of wood. You can create an ordinary feeder-dining room, a small castle, or just a house for birds. And if you are a jack of all trades, then you can decorate the feeder with wood carvings, creating beautiful patterns.


You will need: food (raw), egg, oatmeal, flour, honey, gelatin, thick cardboard, scissors, thick thread, pencil, needle, molds.


You will need: 2 candy boxes, glue, 2 laces.

You will need: box of juice or milk, scissors, string.


You will need: plastic bottle with a capacity of 5-6 liters, scissors, wire.
Making a bird feeder is great, but you need to know exactly what you can put in it.

You can feed the birds raw seeds, millet, oats, millet, buckwheat, crumbs of stale white buns, small pieces of dried fruit, rowan, viburnum.
You can't feed the birds crumbs of fresh white and rye bread, pastries, cakes, chips, salted and fried seeds, nuts and oatmeal.
Thanks to your care, the birds will survive during the winter. In turn, they will delight you in the spring with their songs. Birds are very important, as they not only please the eye, but also perform enormous sanitary and health work!
What would New Year be without champagne, tangerines, Olivier, aspic and everyone’s favorite “Herring under a fur coat”. With the last one...
Let's prepare the necessary ingredients for the cookies. The first thing to do is put the water to boil. We need...
Is it possible to register an employee for the position of financial director - chief accountant? The chief accountant claims that yes, but...
The head of a small business can easily manage the budget independently. CHECKED! If you're budgeting...
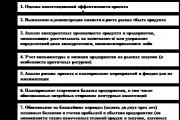
The creation of new projects involves a preliminary economic justification for their feasibility, subsequent...
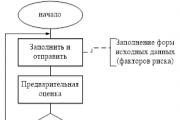
Reporting is generated by the RM, is agreed upon (approved) by the Risk Committee under the Management Board and transmitted to...
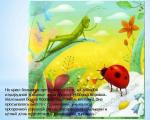
At the edge of a large, very large meadow, on a long emerald blade of grass lived a tiny Ladybug. God's little...

Nowadays, it is quite common for people to turn to the stars. With the help of a horoscope a person can find out...

Business or friendly. If you were pursuing a stranger, it means your level of trust in the female sex...
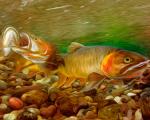
according to Freud's dream book If you dreamed about how you were fishing, it means that in real life you can hardly switch off...
The New Year's whirlwind will spin us around so quickly and rapidly that it's time to thoroughly think through the New Year's...
The article offers you some of the most delicious recipes for making vinaigrette. Vinaigrette is a delicious salad...
July 4th, 2015 , 08:33 pm Lately our Nastena has been completely giving up sweets (and thank God), but...
Fragrant, very tasty chocolate cake, it’s impossible to stop eating! The Negro’s Kiss cake is very easy to prepare,...
Let's prepare the necessary ingredients for the cookies. The first thing to do is put the water to boil. Us...

Is it possible to register an employee for the position of financial director - chief accountant? The chief accountant claims...