The most complete interpretation of sleep orange
Orange juice. The symbolic meaning of orange juice in dream books is pleasure and temptation. Quite often we...
If you don’t have time to visit the gym, but there is a need to strengthen the main muscle groups, tighten your stomach and correct your posture in a short time, then a simple plank exercise will effectively help with this.
The plank is included in the training system of bodybuilders, as well as the general physical training programs of many professional athletes, and is often used in yoga and fitness. And it’s no coincidence that this static exercise strengthens and tones all major muscle groups:
By performing the exercise regularly, you solve several problems at once:
This effect is achieved by extreme muscle tension to overcome gravity and balance the entire body to maintain a horizontal position.
Static exercises allow you to build muscle mass faster than dynamic exercises
Any type of plank is best performed at the end of a workout before stretching, when all muscles are already warmed up and prepared.
You should not hope that doing the plank itself will get rid of extra pounds and excess fat deposits. You can’t do this without proper nutrition and special training. But the plank can speed up the process of losing weight, since the body spends more energy on performing static exercises, which means that calories will be consumed more intensely. But static exercises help build muscle mass faster than dynamic exercises. The body becomes more sculpted, toned and looks slimmer.
Contraindications to this exercise are:
There are many varieties of planks. They are united by a common principle - the correct starting position: from the top of the head to the pelvis, the spine is straight, the neck continues the spine, being in line with it, and the chin is strictly perpendicular to the spine. You should not allow deflection (lordosis) in the spine to avoid injuring your lower back.
It is advisable to include the plank in training 3-4 times a week for 3-4 approaches. You need to start with 30 seconds, and then gradually increase the holding time to 2 minutes or more.
| First approach | 30 sec |
| Second approach | 1 minute |
| Third approach | 1 minute 30 seconds |
| Fourth approach | 2 minutes |
Out of habit, some find it difficult to withstand such time right away. In this case, hold the plank as long as you can. With each workout, the muscles will become stronger, and the task will no longer seem overwhelming.
| Day | Hold Time slats |
Day | Hold Time slats |
| First | 20 sec. | Sixteenth | 2 minutes. 40 sec. |
| Second | 25 sec. | Seventeenth | 2 minutes. 50 sec. |
| Third | 30 sec. | Eighteenth | 3 min. |
| Fourth | 35 sec. | Nineteenth | 3 min. 20 sec. |
| Fifth | 45 sec. | Twentieth | 3 min. 30 sec. |
| Sixth | 1 min. | Twenty first | 3 min. 35 sec. |
| Seventh | 1 min. 10 sec. | Twenty second | 3 min. 40 sec. |
| Eighth | 1 min. 20 sec. | Twenty third | 3 min. 50 sec. |
| Ninth | 1 min. 30 sec. | Twenty-fourth | 4 min. |
| Tenth | 1 min. 40 sec. | Twenty fifth | 4 min. 20 sec. |
| Eleventh | 1 min. 45 sec. | Twenty-sixth | 4 min. 25 sec. |
| Twelfth | 1 min. 50 sec. | Twenty seventh | 4 min. 30 sec. |
| Thirteenth | 2 minutes. | Twenty-eighth | 4 min. 40 sec. |
| Fourteenth | 2 minutes. 10 sec. | Twenty-ninth | 4 min. 50 sec. |
| Fifteenth | 2 minutes. 30 sec. | Thirtieth | 5 minutes. |
 If you follow all the recommendations, problems with the spine will not arise.
Secrets of the correct plank:
Typical mistakes that beginners make:
These errors apply not only to the classic plank - they occur when performing any of its varieties. The photo clearly shows the main mistakes in performing the exercise that should be avoided.
 In all cases, the main principle of the plank is not observed - there is no perfectly straight line of the neck, spine and legs
The main work falls on the muscles of the arms and abs. The principle of correct execution is still the same - a straight spine and a right angle between it and the chin, the gaze is directed to the floor.
 Legs and back form a single straight line
A perfect plank at arms length looks like this:
Stay in this position for as long as you can stand it. Don’t be afraid that in the last moments your muscles begin to tremble from overexertion. After completing the exercise, you can rest for a minute and try again. The second approach can be made a little more difficult by placing your feet together. In this position it will be more difficult to maintain balance. You can do the straight arm plank every day, or you can only do it on training days - it all depends on your goals.
Do you already easily cope with the classic plank and are able to withstand it for several minutes? Then it's time to complicate the exercise.
It helps strengthen the abdominal muscles, front thighs and buttocks. There are fewer supporting points, it becomes more and more difficult to balance, the abdominal muscles and the front surface of the thigh will have to work most intensely.
 You should move on to this exercise after mastering the classic plank.
The principle of performing the exercise is the same, only the arms will be extended, resting on the palms. The back muscles are involved in intensive work.
 The toe of the raised leg can be directed towards you, or it can be extended, the main thing is to maintain balance
You can learn how to do the plank correctly at home from a video from fitness expert Denis Semenikhin.
The option is even more complicated: it is difficult to balance a body that tends to fall on its side. The exercise forces the core muscles to work with increased load, and it can only be performed if you have thoroughly mastered all the previous options.
 Exercise for advanced athletes
The exercise is not for beginners. There are only two reference points, so it will be extremely difficult to maintain balance. The load on the body increases significantly.
This exercise is designed to:
 The muscles that bear the greatest load are highlighted in red.
Over time, you need to increase the plank hold to several minutes. Once you have mastered the side plank well, you can make it more difficult.
Option one:
 Exercise will help you get rid of fat folds on your sides
Option two:
It is for advanced athletes who have mastered the side plank with a dip in the body. The exercise is made more difficult by throwing the leg out. All muscle groups are involved here, the internal muscles of the legs and stabilizer muscles are intensively worked out.
If you have a fitball in your arsenal, then why not use it to diversify the plank?
Option one
 The emphasis on the elbows reduces the load on the joints
When the static plank on a fitball is well mastered and you are able to hold it for several minutes, you can complicate the exercise by adding dynamics to it.
Option two, it is also good for stretching:
The exercise is complicated by alternate turns of the body to the side.
Experienced athletes are able to hold the plank for up to 10 minutes. We can recommend a ten-minute complex for daily training:
Just one exercise - that’s all the universal exercise. But what! It will help you tone up all your muscles and lose excess weight!
Today I’ll tell you about one very effective exercise for the whole body. This exercise is called - plank
The plank is one of the most popular and effective abdominal exercises around the world. The plank forces not only the abdominal and shoulder muscles to work, but also the muscles of the whole body.
This is one of the few abdominal exercises that will allow you to get rid of lower belly fat.
The essence of charging
It consists of once a day “hovering” above the floor for several minutes, leaning only on your arms and toes. Undoubtedly, being “in limbo”, even for two minutes, is not an easy task. But the result will not keep you waiting. After just two weeks of regular exercise, you will notice how all the muscles in your body will tighten.
Classic plank
The plank is a static exercise. There are no movements in it, so the most important thing here is to hold the body correctly.
How to do:
Lie on the floor with your stomach down. Bend your elbows 90 degrees and go into a resting position lying on your elbows (see photo). The body should form a straight line from the top of the head to the heels of the feet.
Support yourself only on your forearms and toes. The elbows are directly under the shoulders.
Keep your body as straight as possible, tighten your abdominal muscles and do not relax. Try not to sag your hips down towards the floor.

1. Feet . Place them together: it will become more difficult to maintain balance, which will increase the load on the abdominal muscles.
2. Legs. They must be straight and tense, otherwise the load on the rectus abdominis muscle, which keeps the lumbar region from bending, will also decrease.
3. Buttocks
. Tighten up. And do not release the tension until the end of the approach. Contraction of the gluteal muscles increases  activation of all core muscles.
4. Lower back. The most difficult moment! When performing the plank correctly, the lumbar spine should be flat. That is, the lower back should neither be rounded nor bent. Imagine that your lower back is pressed tightly against the wall.
5. Belly. Retract, and then (already retracted) try to pull it towards the ribs. Throughout the entire approach, keep your stomach in this position, but do not hold your breath.
6. Elbows. To avoid putting unnecessary stress on your shoulders, place your elbows directly under your shoulder joints.
To increase the intensity, you can move your elbows slightly forward.
The exercises must be performed while exhaling, and hold until moderate tension in the muscles. Hold in this position for as long as possible: to start, just hold for 10 seconds. As a rule, people with different levels of fitness maintain the plank pose from 10 seconds to 2 minutes. Ideally, you need to keep your body in a stationary position for as long as possible - this way you will use the muscles to the maximum, but if you are a beginner, do not try to break the record: start with the smallest.

Advice: If you are doing the front plank exercise for the first time, first hold for 10 seconds, next time for 20 seconds, then 30 seconds and eventually up to 1 minute. A good result is 2 minutes, but if you do 3 sets, then hold out for 1 minute.
Try to gradually increase your training time.
If it is difficult for you to do the exercise, lean on your knees.

The muscles that work in this exercise are the abs, core muscles and buttocks. All you need to do is stand correctly and motionless on your elbows, and the muscles will contract, thereby pumping up your abs.
The muscles involved in the Planck exercise are:

But for this exercise to produce results, it must be performed correctly, otherwise the load will not be distributed correctly, and you will not feel any effect.
Detailed learning of the “Forearm Plank” exercise with Milena Poznyak: 
Plank exercise variations
The bar can be varied according to your “taste and color”. If just standing in one position for two minutes is boring for you, modify and experiment.
Straight arm plank
The basic plank pose has several features.

How to do:
standing, feet together or shoulder-width apart, the stomach is pressed against the spine, the buttocks are compressed, the tailbone is pulled forward (to avoid arching in the lower back).
As you exhale, begin to lower your body down, vertebra by vertebra, until your palms reach the floor. Then move your arms forward until your body is parallel to the floor. Place the bulk of your weight in your hands. Close your eyes and try to feel how your abdominal muscles support your entire body.
Important: Your wrists should be level under your shoulders, your elbows SLIGHTLY bent, your stomach pressed against your spine, and your buttocks squeezed throughout the exercise.
Side plank
What's the secret: This ab exercise is more effective than a traditional plank because you keep your entire body weight on two points of contact instead of four. You have to work harder to maintain your balance.

How to do:
A. Starting position: lying on your left side, place your elbow directly under your shoulder, legs straight. Place your right hand on your right thigh. Legs are straight.
IN. Tighten your abs and lift your pelvis off the floor until you form a diagonal, balancing on your forearm and feet. Don't forget, your body should form a straight line! Stay in this position for 30-45 seconds (or as long as possible). If you can’t stand it for that long, do the exercise again for a total of 30 seconds. Switch sides and repeat the same steps.
Working muscles:

Detailed learning of the “Side Plank” exercise with Milena Poznyak: 
Complications
To strengthen the muscles of the whole body, you will need only 1-2 minutes per approach. If you can’t stand it for two minutes, you can cheat a little and bend your knees.
If you can easily perform planks and side planks for two minutes or more, you can make your life a little more difficult by adding some elements to the exercises.
1.Plank with raised leg
Lift one leg up. This significantly increases the load on your core muscles. And you reduce the number of support points - which means that the body has to make additional efforts to stay in position.
What's the secret: By reducing the support area, the load on the abdominal muscles increases noticeably.

How to do: Stand on your elbows as if doing a regular plank. Pull your stomach in and flatten your lower back. Without changing the position of your body, lift one leg up just above your shoulders, keeping it straight. We pull the toes of the raised leg towards ourselves. Stay in this position as long as you can. Rest and then repeat with the other leg.
When to do it: you can stand in a regular plank for a minute - move on to this option. It is very important that the lower back does not sag. The abdominal and buttock muscles should be in constant tension, while the stomach should be pulled in, which ensures the correct position of the pelvis, tucking the tailbone inward and keeping the body parallel to the floor. If the technique breaks, stop, rest for a few minutes, and repeat.
2. Plank with raised arm
Raise one hand up. The situation is the same - you will have to apply some force to avoid falling on your side. And this is good.
What's the secret: A more difficult option - standing on one hand is even more difficult.

How to do:
Stand in a regular plank position, fixing your back and pulling in your stomach. Maintaining the position of your legs and body, extend one arm forward. Stay in this position for as long as you can.
Rest and then repeat with the other arm.
3. Side complicated plank
What's the secret: This is a completely different type of plank, but in our chain it is the most complex. Works the lateral core and thigh muscles

How to do : lie on your side with your legs together and straightened. They should be in a straight line with the body. Place your left forearm on the floor (elbow directly under the shoulder joint). Raise your right leg up, your left arm above you. Stay in this position as long as you can. Rest and repeat, turning to the other side.
When to do it: as an additional exercise to the regular plank or its more complicated variations.
4. Plank on a fitball
To make it more difficult, use a Swiss ball by resting your elbows on it or placing your feet on the ball.

What's the secret: With this multi-functional exercise, you can add some movement to a simple plank exercise while training your balance by working on a balance ball. The main trick to this exercise is to avoid pulling into your shoulders. If you feel that you cannot balance on the ball, lean it against a wall for greater stability and stability, or practice this exercise on the floor first.
How to do:
A. Starting position - on your knees, elbows resting on the ball. Roll the ball forward until your back is completely straight. Then, keeping your back straight, straighten your knees. Make sure that your ears do not press into your shoulders.
IN. Hold the resulting plank position for 1-2 seconds, lower your knees to lightly touch the floor before returning to the plank position.
Perform 1-3 sets of 8-16 repetitions.
Variant of the Plank exercise on a fitball
Place your feet on the ball so that the support is on your shins. The palms should be placed on the floor strictly below the shoulders and at their width.
From this position, stretch out in one line, without bending at the waist, and maintain your balance for a minute and a half. If you feel like you can do push-ups easily, do it.
Benefits of Planck Exercise
ELASTIC BUTTOCKS
This exercise is aimed at. This way you will not only give them the desired shape, but also get rid of cellulite.

STRONG BACK
During the exercise, the lower back muscles are trained, as well as the shoulders and cervical region. So this exercise can serve as a prevention of osteochondrosis in the neck and lower back. In addition, you will get rid of pain in the shoulders and between the shoulder blades, which occurs due to carrying heavy bags or constantly sitting at a desk.

The muscles will become stronger, the shape of the shoulders will improve - any open T-shirt will look great.
SLUSH LEGS
The main focus of the exercise is on the legs. Everyone is involved. Don't be afraid if you feel a burning sensation in your muscles - this means that the muscles are working.

As a result, you can wear even the tightest skirt.
SLIM STOMACH
When the whole body is tense, automatically, both lower and lateral.

To work your abs even better, pull your stomach in a little, and then tighten and hold it until the end of the workout. But try not to lose your breath.
TIGHT ARMS
It is quite obvious that, along with the legs in this exercise, they account for half of the body weight.

At the same time, both biceps and triceps are pumped. Result: you have strong, but at the same time thin arms.
BY THE WAY
At first, your legs will shake during the exercise. Don't be scared! Having become stronger, the muscles will begin to “shake” less.
The plank is an exercise for losing weight and working out muscles that came to us from CrossFit. All over the world, fitness enthusiasts have already mastered the technique of doing it, but in our country they started doing the plank relatively recently. This is one of the best exercises for maintaining tone and strengthening muscles. It increases strength, endurance, and improves posture. However, most women are interested in the question, is it possible to lose weight with the help of a plank? The answer is yes. After all, it has the maximum effect on the main muscle groups, makes them work and experience tiring loads. The plank exercise for losing weight on the abdomen and sides, arms and legs, is part of the daily training for most athletes of all levels of training. Today we will tell you how to do planks to lose weight.
The plank is a universal static exercise, which is an ideal exercise option for people who do not have the opportunity to regularly visit the gym. The advantages of the plank exercise for losing weight and maintaining your figure include the fact that it does not take much time.
The benefit of the plank element for body shaping is that all muscles are tightened. The gluteal muscles work well, they become elastic and strengthened. Improve the exercise, lift your legs one at a time, this will help you get rid of cellulite on your buttocks.
If you hold the bar every day, the benefits for your figure will be invaluable. The legs will become slimmer, as the leg muscles are fully involved - from the hips to the calves. Reviews of the plank exercise for losing weight in your legs indicate that after just a month your legs become much slimmer and more attractive.
Doing planks for weight loss has the greatest effect on the abdominal area. Excess fat is removed from the lower abdomen, and the waistline is also reduced. After all, when performing, both the lateral and lower abdominal muscles are tensed. We recommend pulling your stomach in during exercise for best results.
The muscles of the shoulders, cervical, and spine work, which is an excellent prevention of osteochondrosis. Doctors often recommend planking for people suffering from pain between the shoulder blades. In addition, the appearance of the arms improves, they remain thin, but the sagging goes away.
.jpg)
Let's move on to the question of how to properly do the plank exercise to lose weight. First, let's look at the classic version of this element. The main task is to take a standing position while lying on a hard surface. A special yoga mat is ideal. The main points of support are elbows and toes.
To take the starting position, lean on your forearms, your elbows should be strictly under your shoulders. The shoulders should not be pressed against the ears, and the head should be in line with the spine. Look straight down at your fists.
.jpg)
If you feel strength in your muscles, your body has long been accustomed to grueling training, and a couple of tens of kilometers is not a detour for you, even in this case you need to “approach” the bar carefully. Do not try to stay in this static pose for a long time at once; you need to start with 15 seconds per approach. It only seems that the exercise is very easy to perform; at first, even two dozen seconds may seem like a real test, during which the body will experience considerable stress. The duration of the exercise should be increased gradually and very slowly, and only after a few weeks you can and should reach 5 minutes a day. For complete beginners in fitness and regular training, it is sometimes difficult to stand in the plank for the first 7 seconds. Considering that you need to perform the exercise not anyhow, but following important rules:
At first it seems that the plank exercise for losing weight on the thighs, arms and abdomen is very easy. However, within 20-30 seconds after the start of the workout, you will notice that your body is trembling from overexertion.

As soon as you can easily stand in the figure plank for 1-2 minutes, you can move on to complicating the exercise. There are many varieties of plank exercise, you can choose which type of element to perform, depending on your goals.
The side plank is ideal for burning belly fat.

If you want to work your entire posterior chain, choose an inverted plank.

The plank exercise for legs and buttocks is best performed with a raised leg.


For starters, 10-20 seconds 2-3 times a day is enough. If your physical fitness allows, stand in the plank longer. Gradually increase the time you perform the exercise to 5 minutes or more, this will make your muscles stronger and more resilient.
Remember, it is important to exercise daily. Do not chase the maximum time for completing the weight loss plank. Pay close attention to technique and correct body position.
After just a month of training, you will notice the first positive changes in your body from the plank exercise for weight loss. It is not for nothing that reviews claim that this is the best exercise in terms of results and time.

Now we will look at a set of plank exercises for weight loss, which, first of all, is suitable for beginners. At this stage, we ensure that the total time spent in the plank approaches 5 minutes.
At first it will be difficult to hold the plank, but by practicing regularly, you will feel strength in your muscles, which will gradually allow you to calmly perform the exercise for 5 minutes.
You need to start with the simplest - the classic version. You can gradually complicate your workouts by performing more “advanced” exercises: doing a side plank, leg raises, using weights, etc.
A set of plank exercises for weight loss should be performed with progress - this can be a complication of the element or an increase in time for the selected type.
Before performing the exercise, it is advisable to do a short warm-up to warm up and prepare the muscles. After training, it is recommended to do several stretching elements.
After you have achieved the first results and can hold the bar for more than 10 minutes, you can move on to a more complex program. A circuit training session is carried out for 10 minutes, during which you need to constantly move from one type of plank to another. You need to change your body position every 10 seconds - this way different muscle groups are worked out, and the body is trained in several planes. We do the front plank, after 10 seconds we move to the side plank, after another 10 seconds back to the front plank. Every 10 seconds we modify the element: add movement of the arms or legs, alternate the bar on the elbows and on outstretched arms.
The plank exercise is most effective for losing belly fat if we alternate different types of element. In this case, approaches should be done with minimal rest. The best way to reduce the volume of your tummy is to use a forearm strap.
But those who strive for a thin waist should focus on the side plank, performed with body bends. As you inhale, raise your free hand up, as you exhale, slowly turn your body, and lower your hand. As you inhale, take the starting position. You need to do 13 repetitions for each side.
Any exercise must begin with a classic plank. And after each approach you need to take a short rest, preferably in the fetal position, moving your arms back. This way the muscles relax and stretch.
Here is an example program:
Follow the plank to lose weight. Avoid the common mistakes described above, they lead to muscle strain and injury.
The weight loss benefits of doing the plank exercise are obvious: women never tire of boasting about their results. Especially if you combine training with proper nutrition. But this set of activities also has contraindications:
If you feel unwell while performing an element, stop the workout immediately. It is advisable not to return to classes until consulting a doctor.
We carefully studied reviews about the plan for losing weight on legs, belly and arms. Most people note a positive result, an improvement in their figure after regular exercise. Photos before and after performing the plank exercise for weight loss, which many women willingly publish, confirm this fact.

At the same time, people who have tried to keep the bar for losing weight are traditionally divided into two camps. Some boast of excellent results of several kilograms in a month, others claim that training did not help them lose weight. Most who regularly perform the exercise notice: it helps keep muscles toned, strengthens the body and gives strength. But, in their opinion, it is impossible to tighten the body only thanks to the bar. It “works” only in combination with other exercises and proper nutrition.
Some, on the contrary, talk about excellent results. They managed to lose 5-8 kilograms in a couple of months and get rid of fat folds on their backs. The main thing is to maintain regularity in training and gradually increase the time you perform the exercise. When you manage to hold the plank for more than five minutes, you can complicate the elements.
The plank is one of the most effective abdominal exercises. You can do it at home or in the gym. To do this, you need to know how to make a bar correctly, why it is needed and what it is. What types of planks are there?
The plank is an exercise that works every muscle using your weight. It helps both warm up the body before training and train after. After just 40 seconds, the human body begins to tremble and everyone understands where the load went.
Every muscle on the body is in a very difficult position, which is why weight loss occurs on the sides and abdomen. Although from the outside it may seem simple, those who have stood the bar understand perfectly well the complexity of the correct execution technique. The bar is needed for elasticity of the whole body, training the buttocks, abdomen, strengthening the spine, bones and ligaments. This option is ideal for those people who came to the hall for the first time.

Photo instructions which muscles work
The universal training program for the plank is 30 days. After regular training, the result is unreal. If desired, you can then add stress by adding weight to your back. Reviews of the exercise show that doing a plank becomes easier only after a month, so it is important to gradually increase the load.
The plank exercise is gaining immense popularity among modern gyms. Trainers have become more competent and already know that it is difficult to strengthen the stomach using simple methods. The effectiveness of training will only be if you honestly follow the entire program. So let's move on to the basic rules:

Photo instructions - how to do the plank correctly
These were the basic recommendations for the plank. The athlete must stand in this position for more than a minute. An unacceptable mistake of many beginners is the adventurism of standing for as long as possible. But they don't follow the technique. Of course, it is better to stand excellently for 25 seconds than to stand poorly for 45. First, we recommend asking your coach for help. Now every gym is filled with competent trainers. Of course, many people do it themselves at home. This is also a suitable option, but only if a person gradually increases the load. It is necessary to understand what position the body is in
What a beginner needs to do at home or in the gym:
The plank has four options for practicing. It all depends on the initial physical form. To lose weight, it is advisable to start from the initial stage to prepare the body. If you follow the program, you can lose weight from the sides and abdomen. Exercises will help you create a beautiful abdominal figure and improve your back health. It suits both sexes equally.
This variation is considered the easiest and is perfect for debutants. The hands should be located above the shoulders. Breathing without delay in an even range. The first level includes a month of classes. After this option is simple, you can move on to the second.

On clasped hands – level 1
This handstand can be seen in every gym. She is the most famous among sports instructors. Stand on your toes and elbows, after putting on comfortable sneakers. The body should have a straight stance without bending.

Elbow stand plank – level 2
The third type of plank is suitable only if with the previous two options you do not have any fatigue during tension. Please note that you cannot do a side plank right away. Lie on your side and support yourself on your elbow and leg. The hand that touched the floor should be parallel to the body, tighten your abdominal muscles.

Side plank – level 3
A very difficult option. Here you need months of body preparation. Take the starting position with your body straight. Lean on your elbow and then slowly straighten your arm. If this option has become easy, then complicate the exercise for yourself. Place your other hand straight.

Lateral on one straight arm – level 4
The duration directly depends on your capabilities. Forces must be assessed without fanaticism. Beginners need to stand for 20 to 30 seconds for 3 sets. After that, half a minute will pass without suffering, add another five seconds. If necessary, add 1 minute for 3-4 approaches. Having completed all types, alternate from the first level to the fourth and back. Such training requires a long preparation.
In addition to getting your body in shape, you can achieve results in losing weight. It has already been mentioned that the plank effectively affects the muscles of the legs (hips), back, abs, arms, legs and buttocks. For diseases of osteochondrosis, this is an excellent remedy for prevention. Strengthen your posture through regular back training.
For women, the load goes to the hips, and for them this is a problem area. Cellulite is always deposited there. Also, the modern pace of life is too busy for some people. Not everyone has time to go to the gym, so doing the plank at home is a great way to quickly get yourself in shape. Exercise for five minutes a day and stick to a weight loss diet. Below you can see the training program for the plank for 30 days.

Plank training program for 30 days
We won’t write about unhealthy foods, hamburgers, or sweets. Everyone knows that without a balanced diet, removing orange peel is problematic. General weight loss recommendations for planks:
Simple rules along with exercise will help you lose weight. Five minutes a day to exercise is easy.
The benefits after exercise are too many. There are a huge number of photos of celebrities who got a flat stomach thanks to planks. They can be viewed on the Internet or in magazines. It is not surprising that every novice athlete starts with this exercise. We recommend taking a photo before training so that you can compare the final result thirty days later.
In addition to the ideal appearance, the benefits of the bar for internal organs should be highlighted. Following the rules will help strengthen your back muscles without harm. This way you will have a powerful corset at the back and front.
Often, if you want to lose weight quickly, some people are not interested in the harm of the plank. Now, of course, everyone is aware that exercise can give unrealistic results. You can approach the trainer and ask about contraindications for planking. But, unfortunately, this is only done by people who are concerned about their health.
True, there are not many of them, but they are:
If there are no contraindications, then it is allowed to improve your body in a short time.
A healthy, fit guy is simply obliged to withstand two circles of the second hand.
But it’s unlikely that you turned out to be cooler than the Dane Tom Hall, who in 2015 stood in this position for 4 hours and 28 minutes! This was already the second record for the 52-year-old man, the year before he stood in the plank for 3 hours and 8 minutes. He was beaten by Chinese policeman Mao Weidong, who was frozen in a static state for 4 hours and 26 minutes in 2014.
But there is a more serious record: a little more than a year ago, at 10:26 in the morning, in the Beijing Shangri-La Hotel, the same Mao Weidong fought with former US special agent George Hood in this, perhaps, the most immobile sport. The men tensed and did not relax for more than half a day: Hood gave up after 7 hours 40 minutes, and Mr. Weidong stopped leaning on his elbows at 18:27, setting the current absolute world record - 8 hours 1 minute!
if you cannot hold the plank for 120 seconds, it means you are: A - overweight; B - weak muscles; B - incorrect training system
Does this compare in any way with our three approaches, say, 2 minutes each? Well-known physical therapist from the USA Bill Hartman advises to “hold on” for 3 minutes, but, according to him, this is an approximate time, an average indicator of the health of the core muscles. Dan John, fitness expert at Men's Health, says that if you can't hold a plank for 120 seconds, you have:
A - overweight; B - weak muscles; B - incorrect training system. A healthy, fit guy is simply obliged to withstand two circles of the second hand. “Whether to stand more is up to you,” he adds, “it’s just an exercise, and longer doesn’t mean better.”
Tom Hall is a professional trainer and owner of a fitness center in the Danish town of Frederiksund. To compete with chain gyms, one day he decided to show how much better he was than other trainers. To do this, he did not lift weights, run long distances or test himself for survival - all he needed was the floor and his own body.
In 2014, he started with 8 minutes of static exercises lying on his elbows, adding 5 minutes per week. A year later, he was already holding on for three hours. “I chose the plank because over the years the exercise has been gaining monstrous popularity, but you shouldn’t think that such training will benefit everyone,” he says, “in group training we never exceed the time of 3 minutes, and that’s enough.”
Hall is a professional athlete, Danish champion in sports aerobics in 1997. He is confident that it was his athletic background that helped him break the world record, however, Hall notes: “The main obstacle is in your head. If you can convince yourself that you are capable of more, you will get what you want, and this strategy works not only in sports.”
A study conducted in the Journal of Strength and Conditioning led Canadian scientists to the conclusion that several short sets are more effective than long planks. University of Waterloo professor Dr Stuart McGill believes core endurance is much more important than core strength because its main purpose is to keep your back straight, but he doesn't think it's right to set records in one exercise.
“If you want to set a record in the plank, you can try, but there is no benefit to the health of the body,” he says. Moreover, the discovery of Canadian scientists is that micro approaches of 10 seconds work on endurance much more effectively. During the experiment, two groups of subjects performed exercises on the core muscles. The first team held the bar for 10 seconds - first 5 approaches, then 4, and so on until one. The second one did crunches and other dynamic exercises. After 6 weeks of training, those who held the bar according to this scheme strengthened their torso muscles significantly more.
The plank is a static exercise. There are no movements in it, so the most important thing here is to hold the body correctly (and for as long as possible).

Put them together: it will become more difficult to maintain balance, which will increase the load on the abdominal muscles.
They must be straight and tense, otherwise the load on the rectus abdominis muscle, which keeps the lumbar region from bending, will also decrease.
Tighten up. And don’t let go of tension until the end of the approach. Contracting the glutes increases activation of all core muscles.
The most difficult moment! When performing the plank correctly, the lumbar spine should be flat. That is, the lower back should neither be rounded nor bent. Imagine that your lower back is pressed tightly against the wall.
Pull it in, and then (already pulled in) try to pull it towards the ribs. Throughout the entire approach, keep your stomach in this position, but do not hold your breath.
To avoid creating unnecessary stress on your shoulders, place your elbows strictly under your shoulder joints.

Orange juice. The symbolic meaning of orange juice in dream books is pleasure and temptation. Quite often we...

We most often overcome all kinds of difficulties encountered along the path of life. Of course, for this we make...

This year your patron Neptune will be in your constellation and this is a good sign, because you will feel...

1993 who? 1993 is the year of which animal? — According to the Chinese horoscope, 1873, 1933, 1993 belonged to the years of the Black Water...

Wave-particle duality of light means that light simultaneously has the properties of continuous electromagnetic...
The role of biology is enormous in our world. Although it is not a priority subject, most students and parents...

Amines are organic derivatives of ammonia containing an NH 2 amino group and an organic radical. In general...
How to answer questions in Part BThe second part of the social studies work consists of 7 tasks with a short answer....
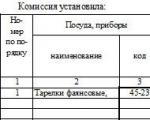
Form TORG-15 is drawn up in the case when during transportation, movement between and within the warehouse, when...

Nutritionists say that for good health and a slim figure, you must include snacks in your...

Delicious pickled carrots for the winter can be prepared in a variety of containers, it can be a wooden...

When I have a few minutes left to prepare breakfast, the simplest and fastest recipes are used....

An elegant table, a decorated Christmas tree, tangerine spirit spilled throughout all the rooms, soon the most magical holiday -...

Each of us has repeatedly faced financial difficulties and difficult periods in life when Fortune...

We most often overcome all kinds of difficulties encountered along the path of life. Of course, for this we...

This year your patron Neptune will be in your constellation and this is a good sign, because you will...