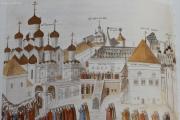
Annunciation Cathedral of the Moscow Kremlin
One of the oldest churches in the Moscow Kremlin stands on the edge of Cathedral Square on the edge of Borovitsky Hill. Many centuries...
We have another master class from Ksenia Emelyanova. Now there are 3 master classes from this author. The rest can be found by the tag with her name.
Dear friends, I am glad to present you my new master class!
Today I will show you how to sculpt a bunny :)
From such a bunny you can make earrings (I once made these, only with different eyes), a pendant, a keychain, a magnet, decorate a mug with it or hang it on a Christmas tree...
The uses of polymer clay are so diverse these days!
But most importantly, I want to show you the principle of sculpting, after which you can make your own bunnies by changing the proportions and the position of the paws and ears! Let's get started.
For sculpting we will need:
Let's start sculpting!
To begin with, take plastic of white and black colors (more white and very little black) to get a light gray color, and mix them thoroughly until smooth. Roll out into a layer 3 mm thick using a pasta machine, rolling pin or other improvised means. I roll out with a regular breadboard knife. I make a similar base so that the product is “solid”, so it will be stronger. You can additionally make a wire frame for the bunny, but it is not necessary.
Using a breadboard knife, carefully cut out the bunny's silhouette. At this stage, it is not important that it is symmetrical, because everything can be corrected during the sculpting process. But if you have difficulty determining symmetry, pay attention to this now.
Using base-color plastic, we lay out the volume for our bunny: on the head, body and ears.
A good tool does not mean cool and expensive. One of my favorites is a simple nail stick. But it is great for smoothing joints. This is what we will do now!
Using a round stack, we mark out places for the eyes.
We collect the volume of white color in the bunny. Insert egg whites into the recesses that match the size of the holes.
We put small cakes on the cheeks and smooth them.
From the base gray we form “hemispherical pads” onto the mouth and place a nose on top.
We roll a small oval out of white plastic and make a lower jaw.
Roll a thin sausage to create an outline for the eyes.
Bake the finished product according to the instructions on the packaging of your plastic. When the product has cooled completely, cover the eyes and nose with varnish. And our bunny is absolutely ready :)
Thanks to everyone who finished reading the master class! I will be happy to answer any questions you may have in the comments. I will also be glad to see photos of your products from my master classes! Inspiration and creative success to everyone!
In this master class I will show you how to make a bunny from polymer clay. A small, funny figurine of a bunny...... From the author Irina Ivanitsk.... Added 4th year. back.
How to make a bunny from polymer clay? Decor of a mug with polymer clay. Also watch master classes: Decor...... From the author Alina Virgo. Added 2nd year. back.
Master class on modeling from polymer clay / mastic / plasticine In this Master class you will learn how easy...... From the author Marina Kh.... Added 3rd year. back.
Easy way how to make the bunny out of polymer clay. Please write to us, what else you want watch on channel. Send us your comments and suggestions wil... From the author of Easy Clay. Year 3 added. back.
The video was prepared by Sasha S. Vihareva in collaboration with FIMO TV. In this master class, the author will show how to create a delicate... From the author of FIMO TV. Added 1 year. back.
In this video you will see how to make a bunny from polymer clay. Polymer clay is a magical material...... From the author Olesya_ Ly. Added 1 year. back.
Today I have prepared for you a Master Class on how to make a rabbit from polymer clay. How to make a hedgehog:...... From the author Saparova_Kate.... Added 4th year. back.
Spoon decor. Decor made of polymer clay. Hello, today we will decorate a spoon with polymer clay...... From the author Likulka OK.... Added 1 year. back.
The world's smallest rabbit! This is the most beautiful miniature rabbit or bunny, whichever you like best!...... From the author JULY NAZAROVA. Added 5 months. back.
In this video I show how I made a hare from polymer clay. For this I needed food foil...... From the author of life is art i.... Added 2 years. back.
In this video I will show you how to make a hare's face from polymer clay. link to dods: link...... From the author of Both Two. Year 3 added. back.
Cup decoration. Hare. Bunny from polymer clay. DIY Hare, bunny, decoration, polymer clay. Hello, this is a master class...... From the author Likulka OK.... Added 1 year. back.
Create a world with your own hands! In order to make a rabbit from polymer clay with your own hands, you will need...... From the author of Handmade Products.... Added 3 years. back.
The video was prepared by Sasha S. Vihareva in collaboration with FIMO TV. In this master class, the author will show how to create a cute...... From the author of FIMO TV. Added 2nd year. back.
In this master class I will show you how to make a Christmas tree decoration from polymer clay. How to make a bunny.... From the author Alina Virgo. Added 2nd year. back.
Decorating with polymer clay. Spoon decor. Hare, Bunny Mi. Decor made of polymer clay. Hello, this...... From the author Likulka OK.... Added 1 year. back.
Let's sculpt a pig on a mug from polymer clay / Polymer Clay / Master class / Part 1 SECOND PART...... From the author Valeria Maslo.... Added 4 months. back.
All my tools are chewed, have you noticed?))) When I sculpture, I enter an altered state of consciousness...... From the author Anastasia Rom.... Added 1 month. back.
Modeling

clay, gauze, rolling pin, slip (soaked clay), brush, hand rag, needle, blade, knife, and stacks (you can make them yourself or buy them in specialized stores)

First, take a small piece of clay and place it on any thick fabric
2:1681Using a rolling pin, roll out the clay into a thin, uniform layer 5 mm thick.
2:149 2:159
3. Now we give the layer a texture; to do this, we roll our layer through gauze again
3:834 3:844
4. Using a saucer and knife, cut out a circle from the layer
4:1454 4:1464
5:9
5. Remove unnecessary things
5:43 5:53
6. Now, using a knife, we divide our layer into three equal parts, these are blanks for hares. We got three triangles, so there will be three birds with one stone.
6:858 6:868
7:9

8. Lubricate the edges of the triangle with slip and connect them together.
8:651 8:661


9. Now we rub the seam, to do this we put gauze on top and run it with our finger several times
11:700 11:710
10. As a result, we should get blanks like this
12:1334 12:1344
13:9
11. Making a smile using a blade
13:75 13:85

12. Insert teeth in the center of the smile (I’ll explain how they are made below)
15:1242 15:1252
16:9

13. Now draw a line up from the center of the smile
17:620 17:630

19:9
15. We fasten our paws with slip on the sides of the hare
19:114 19:124
16 . We make the upper legs, for this we roll two smaller balls and give them the shape of a carrot, and also fasten them with slip.
20:868 20:878

17. We make the nose of a hare, for this we roll a ball and attach it to the upper part of the body. Don't forget about the slip, it serves as cement for us.
22:253 22:263
18. We make the tail in the same way: we roll the ball, attach it to the back of the body using slip.
23:959 23:969
19. Now we make our tail fluffy, for this we make notches with a blade
24:161824:9

20. Let's start with the ears. To do this, take two identical pieces of clay and use your palms to shape them, as in the photo
25:717 25:727

27:9

21. We give the ears relief and volume by crushing them with a stack in the center of each ear.
28:674 28:684

30:9
22. Using a slip, attach the ears to the hare’s head
30:108 30:118
23. For the eyes, roll two small balls and attach them to the slip, while pressing a little with your fingers to hold them tighter
31:855 31:865
24. Using a special tool (you can take a gel pen refill or a cola straw instead) draw the eyes
32:1626 32:9

25. Using a sharp stick, we make eyes, antennae and a navel
34:1148 34:1158
35:9

26. We select our paws, for this we make notches with a stack
36:628 36:638
27. And to complete the image, we just have to make a hole at the top (the string for the bell will go there). As a result, we get such a cheerful, funny and happy hare!
37:1488 37:1498
Now our hare must dry completely, this takes about one to two days, after which it is fired in a muffle furnace at a temperature of 1000 degrees. Only after firing we can begin painting the souvenir. Here you can fantasize in different ways. For example, we like to use glaze and acrylic paints.
38:1088Note: in order to make teeth, you need to roll out the clay into long flagella, flatten them and draw straight lines with a needle right in the center of the flagella.
38:1372 38:1382

The teeth can only be used a day later, after they are completely dry!
40:815 40:825 Bunny made of polymer clayPolymer clay pink, light pink or white, yellow, red
- Eyes printed on paper
- Metal stacks for shaping clay
- Knife
- Modeling board
Step-by-step modeling master class:  1. Knead a piece of pink clay, roll it into a ball and shape it into a muzzle.
2. Now mold the nose, tongue and two balls of the bunny’s face.
3. Glue all this to the head of the future hare.
4. Now make two ears from pink and red clay.
5. Make a body from pink clay.
6. You need to stick a white tummy on the body.
7. Next, form the two upper legs and tail of the bunny from pink clay.
8. You need to make a fluffy collar from white clay, and part of the lower paws from pink clay.
8. Now sculpt the feet using yellow, pink and red clay.
9. We begin assembling the hare. glue parts of the lower legs to the body.
 10-13. Then attach the upper legs, after them the white collar, give it a shape.
14-15. Now we attach the lower limbs, after them we glue the head.
16. Attach ears to the head and decorate the bunny with dark pink clay circles. Also don't forget to glue the eyes.
If necessary, bake the figurine, and at the end glue the eyes with glue. source
Such a touching decoration - polymer clay bunny, which we will do in this master class, will not leave any little fashionista indifferent. What could be softer and more beloved than plush toys, with which children not only play and fall asleep, but inspire them, sharing their secrets and consulting on every occasion. You can use polymer clay to create a prototype of your child’s favorite plush toy and design this product in the form of a brooch, pendant or earrings. The main thing is that it will be a copy of a favorite toy, which can be with the child every minute, causing him warm emotions and a smile. DIY gifts for children bring warmth and kindness.
2. Using a modeling stack (one with a flexible spatula), smooth out all the obtuse corners of the figure so that they become rounded and smooth. Smooth out the ears of the bear cub, and if you can’t make a perfectly straight head, cut off the ears and round the cut points with a stack.

3. Form a 3 cm long figure in the shape of a spindle from mint-colored plastic. Using a blade, cut the spindle into exactly two halves.

4. Attach the ears to the head polymer clay hare and smooth the joints with modeling stack.

5. Using the point of a needle or toothpick, you need to loosen the entire surface of the hare’s body. Make sure there are no missing areas or deep holes in the surface of the clay.


6. From bright pink polymer clay, form a ball with a diameter of 0.5 cm and press it with your finger onto the work surface so that it becomes flat. Place a flat pancake on the hare's tummy. Use a needle to loosen the top layer of pink clay, creating a plush surface effect.

7. From gray polymer clay (a ready-made shade or by mixing white and black shades of clay) we form an oval 6 mm long, flatten it with our fingers so that it becomes flat and with small scissors we cut out triangular parts exactly in the middle of the oval on both sides so that it turns out Infinity sign.

8. Place it on the face polymer clay hare an element made of gray clay and, with the tip of a needle, loosen the surface of the gray plastic.

9. Form a tiny drop from pink polymer clay and place it in a hollow made of gray clay.

10. Make indentations for the eye sockets above the gray part of the muzzle. Form small balls from black polymer clay and place them in the eye sockets.

11. Make a hole for the mouth in the lower hollow using gray clay. Roll out a very thin strip of black plastic and form thin eyebrows above the eyes.

12. From pink polymer clay, previously rolled out on the minimum thickness of a pasta machine, cut out a small rectangle and use a blade to cut out unnecessary parts and give the shape of a bow.

13. Using a cutter or blade, round off the sharp edges of the bow.

14. Using the edge of a needle or toothpick, make longitudinal grooves on the surface of the bow.

15. Attach a bow to any bunny ear. Place the workpiece in the oven for firing, according to all the recommendations specified in the plastic instructions.

16. After firing, glue the metal surface of the brooch base to the back of the plastic blank with hot glue. Can be glued with regular quick-drying glue. I do not recommend covering the loosened surface with varnish - the plush effect will be lost.


This is the original handmade gift for a child. 


If you want to make a homemade gift for a slightly older child, read the master class.

Attach a brooch to your baby's scarf or hat, and you will see how a sincere smile spreads across the cute child's face! Believe me DIY gifts for children They give joy not only to the kids, but also to you)!
One of the oldest churches in the Moscow Kremlin stands on the edge of Cathedral Square on the edge of Borovitsky Hill. Many centuries...

On August 10, at the age of 63, Alexander Korovnikov, a State Duma deputy from the Novgorod region, a member of the United...

How tasty and unusual it is to prepare pears for the winter so that you can treat the whole family to a fragrant and vitamin-rich summer on frosty days...
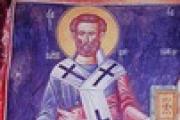
[aram. ; Greek Βαρνάβας] († c. 57), ap. from 70 (memorial on June 11 and there are 70 apostles in the Cathedral). Considered the founder of the Cyprus...
Well, is it time to start preparing for the New Year holidays? I don’t even know if there is a more Christmas staple...
A bride seen in a dream symbolizes naivety and purity of thoughts in real life. She may be wearing shoes, a veil,...

I want to give you the most powerful prayer against witchcraft and corruption that I have. I have never seen anywhere...

several interpretations. the church is an icon for you, which means it’s yours for fun and life experience. (For example, and...

When talking about buying real estate abroad, people often mention the sights of the country, its history and...
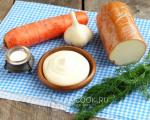
Smoked cheese goes well with raw carrots, and it is with this cheese that the salad turns out more tender....

Culinary professionals rightly believe that onion sauce is a universal gravy for meat,...
Calories: 1450 Protein/100g: 11 Carbohydrates/100g: 15 If you love cheesecake, but the calorie content of this...
An extract from the Unified State Register of Legal Entities (hereinafter referred to as the Unified State Register of Legal Entities) is a document containing...

This is a very successful person, showing promise. To the heights Vyacheslav Lysakov is the most ordinary, from the people, with a kind...

On August 10, at the age of 63, Alexander Korovnikov, a State Duma deputy from the Novgorod region, a member of the faction, died...
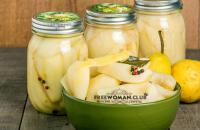
How tasty and unusual it is to prepare pears for the winter, to treat the whole family on frosty days with aromatic and vitamin...