Act on damage, damage, scrap of inventory items
Form TORG-15 is drawn up in the case when during transportation, movement between and within a warehouse, during storage...
Laboratory experiments with atmospheric electricity reveal a lot, but mysteries still remain.
It turned out that cold plasma in a rarefied medium in the presence of a rapidly varying electric field has little to do with it.
There has been a ball lightning workshop at the St. Petersburg Institute of Nuclear Physics for several years. Here a small installation was invented and created that reproduces with sufficient accuracy the natural process of the birth of lightning on a damp surface: there is a copper input that plays the role of a lightning rod, a quartz tube with an electrode, and an open surface of tap water.
The role of the thunder cloud is a 600 µF capacitor bank, which can be charged up to 5.5 kV. This is a serious voltage - the slightest carelessness when working with it poses a mortal danger.
It was described in detail in an institute preprint dated March 24, 2004. The water in the polyethylene cup must be grounded; for this, a copper ring electrode is placed at the bottom. It is connected by an insulated copper busbar to the ground. The positive pole of the capacitor bank is also grounded.
From the copper input, a well-insulated busbar leads to the central electrode. This is a cylinder of iron, aluminum or copper, 5-6 mm in diameter, which is tightly surrounded by a quartz glass tube. It rises above the water surface by 2-3 mm, the electrode itself is lowered down by 3-4 mm. A cylindrical hole is formed into which a drop of water can be dropped. The end of the copper wire from the negative pole of the capacitor bank must be secured to a long ebonite handle.
If you quickly touch the copper input with this spark gap, a plasma jet will fly out from the central electrode with a pop, from which a spherical plasmoid will separate and float in the air. Its color will be different: a bright whitish plasmoid will fall from the iron electrode, green from the copper electrode, and white with a reddish tint from the aluminum electrode: such plasmoids are seen by pilots when lightning strikes the plane.  To get real ball lightning, you need to insert a cylinder of porous carbon into a quartz tube. Such coals are used in arc spectral analysis. Porous carbon can be impregnated with various solutions and suspensions.
If you apply a water extract from the soil to the electrode, with organic matter, particles of coal and clay, then when discharged, classic “orange” colored ball lightning will fly out of the electrode. True, she will live no longer than a second, but this is enough to examine her in all details and admire her.
Obtaining real ball lightning is not difficult. You need linear lightning striking some kind of lightning rod, and damp air.  In order to study the properties of ball lightning, we had to make thousands of them.
First of all, electrical measurements have shown that ball lightning is, indeed, an autonomous formation: the current in the discharge circuit disappears after a tenth of a second, then the lightning moves freely and glows due to the accumulated energy.
Surprisingly, ball lightning has room temperature!
Lightning, by the way, is not much hotter than a cucumber in the garden. This paradox is associated with the special state of ions in the ball lightning core. Each ion generated during the discharge is immediately hydrated - in humid air it is tightly surrounded by water molecules. Opposite ions are attracted to each other, but water molecules prevent them from getting closer. A special state of matter arises—hydrated clusters.
Computer modeling has shown that in hydrated plasma the rate of ion recombination slows down sharply. If in “dry” plasma it occurs in a billionth of a second, then for ions conserved in a cluster, recombination is delayed for tens and hundreds of seconds. During this time the lightning will glow. 
In the ball lightning core, hydrated clusters with a large dipole moment form chain and fractal structures. A cloud of warm, humid air can accumulate enormous energy, up to a kilojoule per liter, if it receives it during discharge in the form of separated ions of different signs.
Thus, the mystery of ball lightning can be considered solved. But just recently it took its place among the mysteries of nature discussed on television and in the press, somewhere next to UFOs, the Tunguska meteorite and the Bermuda Triangle.
And this is not surprising. The myth of ball lightning has fed more than one generation of journalists and scientists.
In pursuit of sensation, colorful details were introduced into reports of ball lightning. The farmer's simple story: “There was a strong clap of thunder. A ball of fire, the size of a fist, ran down the drainpipe and dived into a barrel of water. The water gurgled. I walked over and stuck my hand in the water. The water seems to have become warmer...”, after four consecutive reprints in newspapers, turned into a scientific work on calculating the energy reserve in a volume the size of a fist, capable of evaporating a volume of water the size of a barrel.
This is Denis and he does all sorts of weird but funny shit.

How to turn off a monitor using a magnetron
How to wake someone up with an electric shock
Ionized plasma column
Plasma heats the air so that it begins to sound. Imagine a plasma welding arc modulated by audio frequency currents. There are no moving parts, and therefore no resonances. The main disadvantage is increased ozone formation. “If these tweeters had been invented in the 60s, we would all have died of skin cancer!” - the experts at NewForm Reseach (www.newformresearch.com) scare us. Well, today we are somehow fighting ozone from laser printers...
Tweeter with vertical splitter
In “air” tweeters, sound is generated “out of nowhere,” right in the air, at the intersection of two very powerful ultrasonic beams. When two narrow beams with frequencies of, say, 200 and 205 kilohertz intersect, intermodulation produces a difference tone with a frequency of 5 kilohertz. The problem is that to obtain a level of 100 dB in the audio range, the room will be filled with ultrasonic beams with frequencies over 200 kilohertz and powers up to 150 dB, which is fatal for someone who accidentally comes under such a beam. I would like to believe that these shortcomings are more technological than fundamental. If at the dawn of electricity it was said that household appliances of the future would require a voltage of several kilovolts (color TV), the inventors of that time would have considered such a device deadly dangerous.
Today, dear friends, we will conduct funny but very educational experiments in physics. You and I will call lightning, make an empty tin can explode, and bend a stream of water from the tap. These fun experiments are very interesting and exciting, and at the same time, they will help you understand the physical nature of some things.
Homemade ones are best seen in the dark. The best days for calling lightning are clear and dry days. To do this, you will need: a plastic comb, a woolen sweater or rag, a metal door handle or door frame.
1. Rub the comb with quick movements on a woolen sweater or woolen rag for thirty seconds. The comb will charge.
2. Bring the comb very, very close to the doorknob or frame without touching it. You will see a flash jumping between them, just like lightning running from a cloud to the ground.
 To do this, we will need: an empty aluminum drink can with a ring opening, kitchen tongs, a large bowl or sink half filled with cold water, a tablespoon, a stove.
1. Fill a large bowl with cold water or fill the sink halfway.
2. Check that the tongs are holding the tin tightly.
3. Pour two tablespoons of water into the jar.
4. With the help of an adult, place the jar on the stove and boil water.
5. After steam has escaped from the can for twenty seconds, grab the can with tongs, palm facing up.
6. Quickly bring the jar to cold water, turn it upside down (very carefully so as not to drip boiling water on yourself) and lower the top of the jar just below the level of the cold water.
7. Look what happens!
The steam pushes the air out of the can. As the tin cools, the steam turns back into a very small amount of water. Air pressure from the outside of the can will compress it inward. Without air inside the can to push outward on the walls, this pressure “explodes” the can.
Atmospheric pressure is much greater than you think - just watch how the can collapses!
And again, we need a plastic comb and a woolen sweater or rag.
1. Open the tap a little so that the drops turn into a thin continuous stream.
2. Rub the back of the comb on something woolen.
3. Hold the comb vertically and bring the back side close to the water.
4. The water will bend towards the comb.
Acquires an electrical charge. Then it begins to be attracted to objects that have the opposite charge.
You can rub balloons and try other plastic items, such as plastic bottles and plastic bags. Try also using other fabrics, especially fluffy and silky ones.
One of my very good friends complains,
that she is throwing lightning bolts and feels electrified.
I dedicate this article to her, because, having made lightning according to my
recipes, you can release steam and remove excess charge.
So, what does it take to (lightning-fast) create lightning?
1. An electrical outlet... into which the cord from your computer is plugged.
2. Any version of Adobe Photoshop is installed on this computer.
3. The desire to master the method of creating lightning in 6 steps.
Photoshop is known as a tool for mocking photographs. However, few people tried to draw from scratch. More precisely, maybe they tried, but didn’t get far, it’s too complicated if you just try to draw in it without good advice.
So, lightning. By the way, in addition to the lightning itself, I will give valuable comments on using Photoshop.
Launch Adobe Photoshop.
1. Ctrl+N - create a new document. Specify dimensions, for example, 400 by 400 pixels.
2. Set the default colors - black and white. There is a D key for this - I recommend remembering it. (Try also X - switches background and art colors back and forth)
3. Fill the drawing with a gradient. Please note that you can access the main tools using the corresponding keys. These keys appear when you hold the mouse over the tool. For example, move the mouse to a brush, a tooltip appears - Brush (B) and other tools. Some letters offer a number of tools; access to them is carried out using Shift+letter. Returning to the gradient fill - this is the letter G, it includes both a simple color fill (in buckets with pouring paint) and a gradient. Press Shift+G until you see the gradient. Filling with a gradient is simple - you just need to click in one place of the picture and move the mouse to another place. There are several options for gradient fill - linear, radial, etc. It’s good to try everything to create different lightning bolts.
4. Apply the filter Filter => Render => Difference Clouds
5. Invert the colors (make a negative), which is achieved by pressing the I key (from inverse)
6. Darken the drawing. A good tool is levels - Ctrl+L, you need to move the levers to make the picture darker (move the central slider to the right). That's it, the black and white lightning is ready. You can color it a little.
7. Ctrl+U - the top slider is hue, the bottom two are saturation and brightness. Play with all the engines, look for your unique solution.
Isn't it true that the drawings you make are amazing? You can send me the most interesting ones, and I will post them here.
Anything else to show from Photoshop? By the way, now you can take any photo of yourself in the night sky and add your own lightning there, it can strike your hand. It doesn't hurt at all.
You fly your ship through a cave, dodging enemy fire. However, pretty soon you realize that there are too many enemies and it looks like this is the end. In a desperate attempt to survive, you press the Button. Yes, on that same button. The one you prepared for a special occasion. Your ship charges up and fires deadly lightning bolts at your enemies, one after another, destroying the entire enemy fleet.
At least that's the plan.
But how exactly do you, as a game developer, render such an effect?
SegmentList.Add(new Segment(startPoint, endPoint)); offsetAmount = maximumOffset; // maximum displacement of the top of the lightning for each iteration // (a certain number of iterations) for each segment in segmentList // We go through the list of segments that were at the beginning of the current iteration segmentList.Remove(segment); // This segment is no longer required midPoint = Average(startpoint, endPoint); // Shift midPoint by a random amount in the direction of the perpendicular midPoint += Perpendicular(Normalize(endPoint-startPoint))*RandomFloat(-offsetAmount,offsetAmount); // Make two new segments, from the start point to the end point // and through a new (random) central segmentList.Add(new Segment(startPoint, midPoint)); segmentList.Add(new Segment(midPoint, endPoint)); end for offsetAmount /= 2; // Each time we halve the offset of the center point compared to the previous iteration end for
Essentially, each iteration splits each segment in half, with the center point slightly shifted. Each iteration this shift is halved. So, for five iterations we get the following:


Not bad. It already looks at least like lightning. However, lightning often has branches going in different directions.
To create them, sometimes when you split a lightning segment, instead of adding two segments, you need to add three. The third segment is simply a continuation of the lightning in the direction of the first (with a small random deviation).
Direction = midPoint - startPoint; splitEnd = Rotate(direction, randomSmallAngle)*lengthScale + midPoint; // lengthScale is better to take< 1. С 0.7 выглядит неплохо. segmentList.Add(new Segment(midPoint, splitEnd));
Then, in the next iterations, these segments are also divided. It would also be a good idea to reduce the brightness of the branch. Only the main lightning should be at full brightness, since it is the only one connected to the target.
Now it looks like this:


Now it looks more like lightning! Well... at least the shape. But what about everything else?

... but, as you can see, it turned out quite bright. And, as the lightning decreased, the brightness only increased (as the intersections became closer). When trying to reduce the brightness, another problem arose - the transitions became Very visible as small dots along the entire length of the lightning.
If you have the ability to render lightning on an off-screen buffer, you can render it by applying maximum blending (D3DBLENDOP_MAX) to the off-screen buffer, and then simply add the result to the main screen. This will avoid the problem described above. If you don't have this option, you can create a vertex cut from the lightning by creating two vertices for each point of the lightning and moving each of them in the direction of the 2D normal (the normal is perpendicular to the average direction between the two segments going to that vertex).
It should look something like this:

After experimenting a bit, I found the following useful:
Every lightning is actually two lightning at a time. In this case, every 1/3 second, one of the lightning ends, and the cycle of each lightning is 1/6 second. With 60 FPS it will look like this:
That is, they alternate. Of course, a simple static fade doesn't look very good, so each frame it makes sense to move each point a little (it looks especially cool to move the end points more - it makes everything more dynamic). As a result we get:
And of course you can move the endpoints... let's say if you're aiming at moving targets:
And it's all! As you can see, making a cool looking zipper is not that difficult.
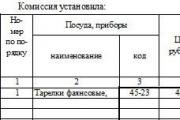
Form TORG-15 is drawn up in the case when during transportation, movement between and within a warehouse, during storage...

Nutritionists say that for good health and a slim figure, you must include snacks in your diet....

Delicious pickled carrots for the winter can be prepared in a variety of containers, it can be a wooden container,...

When I have a few minutes left to prepare breakfast, the simplest and fastest recipes are used. This option...

An elegant table, a decorated Christmas tree, tangerine spirit spilled throughout all the rooms, soon the most magical holiday - New...

Each of us has repeatedly faced financial difficulties and difficult periods in life when Fortune mocked...

If you are new to magic, then it will be useful for you to get acquainted with the signs by which you can accurately...

SECRETS OF DREAMS Why does day follow night? What is life? What is death and what is sleep? These questions...

Main meaning: Whatever version of Madame Lenormand’s deck we take, we can definitely say that this is one of...

An example of a correct income tax return in 2017, download for free in excel the new current...

P. S. Pallas (1741 - 1811) - naturalist and traveler-encyclopedist, who glorified his name with major contributions...

Today, all issues related to the placement of government orders are regulated by the Law on Contract...
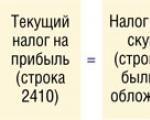
Accounting Regulations Accounting for income tax calculations of organizations PBU 18/02 (as amended by Order...
A trainee salesperson is usually called those salespeople who are not yet ready to work completely independently....

Nutritionists say that for good health and a slim figure, you must include snacks in your...

Delicious pickled carrots for the winter can be prepared in a variety of containers, it can be a wooden...