Jewish code of conduct "Shulchan Aruch" about Christianity and attitude towards the goyim
(Published in Tel Aviv in 1958. Transmitted with minor abbreviations). Jews! Love each other, help each other...
A factory-made telescope is quite expensive, so it is advisable to buy it if you are seriously interested in astronomy. And amateurs can try to assemble a telescope with their own hands.
As you know, there are two types of telescopes:
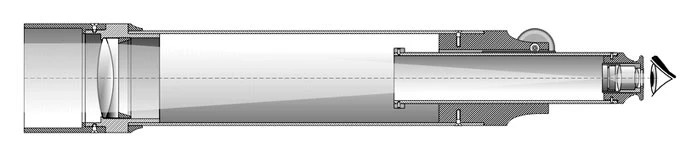
The design of a refracting telescope is quite simple. At one end of the device there is a lens - a lens that collects and focuses light rays. At the other end there is an eyepiece - a lens that allows you to view the image that comes from the lens. The lens is placed in a main tube called the tube, and the eyepiece is placed in a smaller tube called the eyepiece assembly.
To take interesting photographs of the starry sky, you can attach a webcam to a telescope.
From ordinary eight-power binoculars you can build a telescope that provides magnification of over 100 times. Pipes can be glued together from whatman paper. Lenses are suitable from old filmoscopes or similar in magnification. We use the calculation of a simple telescope, and select the length of the device and the distance between the eyepiece lenses experimentally.
There is no need to disassemble the binoculars - the tubes are put directly on it. For ease of use, you can make a tripod. Such a telescope from binoculars allows you to see mountains and craters on the surface of the Moon, satellites of Jupiter, etc.
Make homemade telescope at home is not particularly difficult. Even a high school student can do this kind of work. For a child, a device with a magnification of 30–100 times will be sufficient.
However, there are home craftsmen who can independently assemble three hundredfold quality telescope. Such skills come with experience and can be useful to those who are seriously interested in astronomy.
In contact with
Classmates
I have always wanted to have a telescope to observe the starry sky. Below is a translated article by an author from Brazil who was able to make a mirror telescope with his own hands and from available materials. Saving a lot of money at the same time.

Everyone loves to look at the stars and look at the moon in the clear night. But sometimes we want to see far. We want to see him nearby. Then humanity created a telescope!
Today
We have many types of telescopes, including the classical refractor and the Newtonian reflector. Here in Brazil, where I live, the telescope is a luxury. It costs between R$1,500.00 (about US$170.00) and R$7,500.00 (US$2,500.00). It's easy to find a refractor for R$500.00, but this is close 5/8 wages, considering that we have many poor families and young people waiting better life state. I'm one of them. Then I found a way to look at the sky! Why don't we make our own telescope?
Another problem here in Brazil is that we have very little content about telescopes.
Mirrors
and the lens is not particularly expensive. So, we do not have conditions for purchasing later. An easy way to do this is by using things that are no longer useful!
But where to find these things? Easily! The reflector telescope is made from:
— Primary mirror (concave)
— Secondary mirror (plan)
— Optical lens (the most difficult part!)
— Adjustable plug.
— Tripod;
Where can I find these things?
— Concave mirrors are used in beauty salons (makeup, shops, hairdresser, etc.);
— Flat mirrors are found in many things. You just need to find a small mirror (about 4 cm2);
— The optical lens is hardier to find. You can get it from a broken toy or make it yourself. (I used an old 10x lens from a broken pair of binoculars).
- You can use water pipes (something between 80mm and 150mm in diameter), but I use empty ink tin and towel tin.
- Some black splashes.
You
You need PVC pipes, connectors and a few cardboard rolls too.
You can use hot glue or silicone paste.
So, no more waiting! Let's get it started!

I get 140mm Diameter of the concave mirror from Sagit from 3.18mm (measured with a caliper).
But first you should know that the mirror is Sagitta. In the depths of the mirror (the distance between the bottom surfaces and heights of boundaries).
Knowing this, we have:
Mirror radius (R) = d/2 = 70 mm
Radius of curvature (P) = P2 / 2C = 770.4 mm
Focal length (F) = p/2 = 385.2 mm
Aperture (F) = F / d = 2.8
Now we know everything we need to make our telescope!
Let's start!


By a strange coincidence, our paints are perfect for tin towels!
First we need to remove the paint on the bottom; we can’t.
Then you need to measure the distance between the concave mirror and the eyepiece location. To do this, you need to take into account the radius of the spray paint.
We then mark the height at 315mm. This is about 30 cm.
At this height, we make a hole in the can, as in the photo. IN in this case, I made a hole about 1.4 inches to fit the PVC connector.
As you can see in the next photo, the mirror fits perfectly into the can.


I decided to fix it to support the mirror through 3 points, as in the drawing.
To fit the mirror plane, I used two wooden sticks and a small wooden triangle with a 45° angle.
Then I made some arrangements. With a drill, I made holes to insert the sticks.
Then I calculated the distance between the center of the mirror and the handle of the hole. This is 20 mm.
Make holes in the paint can with a drill.
So I adjusted the sticks to the plane of the mirror, when the eye holes are observed, my own eyes show.
*I attached the mirror in support with hot glue.


I used the microphone pedestal as a telescope tripod. Fitted with tape and elastic.
To find the hearth, we must aim for the sun with a telescope. Obviously, never look at the sun through a telescope!
Place the paper in front of the eye hole and find a smaller light spot. Then measure the distance between the hole and the paper as shown in the picture. Me from a distance of 6 cm.
This distance is required between the hole and the eyepiece. To fit the eyepiece I used a cardboard roll (from toilet paper), cut and fixed with a little tape.


Important detail:
Anything inside the pipe should be black. This prevents light from reflecting in other directions.
I drew ink on the outside of the black tin only on appearance. I also drove pins to hold the tin towels better in the tin paint.
Some other barretes hold better secondary mirror sticks... and then I fixed the "PVC tripod socket" with a rivet and hot glue.
I added a gold plastic edge to the top of the tin ink to make it look nice.


The second part will show you how to design and build a pipe for this crafts.
The general view of the telescope is a symbiosis of ideas drawn from various forums that are devoted to the manufacture of various telescopic homemade and an optician for them.
When making this project, I was not trying to achieve maximum mobility by reducing weight. Instead of this, homemade was developed as a stationary telescope, which will be located in the attic. It was decided to build it entirely from wood. The advantage of this design is the closed housing, which will protect the optics from dust, and the massive weight will make it more stable in the wind.

The design is almost entirely up to you. But there are several rules that should be followed:
In my case it was easy to calculate the curvature of the mirror, since I did it with your own hands. If you bought a primary mirror, it probably came with some information (diameter and focal ratio). To get the "focal center", multiply the diameter by the focal ratio (often called F/D):
"Coordinate center" = Diameterx Focus attitude
In my case, F = 7.93 x 4.75 = 37.67 inches (95.68 cm). This is the distance from the mirror in which a clear image is reproduced. You can’t put your head in front of the mirror every time to block the light coming from the star, can you? This is why it is necessary to use a secondary mirror (called an elliptical) oriented at 45 degrees to reflect the light to the side.

The distance between this mirror and your eye will depend on the size of your focuser. If you choose a low profile focuser, the distance will be minimal and you will need a smaller mirror. If you choose a higher focuser, the distance will be greater and the elliptical mirror should be bigger size, thereby reducing the amount of light that is reflected from the main mirror.
The last thing you need to decide is what you want to use this telescope for: visual observation or astrophotography. For visual observation, we mount an alt-azimuth and a small elliptical mirror. For photography, you'll need a precision mount to cancel out the Earth's rotation, a 5cm focuser, and an oversized elliptical mirror to prevent vignetting on the image.

Now that you have made sure that all the boards fit together and the sizes are correct, we can begin gluing the partitions to the boards.


We glue the boards (one at a time) onto the partitions. This will ensure a more even filling of the tube. You can adjust the other boards to fit into the gaps (by sanding the edges with a plane and sandpaper).


Now that the tube is glued, you need to treat the boards to make the surface smoother. You can use a plane and 120, 220, 400 and 600 grit sandpaper to get the wood as smooth as possible.

If you notice that some of the boards don't fit perfectly, make small wood inserts using wood glue and wood dust. Mix them together and cover the cracks with this mixture. Let dry and sand the glued areas.


To place the Focuser you need to correctly calculate the positions. Let's use the site to find the distance between the optical axis of the focuser and the end of the tube.


Once you have measured the distance, use a bit that is slightly larger in diameter than the focuser and drill a hole in the center on one side. Position the Focuser and mark the position of the screws with a pencil, then remove the Focuser. Now drill 4 holes in each corner.

You can see that my focal point was slightly larger than the width of the board, so I had to add 2 wedges on both sides to create a flat surface.


The moving “wheels” are 1.2 times larger than the mirror.

The rocker is constructed from walnut and maple. Teflon pads make the telescope move smoother.

The sides of the rocker are mounted on round bases. Cut-out handles (on each side) help with transport.


In order to rotate the tool from left to right, we need to add a vertical axis.

The base is made of plywood, mounted on 3 hockey pucks (reduces vibration). There is a central rod and 3 Teflon gaskets.


You will need to find the center of gravity.

You will also need an eyepiece. The less focal length, the higher the degree of magnification. To calculate, use the formula:

Magnification = telescope focal length / eyepiece focal length

My 11mm eyepiece gives me 86x magnification.


To prevent dust from accumulating on the primary mirror, you will need a cap on the front end of the tube. A simple piece of plywood with a handle will be a great solution.

Thank you for your attention!
Telescope- the dream of many, because there are so many stars in the universe that you want to look at each one. Store prices for this device are a bit steep for ordinary people, so there is an option to make a telescope with your own hands.
For the simplest telescope we need:
Lenses, 2 pcs.;
- thick paper, several sheets;
- glue;
- magnifying glass.
There are two types of telescopes - refractors and reflectors. We will make a refracting telescope, since lenses for it can be bought at any pharmacy. A spectacle lens is required, diameter - 5 cm, diopters +0.5-1. For the eyepiece we will take a magnifying glass with a focal length of 2 cm.
Let's get started!
From a sheet of thick paper, make a pipe with an approximate diameter of 5 cm. Then, straighten the sheet and paint the inside with black. You can use gouache paints. Rewind into a tube and secure the position using glue.
The length of our pipe should be about 2 meters.

We make this pipe in the same way as the main one. Length - 20 cm. Don't forget, this pipe will be put on the main one, so the diameter should be a little larger.
Once you glue the two pipes together, all that remains is to insert the lenses. Install them as shown in the diagram. Fix them well so that they are not damaged during use.
Probably everyone in their life has been at least a little interested in astronomy and wanted to have with them an instrument that would allow them to take a closer look at the mysteries of the starry sky.
It’s good if you have binoculars or a telescope - even with such rather weak astronomical instruments you can already admire the beauty of the starry sky. But if your interest in this science is strong enough, but there is no access to the tool at all, or the available tools do not satisfy your curiosity, you will still need a more powerful tool - telescope which you can do yourself at home. In our article step-by-step instruction with photos and videos on how to make a telescope with your own hands.
A factory-made telescope will cost you quite a lot, so purchasing it is only appropriate if you want to engage in amateur or amateur astronomy. professional level. But first, in order to acquire basic knowledge and skills, and finally understand whether astronomy is really for you, you should try to make a telescope with your own hands.
In many children's encyclopedias and other scientific publications you can find a description of how to make a simple telescope. Already such a tool will allow you to see craters on the Moon, the disk of Jupiter and its 4 satellites, the disk and rings of Saturn, the crescent of Venus, some large and bright star clusters and nebulae, stars, invisible to the naked eye. It is immediately worth noting that such a telescope cannot claim image quality in comparison with factory-made telescopes due to the mismatch of the purpose of the optics that will be used.
First, a little theory. The telescope, as in the photo, consists of two optical units - lens And eyepiece. The lens collects light from objects; its diameter directly determines the maximum magnification of the telescope and how faint objects can be observed. The eyepiece magnifies the image formed by the lens, followed by the human eye in the optical design.
There are several types optical telescopes, two of the most common are refractor And . The reflector lens is represented by a mirror, and the refractor lens is represented by a system of lenses. At home, making a mirror for a reflector is quite labor-intensive and precise process, which not everyone can do. Unlike a reflector, inexpensive refractor lenses can be easily purchased at an optical store.
Increase telescope is equal to the ratio Fob/Fok (Fob is the focal length of the lens, Fok is the eyepiece). Our telescope will have a maximum magnification of about 50x.
To make a lens, you need to purchase a spectacle lens blank with a power of 1 diopter, which corresponds to a focal length of 1 m. Such blanks usually have a diameter of about 70 mm. Unfortunately, spectacle lenses made in the form of menisci are poorly suited for this application, but you can stop at them. If you have a long focal length biconvex lens, it is recommended to use this one.
An ordinary magnifying glass (loupe) with a small diameter of about 30 mm can serve as an eyepiece. A good option there may also be an eyepiece from a microscope.
As housing you can use two tubes made of thick paper, one short - about 20 cm (eyepiece unit), the second about 1 m (the main part of the tube). The short pipe is inserted into the long one. The body can be made either from a wide sheet of whatman paper, or from a roll of wallpaper, rolled into a tube in several layers and glued with PVA glue. The number of layers is selected manually until the pipe becomes sufficiently rigid. The inner diameter of the main pipe should be equal to the diameter of the spectacle lens.
The lens (spectacle lens) is mounted in the first tube with the convex side outward using a frame - rings with a diameter equal to the diameter of the lens and a thickness of about 10 mm. A disk is installed immediately behind the lens - diaphragm with a hole in the center with a diameter of 25 - 30 mm - this is necessary in order to reduce significant image distortions resulting from a single lens. This will reduce the amount of light collected by the lens. The lens is installed closer to the edge of the main tube.
The eyepiece is installed in the eyepiece assembly closer to its edge. To do this, you will have to make an eyepiece mount from cardboard. It will consist of a cylinder equal in diameter to the eyepiece. This cylinder will be attached to inside pipes with two disks with a diameter equal to the internal diameter of the eyepiece assembly with a hole equal in diameter to the eyepiece.
Focusing will be done by changing the distance between the lens and the eyepiece, due to the movement of the eyepiece assembly in the main tube, and fixation will occur due to friction. It is convenient to focus on bright and large objects such as the Moon, bright stars, nearby buildings.
When building a telescope, it is necessary to take into account that the lens and eyepiece must be parallel to each other, and their centers must be strictly on the same line.
You can also experiment with the diameter of the aperture opening and find the optimal one. If you use a lens with an optical power of 0.6 diopters (the focal length is 1/0.6, which is about 1.7 m), this will increase the aperture opening and increase the magnification, but will increase the length of the tube to 1.7 m.
It is always worth remembering that in a telescope and any other optical instrument You can't look at the sun. This will instantly damage your vision.
So, you have become familiar with the principle of building a simple telescope and can now make it yourself. There are other telescope options from spectacle lenses or telephoto lenses. Any manufacturing details, as well as other information you are interested in, can be found on websites and forums on astronomy and telescope construction. This is a very broad field, and is practiced by both complete beginners and professional astronomers.
And remember, you just have to plunge into the previously unknown world of astronomy - and if you wish, it will show you many treasures of the starry sky, teach you the techniques of observation, photographing completely different objects and much more that you didn’t even know about.
Clear skies to you!
(Published in Tel Aviv in 1958. Transmitted with minor abbreviations). Jews! Love each other, help each other...
Take a ladle or saucepan and pour milk and cream into it. Add vanilla sugar (sugar with vanilla seeds). In a separate...

Hello everyone! Today we have a very tasty and simple recipe in front of us - sausages in dough in the oven. Can you smell what...

Avocado is one of the healthiest fruits. This is a real storehouse of vitamins and nutrients. And it is often...

Roast pork is an ideal tasty and satisfying dish that can feed the whole family. Housewives love roast...

This cake is very easy to make and tastes like the classic Napoleon. When making a cake there are several...

Representatives of these zodiac signs do not always become close people, but they are pleasant and interesting to each other....

Compatibility between a Rooster man and a Pig woman is based on mutual understanding between the partners. They have different personalities and...
several basic concepts and formulas. All substances have different mass, density and volume. A piece of metal...

If we’re going to talk about gender equality, then it’s with someone like an Aries woman. This emancipated lady is a bright...

The meaning of life is related to the question “What to live for”, and not to the question of how to maintain life. Attitude...
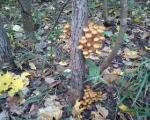
A mushroom is a living organism that forms a separate kingdom of the same name. For a long time they were classified as a kingdom...
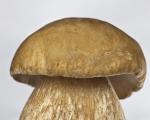
For lovers of “quiet” hunting, mushroom season begins in early summer and lasts until late autumn. And rarely do they...
Aleshnikova, V.I. Use of professional consultants. - M.: Infra-M, 1999. - 240 p. 2. Beich, E....
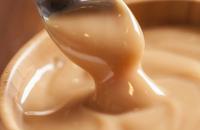
Take a ladle or saucepan and pour milk and cream into it. Add vanilla sugar (sugar with vanilla seeds). IN...

Hello everyone! Today we have a very tasty and simple recipe in front of us - sausages in dough in the oven. Do you feel...